ChevyParts
My Garage
My Account
Cart
OEM Chevrolet Suburban 1500 A/C Switch
Air Conditioning Switch- Select Vehicle by Model
- Select Vehicle by VIN
Select Vehicle by Model
orMake
Model
Year
Select Vehicle by VIN
For the most accurate results, select vehicle by your VIN (Vehicle Identification Number).
33 A/C Switches found


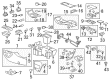
Chevrolet Suburban 1500 Control Module Part Number: 15109353
$192.74 MSRP: $396.09You Save: $203.35 (52%)Ships in 1 Business Day


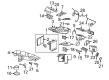
Chevrolet Suburban 1500 Heater Control, Rear Part Number: 20787114
$228.44 MSRP: $469.44You Save: $241.00 (52%)Ships in 1-2 Business Days

Chevrolet Suburban 1500 Heater Control, Rear Part Number: 22879021
$218.16 MSRP: $448.30You Save: $230.14 (52%)Ships in 1-2 Business Days

Chevrolet Suburban 1500 Heater Control, Rear Part Number: 20787116
$278.85 MSRP: $573.04You Save: $294.19 (52%)

Chevrolet Suburban 1500 Heater Control, Rear Part Number: 25936130
$195.07 MSRP: $346.14You Save: $151.07 (44%)

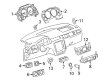
Chevrolet Suburban 1500 Heater & A/C Control Part Number: 15748172
$30.15 MSRP: $53.84You Save: $23.69 (44%)
Chevrolet Suburban 1500 Heater & A/C Control Part Number: 15748176


Chevrolet Suburban 1500 Heater Control Part Number: 16221685


Chevrolet Suburban 1500 Heater Control Part Number: 19244874


Chevrolet Suburban 1500 Heater Control Part Number: 15112019


Chevrolet Suburban 1500 Heater Control Part Number: 15112020


Chevrolet Suburban 1500 Heater Control Part Number: 15763059


Chevrolet Suburban 1500 Heater Control Part Number: 21997352


Chevrolet Suburban 1500 Heater Control Part Number: 15832313
$164.02 MSRP: $290.44You Save: $126.42 (44%)
Chevrolet Suburban 1500 Heater Control, Rear Part Number: 15855848


Chevrolet Suburban 1500 Heater Control Part Number: 19244873

Chevrolet Suburban 1500 Heater Control Part Number: 21997350
$167.91 MSRP: $297.42You Save: $129.51 (44%)
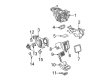
Chevrolet Suburban 1500 Blower Motor Switch Part Number: 15748174

Chevrolet Suburban 1500 Blower Motor Switch Part Number: 15112023
Chevrolet Suburban 1500 Blower Motor Switch Part Number: 15748175
| Page 1 of 2 |Next >
1-20 of 33 Results
Chevrolet Suburban 1500 A/C Switch
Our website offers an extensive catalog of genuine Chevrolet Suburban 1500 A/C Switch at unbeatable prices. Every OEM Chevrolet Suburban 1500 A/C Switch comes with a manufacturer's warranty, an easy return policy, and rapid delivery service. Don't miss out on this great opportunity!
Chevrolet Suburban 1500 A/C Switch Parts Questions & Experts Answers
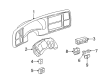
- Q: How to service the A/C Switch control assembly for heat and A/C on Chevrolet Suburban 1500?A: Service of the heat and A/C control assembly starts by taking off two components: instrument cluster trim plate bezel and instrument panel storage tray. The second step involves removing the inflatable restraint module switch that is currently located on the instrument panel. First remove the HVAC control assembly through the process of letting go the retaining tabs while pulling the control head out of its instrument panel carrier. The HVAC control assembly requires disconnection of its electrical connectors. The HVAC control assembly installation requires users to reattach the electrical connectors before inserting it back into position. Reattach both the inflatable restraint module switch to the instrument panel before adding the instrument panel storage tray and instrument cluster trim plate bezel. Complete the HVAC module actuator calibration following an appropriate method.

Related Chevrolet Suburban 1500 Parts
 Chevrolet Suburban 1500 A/C Expansion Valve
 Chevrolet Suburban 1500 A/C Hose
 Chevrolet Suburban 1500 Air Temperature Sensor
 Chevrolet Suburban 1500 Ambient Temperature Sensor
 Chevrolet Suburban 1500 Blend Door Actuator
 Chevrolet Suburban 1500 Blower Control Switches
 Chevrolet Suburban 1500 Blower Motor
 Chevrolet Suburban 1500 Blower Motor Resistor
 Chevrolet Suburban 1500 Cabin Air Filter
 Chevrolet Suburban 1500 Evaporator
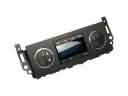 Chevrolet Suburban 1500 HVAC Control Module
 Chevrolet Suburban 1500 Heater Core