ChevyParts
My Garage
My Account
Cart
OEM GMC Sierra 1500 Camshaft
Cam- Select Vehicle by Model
- Select Vehicle by VIN
Select Vehicle by Model
orMake
Model
Year
Select Vehicle by VIN
For the most accurate results, select vehicle by your VIN (Vehicle Identification Number).
22 Camshafts found


GMC Sierra 1500 Camshaft Part Number: 12689035
$220.97 MSRP: $532.86You Save: $311.89 (59%)Ships in 1-2 Business Days


GMC Sierra 1500 Camshaft Part Number: 12612273
$454.92 MSRP: $774.50You Save: $319.58 (42%)Ships in 1-3 Business Days


GMC Sierra 1500 Camshaft Part Number: 12625436
$407.69 MSRP: $700.20You Save: $292.51 (42%)Ships in 1-2 Business Days


GMC Sierra 1500 Camshaft Part Number: 12561721
$516.55 MSRP: $816.41You Save: $299.86 (37%)Ships in 1-3 Business Days


GMC Sierra 1500 Camshaft Part Number: 10241691
$353.35 MSRP: $556.00You Save: $202.65 (37%)Ships in 1-3 Business Days

GMC Sierra 1500 Camshaft Part Number: 12560967
$516.55 MSRP: $816.41You Save: $299.86 (37%)Ships in 1-3 Business Days

GMC Sierra 1500 Camshaft Part Number: 12619823
$126.81 MSRP: $215.89You Save: $89.08 (42%)

GMC Sierra 1500 Camshaft Part Number: 12629512
$172.70 MSRP: $236.42You Save: $63.72 (27%)
GMC Sierra 1500 Camshaft Part Number: 12703450
$416.32 MSRP: $654.90You Save: $238.58 (37%)Ships in 1-3 Business Days
GMC Sierra 1500 Camshaft Part Number: 12583227
$454.92 MSRP: $774.50You Save: $319.58 (42%)Ships in 1-3 Business DaysGMC Sierra 1500 Camshaft Part Number: 12698637
$100.98 MSRP: $158.13You Save: $57.15 (37%)Ships in 1-3 Business Days
GMC Sierra 1500 Camshaft Part Number: 12711967
$396.90 MSRP: $681.66You Save: $284.76 (42%)Ships in 1-2 Business Days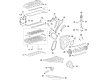
GMC Sierra 1500 Camshaft Part Number: 40009303
$100.27 MSRP: $157.06You Save: $56.79 (37%)Ships in 1-3 Business Days
GMC Sierra 1500 Camshaft Part Number: 55508605
$88.78 MSRP: $139.04You Save: $50.26 (37%)Ships in 1-3 Business Days
GMC Sierra 1500 Camshaft Part Number: 12664911
$108.53 MSRP: $186.34You Save: $77.81 (42%)Ships in 1-3 Business DaysGMC Sierra 1500 Camshaft Part Number: 55508606
$92.67 MSRP: $145.12You Save: $52.45 (37%)Ships in 1-3 Business Days
GMC Sierra 1500 Camshaft Part Number: 12703806
$359.99 MSRP: $566.42You Save: $206.43 (37%)Ships in 1-3 Business DaysGMC Sierra 1500 Camshaft Part Number: 40009063
$104.13 MSRP: $163.07You Save: $58.94 (37%)Ships in 1-3 Business Days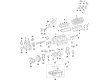
GMC Sierra 1500 Camshaft Part Number: 12664912
$117.39 MSRP: $201.57You Save: $84.18 (42%)


GMC Sierra 1500 Camshaft Part Number: 12583623
$242.45 MSRP: $381.48You Save: $139.03 (37%)
| Page 1 of 2 |Next >
1-20 of 22 Results
GMC Sierra 1500 Camshaft
Want to cut long-term maintenance and repair costs? Choose OEM Camshaft. Those parts deliver top durability you can trust. On our site, you'll find a huge catalog of genuine GMC Sierra 1500 parts. Prices are unbeatable, so you can keep more in your pocket. Every OEM GMC Sierra 1500 Camshaft includes a manufacturer's warranty. You can also get an easy return policy that keeps buying risk free. Fast delivery, get your car on the road quickly. It's simple to search, compare, and order. Stop guessing about quality or fit. Order today and save with parts that last.
GMC Sierra 1500 Camshaft Parts Questions & Experts Answers
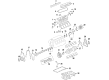
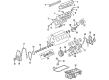
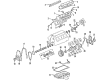
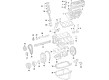
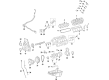
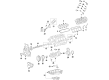
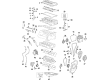
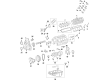
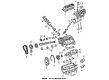
- Q: How to replace the camshaft and ensure the valve lifters are also replaced on GMC Sierra 1500?A:The Camshaft replacement process requires replacement of all valve lifters at the same time. The first step involves removing the radiator support and after that the valve lifters. Afterward remove the engine front cover along with the Starter motor. Use the j42386-a (Flywheel Holding Tool) and fasten its two m10-1.5 x 120 mm and m10-1.5 x 45 mm bolts by tightening them to 50 nm (37 lb ft). Remove the crankshaft sprocket until the marks on the cmp actuator and sprocket align perfectly. Start by removing the cmp actuator solenoid valve (234) before extracting the cmp actuator (235) along with the Timing Chain (208). The procedure requires caution due to equal diameters in every Camshaft journal and involves removing the Camshaft retainer bolts (204) followed by their retainer (203). Drive the Camshaft sprocket bolt through the Camshaft front hole until it becomes a suitable tool for gradually pulling the Camshaft out from the engine block. Apply clean engine oil to all Camshaft journals before putting the Camshaft into the engine block by inserting a bolt tool as a rotational handle. Clean the gasket surface of the engine block before installing both components of the Camshaft retainer (203) and bolts (204). Follow the torque sequence by securing hex head bolts to 25 nm (18 lb ft) first and torx(R) head bolts to 15 nm (11 lb ft). Use the en 46330 (Timing Belt Tensioner Retaining Pin) to install the Timing Chain tensioner guide after reducing its compression. The cmp actuator needs to be installed correctly onto the Camshaft locating pin where the sprocket teeth must interlock with the Timing Chain teeth while both alignment marks should face each other. Mount the cmp actuator so its timing mark rests at 6 o'clock before fastening the cmp actuator (235) and Timing Chain (208) by ensuring correct positioning with the locating pin. An exam of the cmp actuator and Timing Chain installation must verify correct positioning that stays inside the engine block front face dimensions. Fasten a new cmp actuator solenoid valve (234) with hand tightening until it becomes snug. Inspection of sprockets must confirm their alignment before you remove the en 46330. Begin by screwing down the cmp actuator solenoid valve to 65 nm (48 lb ft) before performing a second torque to 90 degrees by using an angle meter j 45059. Before installing the winner motor and engine front cover remove the j 42386-a (Flywheel Holding Tool) together with its bolts. Conclude installation by adding the valve lifters along with the radiator support.

Related GMC Sierra 1500 Parts
 GMC Sierra 1500 Oil Filter
 GMC Sierra 1500 Camshaft Bearing
 GMC Sierra 1500 Crankshaft Seal
 GMC Sierra 1500 Engine Mount Bracket
 GMC Sierra 1500 Oil Drain Plug Gasket
 GMC Sierra 1500 Oil Pan Gasket
 GMC Sierra 1500 Piston
 GMC Sierra 1500 Piston Ring
 GMC Sierra 1500 Rocker Shaft Spring Kit
 GMC Sierra 1500 Rod Bearing
 GMC Sierra 1500 Timing Cover Gasket
 GMC Sierra 1500 Valve Cover Gasket