ChevyParts
My Garage
My Account
Cart
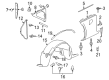
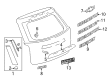
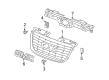
OEM GMC Yukon XL 1500 Emblem
Badge- Select Vehicle by Model
- Select Vehicle by VIN
Select Vehicle by Model
orMake
Model
Year
Select Vehicle by VIN
For the most accurate results, select vehicle by your VIN (Vehicle Identification Number).
16 Emblems found


GMC Yukon XL 1500 Emblem, Red Part Number: 22881265
$98.71 MSRP: $146.91You Save: $48.20 (33%)


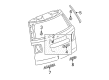
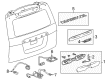
GMC Yukon XL 1500 Emblem, Rear Part Number: 22759917
$93.56 MSRP: $139.26You Save: $45.70 (33%)Ships in 1-2 Business Days


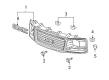
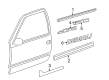
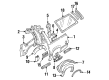
GMC Yukon XL 1500 Nameplate, Front Part Number: 15825691
$40.96 MSRP: $58.61You Save: $17.65 (31%)Ships in 1-3 Business Days

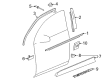
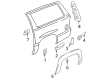
GMC Yukon XL 1500 Nameplate, Outer Part Number: 15070426
$97.35 MSRP: $139.29You Save: $41.94 (31%)Ships in 1-3 Business Days
GMC Yukon XL 1500 Emblem Part Number: 84689784
$11.42 MSRP: $17.00You Save: $5.58 (33%)Ships in 1-3 Business Days
GMC Yukon XL 1500 Nameplate, Green Part Number: 84674417
$24.00 MSRP: $35.72You Save: $11.72 (33%)Ships in 1-3 Business Days
GMC Yukon XL 1500 Nameplate Part Number: 84674406
$54.03 MSRP: $80.42You Save: $26.39 (33%)Ships in 1-3 Business Days
GMC Yukon XL 1500 Emblem Part Number: 19421090
$94.76 MSRP: $141.04You Save: $46.28 (33%)Ships in 1-3 Business Days
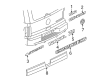
GMC Yukon XL 1500 Nameplate, Rear Part Number: 15825689
$106.22 MSRP: $158.10You Save: $51.88 (33%)Ships in 1-3 Business Days

GMC Yukon XL 1500 Emblem, Blue; Green; Red, Rear Part Number: 19301322


GMC Yukon XL 1500 Nameplate Part Number: 15768672
GMC Yukon XL 1500 Nameplate Part Number: 15768780
GMC Yukon XL 1500 Nameplate Part Number: 15768779

GMC Yukon XL 1500 Nameplate, Rear Part Number: 15757310

GMC Yukon XL 1500 Nameplate, Front Part Number: 15114055

GMC Yukon XL 1500 Nameplate, Outer Part Number: 15036137
GMC Yukon XL 1500 Emblem
Want to cut long-term maintenance and repair costs? Choose OEM Emblem. Those parts deliver top durability you can trust. On our site, you'll find a huge catalog of genuine GMC Yukon XL 1500 parts. Prices are unbeatable, so you can keep more in your pocket. Every OEM GMC Yukon XL 1500 Emblem includes a manufacturer's warranty. You can also get an easy return policy that keeps buying risk free. Fast delivery, get your car on the road quickly. It's simple to search, compare, and order. Stop guessing about quality or fit. Order today and save with parts that last.
GMC Yukon XL 1500 Emblem Parts Questions & Experts Answers
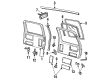
- Q: What tools are required to service and repair the body emblem or nameplate on GMC Yukon XL 1500?A:When fixing the body emblem or nameplate you will need a Heat Gun with model number J 25070. Clean the designated mounting surface first using a 50% alcohol and 50% water solution before the start to ready it for proper adhesive connection. Wait until the flat surface and trim items reach an interior environment temperature between 60 to 90°F (17 to 32°C) before finishing the drying process. Warm the back side of moldings or emblem with either a heated surface or heat gun model J 25070 as needed. Take off the backing from the rear of the parts to expose the adhesive and gently push it onto the surface. Place the rear emblem on its surface and spread even force all over the contact points until you reach ideal adhesion. A wallpaper roller is useful for this step when done correctly.

Related GMC Yukon XL 1500 Parts
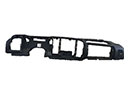 GMC Yukon XL 1500 Dash Panel Vent Portion Covers
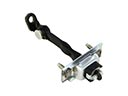 GMC Yukon XL 1500 Door Check
 GMC Yukon XL 1500 Door Handle
 GMC Yukon XL 1500 Door Moldings
 GMC Yukon XL 1500 Door Seal
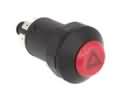 GMC Yukon XL 1500 Hazard Warning Switch
 GMC Yukon XL 1500 Liftgate Hinge
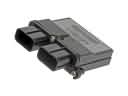 GMC Yukon XL 1500 Occupant Detection Sensor
 GMC Yukon XL 1500 Parking Assist Distance Sensor
 GMC Yukon XL 1500 Tailgate Lock
 GMC Yukon XL 1500 Weather Strip
 GMC Yukon XL 1500 Wiper Blade