ChevyParts
My Garage
My Account
Cart
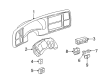
OEM GMC Yukon XL 2500 A/C Switch
Air Conditioning Switch- Select Vehicle by Model
- Select Vehicle by VIN
Select Vehicle by Model
orMake
Model
Year
Select Vehicle by VIN
For the most accurate results, select vehicle by your VIN (Vehicle Identification Number).
34 A/C Switches found


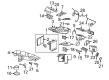
GMC Yukon XL 2500 Heater Control, Rear Part Number: 20787114
$228.44 MSRP: $469.44You Save: $241.00 (52%)Ships in 1-2 Business Days

GMC Yukon XL 2500 Heater Control, Rear Part Number: 22879021
$218.16 MSRP: $448.30You Save: $230.14 (52%)Ships in 1-2 Business Days


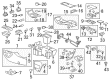
GMC Yukon XL 2500 Control Module Part Number: 15109353
$192.74 MSRP: $396.09You Save: $203.35 (52%)Ships in 1 Business Day

GMC Yukon XL 2500 Heater Control, Rear Part Number: 20787116
$278.85 MSRP: $573.04You Save: $294.19 (52%)

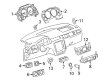
GMC Yukon XL 2500 Heater & A/C Control Part Number: 15748172
$30.15 MSRP: $53.84You Save: $23.69 (44%)

GMC Yukon XL 2500 Heater Control, Rear Part Number: 25936130
$195.07 MSRP: $346.14You Save: $151.07 (44%)
GMC Yukon XL 2500 Heater & A/C Control Part Number: 15748176


GMC Yukon XL 2500 Heater Control Part Number: 16221685


GMC Yukon XL 2500 Heater Control Part Number: 19244874


GMC Yukon XL 2500 Heater Control Part Number: 15112019


GMC Yukon XL 2500 Heater Control Part Number: 15112020


GMC Yukon XL 2500 Heater Control Part Number: 15763059


GMC Yukon XL 2500 Heater Control Part Number: 21997352


GMC Yukon XL 2500 Heater Control Part Number: 15832313
$164.02 MSRP: $290.44You Save: $126.42 (44%)
GMC Yukon XL 2500 Heater Control, Rear Part Number: 15855848


GMC Yukon XL 2500 Heater Control Part Number: 19244873

GMC Yukon XL 2500 Blower Motor Switch Part Number: 15748174

GMC Yukon XL 2500 Blower Motor Switch Part Number: 15112023
GMC Yukon XL 2500 Blower Motor Switch Part Number: 15748175
GMC Yukon XL 2500 Blower Motor Switch Part Number: 15112022
| Page 1 of 2 |Next >
1-20 of 34 Results
GMC Yukon XL 2500 A/C Switch
Want to cut long-term maintenance and repair costs? Choose OEM A/C Switch. Those parts deliver top durability you can trust. On our site, you'll find a huge catalog of genuine GMC Yukon XL 2500 parts. Prices are unbeatable, so you can keep more in your pocket. Every OEM GMC Yukon XL 2500 A/C Switch includes a manufacturer's warranty. You can also get an easy return policy that keeps buying risk free. Fast delivery, get your car on the road quickly. It's simple to search, compare, and order. Stop guessing about quality or fit. Order today and save with parts that last.
GMC Yukon XL 2500 A/C Switch Parts Questions & Experts Answers
- Q: How to replace the A/C Switch control assembly on GMC Yukon XL 2500?A:To get started, take out the console roof screw, and after that, remove the console from the headliner. Take off the electrical plugs from the console and pull the console out of the vehicle. Carefully push in the 4 tabs that are found on the back of the A/C Switch to release it from the console. Attach the A/C Switch to the console before plugging in the electrical connectors into the console. Re-attach the console to the headliner using the overhead console screw and tighten it until it reaches 2 n.m (18 lb in).

Related GMC Yukon XL 2500 Parts
 GMC Yukon XL 2500 A/C Expansion Valve
 GMC Yukon XL 2500 A/C Hose
 GMC Yukon XL 2500 Air Temperature Sensor
 GMC Yukon XL 2500 Ambient Temperature Sensor
 GMC Yukon XL 2500 Blend Door Actuator
 GMC Yukon XL 2500 Blower Control Switches
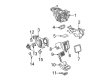
 GMC Yukon XL 2500 Blower Motor
 GMC Yukon XL 2500 Blower Motor Resistor
 GMC Yukon XL 2500 Cabin Air Filter
 GMC Yukon XL 2500 Evaporator
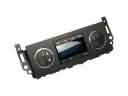 GMC Yukon XL 2500 HVAC Control Module
 GMC Yukon XL 2500 Heater Core