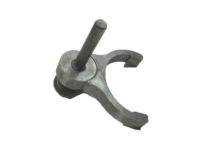
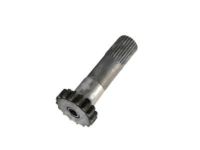
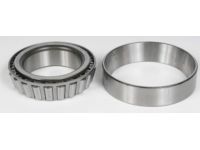
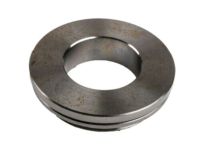
Make sure this part fits

GM 22928970
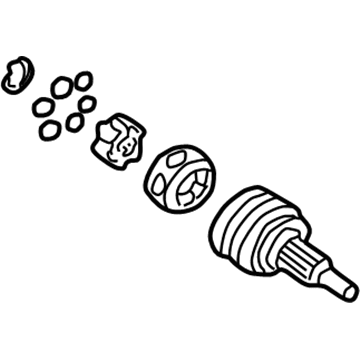
C.V. Joint, Front

1999-2020 GM

Customer Questions & Expert Answers (20)
GM 22928970 C.V. Joint, Front
  • Part Description
    Joint, Front Axle U Joint; CV Joint Kit; CV Joint
  • Position
    Front
  • Replaces
    26057639, 26069245
  • Manufacturer
    General Motors
Make sure this part fits
$135.51 MSRP: $215.15
You Save: $79.64 (38%)
Ships in 1-2 Business Days
1
ADD TO CART
  • Related Parts
  • Product Specifications
  • Vehicle Fitment
  • Customer Questions & Expert Answers
  • Product Specifications

    BrandGenuine GM
    Manufacturer Part Number22928970
    Part DescriptionJoint, Front Axle U Joint; CV Joint Kit; CV Joint
    Other NamesOuter CV Joint; Outer Joint; Joint Kit, Front Axle U Joint
    Item Dimensions8.6 x 6.9 x 7.1 inches
    Item Weight0.40 Pounds
    PositionFront
    ConditionNew
    Fitment TypeDirect Replacement
    Replaces26057639, 26069245
    Require Quantity2
    ManufacturerGeneral Motors
    SKU22928970
    WarrantyThis genuine GM part is guaranteed by GM's factory warranty.
    Shipping & ReturnShipping Policy Return Policy
    Warning: California's Proposition 65
  • Vehicle Fitment

    Year Make Model Trim Engine
    2002-2020 Cadillac EscaladeBase, Hybrid, Hybrid Platinum, Luxury, Platinum, Premium, Premium Luxury8 Cyl 5.3 L GAS, 8 Cyl 6.0 L FULL HYBRID EV-FLEX (FHEV), 8 Cyl 6.0 L FULL HYBRID EV-GAS (FHEV), 8 Cyl 6.0 L GAS, 8 Cyl 6.2 L FLEX, 8 Cyl 6.2 L GAS
    2003-2020 Cadillac Escalade ESVBase, Luxury, Platinum, Premium, Premium Luxury8 Cyl 6.0 L GAS, 8 Cyl 6.2 L FLEX, 8 Cyl 6.2 L GAS
    2002-2013 Cadillac Escalade EXTBase, Luxury, Premium8 Cyl 6.0 L GAS, 8 Cyl 6.2 L FLEX, 8 Cyl 6.2 L GAS
    2007-2013 Chevrolet AvalancheBlack Diamond LS, Black Diamond LT, Black Diamond LTZ, LS, LT, LTZ8 Cyl 5.3 L FLEX, 8 Cyl 5.3 L GAS, 8 Cyl 6.0 L GAS
    2002-2006 Chevrolet Avalanche 1500Base, LS, LT, North Face, On Road Edition, WBH, Z66, Z718 Cyl 5.3 L FLEX, 8 Cyl 5.3 L GAS
    2002-2006 Chevrolet Avalanche 2500Base, LS, LT8 Cyl 8.1 L GAS
    1999-2019 Chevrolet Silverado 1500Base, Custom, Custom Trail Boss, High Country, Hybrid, LS, LT, LT Trail Boss, LTZ, RST, SS, SSV, WT, XFE, Z71 Off-Road6 Cyl 4.3 L FLEX, 6 Cyl 4.3 L GAS, 8 Cyl 4.8 L FLEX, 8 Cyl 4.8 L GAS, 8 Cyl 5.3 L FLEX, 8 Cyl 5.3 L FULL HYBRID EV-GAS (FHEV), 8 Cyl 5.3 L GAS, 8 Cyl 5.3 L MILD HYBRID EV-GAS (MHEV), 8 Cyl 6.0 L FULL HYBRID EV-FLEX (FHEV), 8 Cyl 6.0 L FULL HYBRID EV-GAS (FHEV), 8 Cyl 6.0 L GAS, 8 Cyl 6.2 L FLEX, 8 Cyl 6.2 L GAS
    2007 Chevrolet Silverado 1500 ClassicHybrid, LS, LT, SS, WT6 Cyl 4.3 L GAS, 8 Cyl 4.8 L GAS, 8 Cyl 5.3 L FLEX, 8 Cyl 5.3 L FULL HYBRID EV-GAS (FHEV), 8 Cyl 5.3 L GAS, 8 Cyl 6.0 L GAS
    2005-2006, 2001-2003 Chevrolet Silverado 1500 HDBase, LS, LT8 Cyl 6.0 L GAS
    2007 Chevrolet Silverado 1500 HD ClassicLT8 Cyl 6.0 L GAS
    View More
  • Customer Questions & Expert Answers

    Q:
    Can you help me check if this 22928970 is the right part for my car? Posted by ChevyPartsGiant Specialist
    A:
    Please Select Your Vehicle model to see if part number 22928970 is suitable before ordering.
    Posted by ChevyPartsGiant Specialist
    Q:
    How to replace the outer CV Joint and seal on Cadillac Escalade ESV? Posted by Customer
    A:
    To replace the wheel drive shaft outer joint and seal, collect the required tools: snap ring pliers (J 8059), seal clamp tool (J 35910), as well as drive axle clamp swage tool (J 36652), but as stated, there was no mention of any expiry date. The first step is to use a hand grinder to slice through the swage ring, and after that cut off the small boot clamp with side cutters. Slide the boot down the halfshaft bar and off the CV Joint outer race scooping out any grease. Separate the ears of the halfshaft bar retaining snap ring from the inside race of the inner race with the use of snap ring pliers (J 8059). Take off the CV Joint and boot from the halfshaft bar and discard the old boot. Use a brass drift to delicately strike and rotate the CV Joint cage in order to remove all six chrome alloy balls. Clean the inner and outer race assemblies, CV Joint cage and chrome alloy balls with cleaning solvent to make sure all the old grease and contaminants are erased, and then dry all the parts and check for wear or damage. Apply a thin layer of grease on the inner and outer race grooves, dovetail the inner race with the cage, and insert it. Install the cage and inner race into the outer race and thereafter use the brass drift to install the chrome alloy balls. Apply the pre-measured grease from the kit while packing the CV Joint boot and assembly, and put on the new small boot clamp on the CV Joint seal then slip the boot over the halfshaft bar ensuring it is torqued to 136 nm (100 ft. Lbs) using the seal clamp tool (J 35910). Make sure that the retaining ring side of the inner race CV Joint is towards the halfshaft bar and then slide the CV Joint to it and pull on to it to confirm engagement. Finally, slip the large diameter of the CV Joint boot over the CV Joint outer race and secure it tightly using the drive axle clamp swage tool (J 36652) and tighten the bolts while aligning tension and finally pull off the half heave assembly from the tool.
    Posted by ChevyPartsGiant Specialist
    Q:
    What Tools Are Required to Service and Repair the CV Joint Boot for the Wheel Drive Shaft Inner Joint and Seal Replacement on Cadillac Escalade? Posted by Customer
    A:
    The tools needed in order to service and repair the constant velocity joint boot, namely in the wheel drive shaft inner joint as well as the replacement of the seal, include: snap ring pliers (J8059), seal clamp tool (J35910) and drive axle clamp swage tool (J36652) start by using a hand grinder to cut through the swage ring and pry out the tripot housing from the halfshaft and make sure to degrease it and clean well then let it dry. Unplug the small boot retaining clamp using side cutters, and remove the spacer ring, tripot spider assembly, and tripot boot from the halfshaft bar. Clean the halfshaft bar with wire brush to remove rust in the seal mounting and check the needle rollers, needle bearings, and the trunnion for wear and damage, any faulty part should be replaced with the appropriate service kit. For assembly, fit the new small seal clamp onto the joint seal, press onto the halfshaft bar, and tighten to a torque of 136 nm (100ft lbs) using seal clamp tool (J35910). Mount the convolute retainer tool over the inboard joint seal making sure to take the proper convolutions for the appropriate models. Following that, put the tripot spider assembly onto the halfshaft bar, then the spacer ring, and pack the tripot seal and housing with the pre-measured grease from the kit. Take the tripot housing and seal and deform it by slightly pinching the swage ring and pushing it over the seal, align it with the tripot housing. Mount the base of the drive axle clamp swage tool (J36652) in a vise, verify the inboard stroke position, and install halfshaft assembly into the base. Mount the upper section of the tool, and align the swage ring and clamp, hand tighten the bolts, to ensure that the components of the tripot boot, housing, and swage ring are properly aligned. Make sure that each bolt is tightened to 180 degrees at a time, and alternately, set the two halves of the tool into contact, then loosen the bolts and take off the halfshaft assembly and finally remove the convolute retainer tool from the boot.
    Posted by ChevyPartsGiant Specialist
    Q:
    How to Service and Repair the CV Joint Boot on Cadillac Escalade? Posted by Customer
    A:
    In order to service and repair the constant velocity joint boot, start by collecting the required tools: snap ring pliers (J 8059), drive axle seal clam pliers (J 35910), drive axle clamp swage tool (J 36652-1), and axle swage tool (J 36652-2). There is reason to be careful with the wheel drive shaft, it can be cut with a help of a hand grinder cutting through a swage ring and the side cutters will take the small boot clamp away. Slide the boot down halfshaft bar, and clean the CV Joint face. Find and open the snap ring ears using the snap ring pliers, pull CV Joint and boot out of the halfshaft bar, eliminating the old boot. Use a brass drift to slide the CV Joint cage to one side and pull out all the (6) chrome alloy balls. Clean the inner/exterior race assemblies, the CV Joint cage and the chrome alloy balls, confirming their wear or damage. Grease the inner and outer race groves, align and place the inner race in the cage, while the cage is placed in the outer race. Mount the chrome alloy balls, and pack the CV Joint boot and assembly with grease, mounting the small boot clamp using the drive axle seal clamp pliers and tightening up to 136 n.m (100 lb ft). Put the new swage ring on and slide it down the boot in such a way that retaining ring side of the CV Joint inner race faces the halfshaft bar before sliding the CV Joint on the halfshaft bar. Clamp the cvj boot to the external cvj race tightly by using the drive axle clamp swage tool (or Axle Swage Tool) and align, then bind the bolts alternately until it is locked. Finally, replace the wheel drive shaft.
    Posted by ChevyPartsGiant Specialist
    Q:
    What Tools Are Required to Service and Repair the CV Joint Boot for the Wheel Drive Shaft Inner Joint and Seal Replacement on Cadillac Escalade EXT? Posted by Customer
    A:
    Specifically for the service and repair, the constant velocity joint boot, that is, wheel drive shaft inner joint and seal replacement, the following tools are needed: j 35910 seal clamp tool j 36652-1 drive axle clamp swage tool and j 36652-98 drive axle clamp swage tool. Lay the halfshaft in its normal position, and start cutting into the swage ring with the hand grinder then remove the tripot housing, being sure to wipe and degrease it properly, before drying it using a clean piece of cloth. De-install the little boot retaining clamp with side cutters, and remove the spacer ring, tripot spider assembly, and tripot boot from the halfshaft bar. Clean halfshaft bar using wire brush and check all components for wear/damage, replace duff parts using appropriate service kit. For assembly, install the new small seal clamp to the joint seal, and compress the clamp onto the halfshaft bar and then fix it using j 35910 seal clamp tool and tighten to 136 nm (100 ft. Lbs.). Mount the tripot joint with the convolute retainer in the right position, tripot spider assembly and spacer ring while, packing the tripot seal and housing with provided grease. Pinch swage ring a little then slide it over the seal; align the tripot seal with tripot swage ring to the housing. For the 1500 models the base of the j 36652-98 is to be fixed in a vise, and for the 2500, 3500, and hummer h2 models to be set with the j 36652-1 standard factory specifications. Drive the inboard end of the halfshaft assembly into the corresponding tool base, install the top half, align the swage ring and clamp and fasten the bolts by hands. Alternative tightening of each bolt until the two halves of the tool comes in contact and then loosening the bolts to remove the halfshaft assembly. Lastly, check inboard stroke position using given measurements for each model and pull out the convolute retainer tool of the boot.
    Posted by ChevyPartsGiant Specialist
    Q:
    How to Service and Repair the CV Joint Boot on Chevrolet Avalanche 1500? Posted by Customer
    A:
    To service and repair the constant velocity joint boot, take the following tools for servicing and repair: snap ring pliers (J8059), seal clamp tool (J35910), drive axle clamp swage tool (J36652). Use hand grinder for cutting through the swage ring and use side cutters for cutting small boot clamp. Slip the boot down the halfshaft bar and off from the outer race of the CV Joint, cleaning off any grease. Bend the halfshaft bar retaining snap ring ears apart using the snap ring pliers (J8059) while holding the snap ring from the inner race. If the CV Joint and boot on the half shaft bar are damaged, remove the CV Joint and boot from the halfshaft bar discarding the old boot, replacing the damaged boot with a new one from the fully trimmed boot set, then installing it back on to the half shaft bar. Carry out a careful knocking and tilting motion on the CV Joint cage using brass drift until six examples of chrome alloy balls are either removed entirely from the casing. Clean the inner and outside race assemblies, CV Joint cage, and chrome alloy balls with cleaning solvent so that all old grease and contaminants are removed. Adjust or remove all parts for damaged or worn cv joints and replace CV Joint assembly as required. Put on a thin layer of grease on the inner and outer race grooves, then place the inner race into the cage, followed by the cage and inner race into the outer race. Apply the brass drift to tilt the cage and put in the chrome alloy balls. Pack the CV Joint boot and assembly with the measured grease from the kit and place the new small boot clamp on the CV Joint seal and slide on the boot on the halfshaft bar tightly clamp the boot with the seal clamp tool (J35910) to 136 nm (100 ft. Lbs.). Make sure retaining ring side of the CV Joint inner race faces the halfshaft bar, before placing CV Joint on it - verify the engagement - pull the joint. Push the large diameter of the CV Joint boot over the CV Joint outer race and tighten the CV Joint boot to the cv to the CV Joint outer race using the drive axle clamp swage tool (J36652). Mount the base of the tool in a vise, insert the 0t-57cvjoint into the bottom 1/2 of the tool with the CV Joint boot, assembly, and swage88-13570.89eme place. Install the upper half of the tool, align the swage ring, and tighten the bolts alternately until the two halves of the tool have contact. Lastly, remove the bolts and take off the halfshaft assembly from the drive axle clamp swage tool (J36652).
    Posted by ChevyPartsGiant Specialist
    Q:
    How to replace the outer CV Joint and seal of the constant velocity joint boot on Chevrolet Silverado 3500? Posted by Customer
    A:
    In order to replace the outer joint and the seal of the constant velocity joint boot, the following actions need to be followed; starting with the removal of the wheel drive shaft and the wheel drive shaft seal cover if it is present. Exercising caution when using the hand grinder near CV Joint outer race to cut through the swage ring. Cut off the little boot clamp with the side cutters and pull the boot down the halfshaft bar away from the CV Joint outer race. Clean the grease from the face of the CV Joint and find the halfshaft bar retaining snap ring in the inner race. Use j 8059 to spread snap ring ears apart and remove CV Joint and boot from the halfshaft bar, throwing away the old boot. Start by tapping and tilting the CV Joint cage with the help of a brass drift to remove the chrome alloy balls, doing the same process until all six balls are removed from the cage. Pts with inner race 90 degrees to alignment with outer race 29 exit. Rotate the inner race upward to allow the separation from the cage , clean the inner as well as outer race assemblies, the CV Joint cage, as well as the chrome alloy balls using solvent to remove all the old grease as well as contaminants then use a drying procedure. Test for usage and tear and repair any faulty elements. Wipe off the rust over the sealing mounting site of the halfshaft bar with a wire brush. After inspection, check all parts again and lubricate inner and outer race groves with a light coat of grease. Tilt the inner race to cage at 90 degrees and align it to the cage windows before inserting. Install the cage and inner race into the outer race, and use the brass drift to tilt the cage and insert the chrome alloy balls one by one. Pack the CV Joint-boot and assembly with the pre-measured grease from the kit and place the new small boot clamp onto the CV Joint seal, slide the boot on to the halfshaft bar ensuring that the very end of the small boot fits in to the boot turn of the joint.items remedied at week 9. Place the small boot clamp with j35910, breaker bar, torque wrench to 136nmf (100ilis ft), inspection gap dimension of the clamp ear. Distort new swage ring into an oval shape to slide over boot while retaining ring side ofcv joint inner race is faced to the half shaft bar before sliding CV Joint on to half shaft bar until retaining snap ring engages. Check the engagement by tugging at CV Joint and slide on the large diameter of the CV Joint boot onto the CV Joint outer race. In order to tighten the boot installation nicely, for 1500 models you can use j 36652-1 or j 36652-2 for 2500 and 3500 models, fasten the base to a vise. Position the CV Joint end of the halfshaft assembly in the tool aligning the CV Joint boot , assembly , swage ring . Apply the top half of the tool onto the assembly, match the swage ring, and tighten the bolts in an alternating manner until snug. Loosen the bolts and remove the halfshaft assembly from the tool and then install the wheel drive shaft seal cover if necessary and the wheel drive shaft.
    Posted by ChevyPartsGiant Specialist
    Q:
    How to replace the outer CV Joint and seal on Chevrolet Suburban 1500? Posted by Customer
    A:
    A set of tools you will need to replace the wheel drive shaft outer joint and seal includes: snap ring pliers (J 8059), seal clamp tool (J 35910), split plate swage clamp (J 36652-98 for K1 5 models), and split plate swage clamp (J 36652 for K25 models). First, put protective covers on the vise jaws, fixing halfshaft in a vise, while making sure not to harm the CV Joint outer face. Using a hand grinder will help you cut through the swage ring, then the side cutters can eliminate the small seal clamp. Slide the seal from the halfshaft bar and clean the CV Joint face with grease. Sightline the halfshaft bar retaining snap ring and spread them out using the snap ring pliers, now pry the CV Joint and seal from the halfshaft bar and dispose of the old seal. Use a brass drift to delicately tap and tip the CV Joint cage to enfeeble the chrome alloy balls out of the mechanics, repeating this until all six are freed. Clean the inner and outer race assemblies, CV Joint cage, and chrome alloy balls with solvent and dry and inspect for the damage, replacing damaged parts. Cleaning the halfshaft bar with the help of a wire brush. Inspect all parts again before casting for assembly, cover the inner race and the outer race grooves with grease, and match the inner race with the cage before inserting it. Inserting cage into-out in with proprietary, then using brass drift to tender cage and insert the chrome alloy balls. Apply the CV Joint stuffing pack and assembly using the provided grease and attach on the new small seal clamp to the CV Joint stuff pack and thread on the half shaft bar securing it to a preload of 136 nm (100 ft lbs) using the seal clamp tool. Check for the right gap dimension on the clamp ear and try distorting the new swage ring into an oval shape and try sliding it over the seal. Ensure that the retaining ring side of the CV Joint inner race is toward the halfshaft bar to ensure proper engagement before sliding the joint onto the bar. Finally, clamp the CV Joint seal tightly to the outer race with the split plate swage clamp by aligning the components fasten the bolt until the two halves of the tool touch removing the half shaft assembly from the clamp.
    Posted by ChevyPartsGiant Specialist
    Q:
    How to replace the outer CV Joint and seal on the wheel drive shaft on Chevrolet Suburban 2500? Posted by Customer
    A:
    To replace the wheel drive shaft outer joint and seal start by obtaining tools such as: snap ring pliers (J 8059), seal clamp tool (J 35910), split plate swage clamp(J 36652). Examine the transmission sealing surface for rusting once the wheel drive shaft is taken off, cleaned using 320 grit cloth or equal in rotating movement, and cleaned up with transmission fluid to clear the debris (Stockrahm, P. A. 75). Secure the halfshaft in a vise with protective covers and then carefully grind the hand grinder through the swage ring. Cut the small seal clamp using side cutters and pull the seal down the halfshaft bar away from CV Joint outer race. Remove the grease off the face of the CV Joint and find the halfshaft bar retaining snap ring in the inner race expanding them with the snap ring pliers (J 8059). Remove the existing CV Joint and seal, discarding the old seal (Hint: It might be easier to replace it with another seal). Apply a brass drift to tilt the CV Joint cage and eliminate all the six chrome alloy balls. Clean thoroughly with cleaning solvent all inner and outer assemblies of the races and CV Joint cage and chrome alloy balls, then dry and inspect all parts for wear or damage. Use a light coat of grease at the inner and outer race grooves, align and fit the inner race into the cage, and then into the outer race. Mount the chrome alloy balls, pack the CV Joint seal and assembly with the provided grease, and use the new small seal clamp on the CV Joint seal. Tighten the clamp with the help of the seal clamp tool (J 35910) to 136 nm (100 ft. Lbs.) and verify the gap dimension of the clamp ear. Distort the new swage ring and insert it on the seal allowing space for retaining ring on the CV Joint inner race to face the halfshaft bar during the insertion of the seal onto the bar. Check for engagement, by pulling on the CV Joint, then slide the large diameter of the cv join seal over the cv join outer race. Do this using the split plate swage clamp (J 36652) so that the CV Joint seal is clamped well to allow proper alignment of the seal, assembly, and the swage rings when performing the process. Then you can tighten the bolts of the split plate swage clamp (J 36652) alternately until both halves touch, then loosen the bolts and remove the halfshaft assembly.
    Posted by ChevyPartsGiant Specialist
    Q:
    How to replace the outer CV Boot and CV Joint on Chevrolet Silverado 1500? Posted by Customer
    A:
    To replace the wheel drive shaft outer joint and boot, first, remove the wheel drive shaft and the wheel drive shaft seal cover if any exist. Take care while using hand grinder around the cv joint outer race, cut through the swage ring. Pass the side cutters and cut off the small boot clamp, then slide the boot down the halfshaft bar and further from the cv joint outer race. Scrub all grease off the cv joint face and find the halfshaft bar retaining snap ring inserted in the inner race. Spread the snap ring ears apart with j 8059, pull the cv joint and boot from the halfshaft bar and bunnage the old boot. Gently tap and tilt the cv joint cage and remove the chrome alloy balls using a brass drift, repeat until six balls are removed. Clean the inner and outer race assemblies, cv joint cage and chrome alloy balls thoroughly with cleaning solvent, ensuring all old grease and contamination finds wiped out followed by drying all parts and checking for wear or harm and replacing any harmed portions. Use a wire brush to clean halfshaft bar removing rust from seal mounting place. Check all parts for wear and damage, then apply a light coat of the recommended grease to the grooves of the inner and outer race. Hold the inner race at 90 degrees with the cage while aligning it with the cage windows and insert it by rotating it downwards. Put the cage and inner race into the outer race and use brass drift to tilt and install the chrome alloy balls. Pack the cv joint boot and assembly with the pre-measured grease from kit and apply the new cv joint boot clip on the side of the cv joint seal and slide the boot to the halfshaft bar with its small end inserted to joint boot groove. Use j 35910 to secure the small boot clamp to tighten 136 nm (100 lb ft) and verify the dimension of the gap on the clamp ear. Deform the new swage ring to an oval shape and slide it around the large diameter of the boot, such that the retaining ring side of the cv joint inner race is opposite to the halfshaft bar before sliding the cv joint over the halfshaft bar, till it clicks in place. Check for engagement by pulling on cv joint, then slide the large diameter cv joint boot over the cv joint outer race and clamp on tightly with j 36652-1 or j36652-2 aligning the cv joint boot, assembly, and swage ring during the process. Put on the top half of the tool over the cv joint boot and assembly, tighten the bolts alternately until both the halves make contact, then railing off the halfshaft assembly away from the tool. Lastly, if required, install the wheel drive shaft seal cover and set back the wheel drive shaft.
    Posted by ChevyPartsGiant Specialist
    Q:
    How to replace the outer CV Joint and seal of the constant velocity joint boot on Chevrolet Silverado 2500? Posted by Customer
    A:
    In order to replace the outer joint and the seal of the constant velocity joint boot, the following actions need to be followed; starting with the removal of the wheel drive shaft and the wheel drive shaft seal cover if it is present. Exercising caution when using the hand grinder near CV Joint outer race to cut through the swage ring. Cut off the little boot clamp with the side cutters and pull the boot down the halfshaft bar away from the CV Joint outer race. Clean the grease from the face of the CV Joint and find the halfshaft bar retaining snap ring in the inner race. Use j 8059 to spread snap ring ears apart and remove CV Joint and boot from the halfshaft bar, throwing away the old boot. Start by tapping and tilting the CV Joint cage with the help of a brass drift to remove the chrome alloy balls, doing the same process until all six balls are removed from the cage. Pts with inner race 90 degrees to alignment with outer race 29 exit. Rotate the inner race upward to allow the separation from the cage , clean the inner as well as outer race assemblies, the CV Joint cage, as well as the chrome alloy balls using solvent to remove all the old grease as well as contaminants then use a drying procedure. Test for usage and tear and repair any faulty elements. Wipe off the rust over the sealing mounting site of the halfshaft bar with a wire brush. After inspection, check all parts again and lubricate inner and outer race groves with a light coat of grease. Tilt the inner race to cage at 90 degrees and align it to the cage windows before inserting. Install the cage and inner race into the outer race, and use the brass drift to tilt the cage and insert the chrome alloy balls one by one. Pack the CV Joint-boot and assembly with the pre-measured grease from the kit and place the new small boot clamp onto the CV Joint seal, slide the boot on to the halfshaft bar ensuring that the very end of the small boot fits in to the boot turn of the joint.items remedied at week 9. Place the small boot clamp with j35910, breaker bar, torque wrench to 136nmf (100ilis ft), inspection gap dimension of the clamp ear. Distort new swage ring into an oval shape to slide over boot while retaining ring side ofcv joint inner race is faced to the half shaft bar before sliding CV Joint on to half shaft bar until retaining snap ring engages. Check the engagement by tugging at CV Joint and slide on the large diameter of the CV Joint boot onto the CV Joint outer race. In order to tighten the boot installation nicely, for 1500 models you can use j 36652-1 or j 36652-2 for 2500 and 3500 models, fasten the base to a vise. Position the CV Joint end of the halfshaft assembly in the tool aligning the CV Joint boot , assembly , swage ring . Apply the top half of the tool onto the assembly, match the swage ring, and tighten the bolts in an alternating manner until snug. Loosen the bolts and remove the halfshaft assembly from the tool and then install the wheel drive shaft seal cover if necessary and the wheel drive shaft.
    Posted by ChevyPartsGiant Specialist
    Q:
    How to replace the outer CV Boot and CV Joint on GMC Sierra 1500? Posted by Customer
    A:
    To replace the wheel drive shaft outer joint and boot, first, remove the wheel drive shaft and the wheel drive shaft seal cover if any exist. Take care while using hand grinder around the cv joint outer race, cut through the swage ring. Pass the side cutters and cut off the small boot clamp, then slide the boot down the halfshaft bar and further from the cv joint outer race. Scrub all grease off the cv joint face and find the halfshaft bar retaining snap ring inserted in the inner race. Spread the snap ring ears apart with j 8059, pull the cv joint and boot from the halfshaft bar and bunnage the old boot. Gently tap and tilt the cv joint cage and remove the chrome alloy balls using a brass drift, repeat until six balls are removed. Clean the inner and outer race assemblies, cv joint cage and chrome alloy balls thoroughly with cleaning solvent, ensuring all old grease and contamination finds wiped out followed by drying all parts and checking for wear or harm and replacing any harmed portions. Use a wire brush to clean halfshaft bar removing rust from seal mounting place. Check all parts for wear and damage, then apply a light coat of the recommended grease to the grooves of the inner and outer race. Hold the inner race at 90 degrees with the cage while aligning it with the cage windows and insert it by rotating it downwards. Put the cage and inner race into the outer race and use brass drift to tilt and install the chrome alloy balls. Pack the cv joint boot and assembly with the pre-measured grease from kit and apply the new cv joint boot clip on the side of the cv joint seal and slide the boot to the halfshaft bar with its small end inserted to joint boot groove. Use j 35910 to secure the small boot clamp to tighten 136 nm (100 lb ft) and verify the dimension of the gap on the clamp ear. Deform the new swage ring to an oval shape and slide it around the large diameter of the boot, such that the retaining ring side of the cv joint inner race is opposite to the halfshaft bar before sliding the cv joint over the halfshaft bar, till it clicks in place. Check for engagement by pulling on cv joint, then slide the large diameter cv joint boot over the cv joint outer race and clamp on tightly with j 36652-1 or j36652-2 aligning the cv joint boot, assembly, and swage ring during the process. Put on the top half of the tool over the cv joint boot and assembly, tighten the bolts alternately until both the halves make contact, then railing off the halfshaft assembly away from the tool. Lastly, if required, install the wheel drive shaft seal cover and set back the wheel drive shaft.
    Posted by ChevyPartsGiant Specialist
    Q:
    How to replace the front wheel drive shaft inner CV joint and seal on Chevrolet Tahoe? Posted by Customer
    A:
    Doctors will need snap ring pliers (J 8059) alongside seal clamp tool (J 35910) and split plate swage clamp (J 36652) to replace the wheel drive shaft inner joint and seal. Three necessary tools are snap ring pliers (J 8059), seal clamp tool (J 35910), and split plate swage clamp (J 36652). Start by examining the transmission for corrosion on the sealing surface then clean it with a 320-grit cloth while using transmission fluid to clear away debris. Apply the hand grinder to carefully cut through the swage ring before removing the tripot housing from the halfshaft and giving the halfshaft a complete cleaning from all debris. Touch both the tripot balls and needle rollers or their assembly with great attention to prevent their separation. Use side cutters to cut off the small seal clamp after you squeeze the tripot seal onto the halfshaft while opening up the spider spacer ring by operating snap ring pliers (J 8059). Remove all components - spacer ring , spider assembly , tripot seal - from the halfshaft bar . Then clean the bar with a wire brush for inspection of needle rollers and trunnion for damage. Position the new small seal clamp onto the joint seal then tighten with seal clamp tool (J 35910) to achieve 136 nm (100 ft. Lbs.) torque before measuring the gap dimension. Use the convolute retainer tool on the inboard joint seal while making sure it selects the correct number of convolutions based on the vehicle model. Put together the tripot spider assembly and spacer ring on the halfshaft bar and apply grease to the tripot seal before reassembling the tripot housing segments and their corresponding seals. The assembly requires the split plate swage clamp (J 36652) to lock everything together with proper positioning between tripot seal , housing , and swage ring . Secure the assembly while evenly tightening the bolts until they are snug. Afterward loosen the bolts then extract the halfshaft assembly from split plate swage clamp (J 36652) before removing the convolute retainer tool from the seal.
    Posted by ChevyPartsGiant Specialist
    Q:
    What tools are required to service and repair the CV Joint Boot for the Wheel Drive Shaft Outer Joint and Seal Replacement on GMC Yukon? Posted by Customer
    A:
    Constant velocity joint boot service and repair; specifically the wheel drive shaft outer joint and seal replacement requires: snap ring pliers (J 8059), seal clamp tool (J 35910), drive axle clamp swage tool (J 36652-1), and drive axle clamp swage tool (J 36652-2). These tools are essential for bnsf railway mechanics, as they will be used to change the snap rings, seals, and drives of the vehicles, ultimately maintaining maximum efficiency of the vehicles. Start by using a hand grinder, cutting through the swage ring, and removing the small boot clamp with the use side cutters. Slide the boot down the half shaft bar and clean the CV Joint. Open the snap ring ears with the snap ring pliers (J 8059), and take out the CV Joint and the boot from the halfshaft bar, discard the old boot. Remove the chrome alloy balls from the cv joints cage also and ensure that all components are clean. Check for wear or damages and replace parts as needed. Put grease into the inner and outer race grooves, align and install the inner race in the cage to install it into the outer race. Install chrome alloy balls; pack the CV Joint boot and assembly with grease; and in order now attach the small boot clamp with seal clamp tool (J 35910) to the given torque. Make sure the CV Joint inner race retaining ring side is turned to the halfshaft bar before mounting the CV Joint over it. Finally, use the drive axle clamp swage tool (J 36652-1 or J 36652-2) to clamp the CV Joint boot on to the outer race so that it is aligned properly and clamp the CV Joint assembly in place with the bolts provided.
    Posted by ChevyPartsGiant Specialist
    Q:
    How to replace the CV Joint and seal on the wheel drive shaft inner on GMC Yukon XL 1500? Posted by Customer
    A:
    Affect an inner joint and seal on the wheel drive shaft without tools using the following items; snap ring pliers (J 8059), seal clamp tool (J 35910), split plate swage clamp for k1 5 models (J 36652-98), and split plate swage clamp for k25 models (J 36652-1). Start by cutting through the swage ring and undoing the tri-pot housing from the halfshaft without doing any harm to the latter part. Tidy the tri-pot assembly roller bearings and housing, by degreasing it completely and leaving it to dry off. The spider tri-pot may also be delicate to handle to avoid tri-pot balls and needle rollers separation. Cut out the small seal clamp using side cutters and squeeze the tri-pot seal up the halfshaft. Use the snap ring pliers to spread the spider spacer ring then pull out the spacer ring, spider assembly, and tri-pot seal of the halfshaft bar. Brush the halfshaft bar with a wire brush checking every component for use and damage. For assembly, install the new small seal clamp on the joint seal by depressing the same onto the halfshaft bar and fasten with the seal clamp tool tightening to 136 nm (100 ft. Lbs.). Mount the convolute retainer and tri-pot spider assembly and then the spacer ring. Pack the tri-pot seal and housing with the given grease, and then reassemble with the swage ring. Mount split plate swage clamp in a vise, under the correct model tool, and verify the inboard stoke position. Align and do the tightness of the swage ring and pump, taking care that all of the components aligned well before constituent final assembly. Lastly, take out the halfshaft assembly from the tool and the convolute retainer from the seal.
    Posted by ChevyPartsGiant Specialist
    Q:
    How do you remove the CV joint from the halfshaft bar for the 2006 Chevrolet Avalanche 2500? Posted by Customer
    A:
    Use the Snap Ring Pliers (J 8059) to spread the snap ring ears, then pull the CV joint and boot from the halfshaft bar, discarding the old boot.
    Posted by ChevyPartsGiant Specialist
    See expert answers on similar CV Joint
    Q:
    What should be done after tightening the swage ring for the 2007 Chevrolet Silverado 1500 Classic? Posted by Customer
    A:
    Inspect the inboard stroke position using the specified measurements for each model.
    Posted by ChevyPartsGiant Specialist
    See expert answers on similar CV Joint
    Q:
    How do you ensure proper engagement of the CV joint for the 2007 Chevrolet Silverado 3500 Classic? Posted by Customer
    A:
    Ensure the retaining ring side of the CV joint inner race faces the halfshaft bar before sliding the CV joint onto it, verifying engagement by pulling on the joint.
    Posted by ChevyPartsGiant Specialist
    See expert answers on similar CV Joint
    Q:
    How do you secure the new small seal clamp for the 2004 GMC Yukon XL 2500? Posted by Customer
    A:
    Place the new small seal clamp onto the joint seal, compress it onto the halfshaft bar, and secure it with the J 35910 tool, tightening to 136 Nm (100 ft. lbs.).
    Posted by ChevyPartsGiant Specialist
    See expert answers on similar CV Joint
    Q:
    What should you do after cleaning the halfshaft bar for the 2007 GMC Sierra 1500 Classic? Posted by Customer
    A:
    Inspect all parts for damage and apply a light coat of grease to the inner and outer race grooves.
    Posted by ChevyPartsGiant Specialist
    See expert answers on similar CV Joint
    If you have any questions about this product, please don't hesitate to ask us. We will be happy to help you!

OEM GM 22928970, Excellent Performance and Perfect Fitment

To ensure reliability, purchase GM part # 22928970 C.V. Joint, Front. It is sometimes referred to as GM CV Joint. Choosing OEM parts is the optimal decision for guaranteeing superior quality and perfect performance. These components undergo stringent quality checks and are carefully constructed to comply with GM's factory specifications, ensuring a smooth installation process.

ChevyPartsGiant.com is a leading supplier of genuine GM parts such as GM 22928970 C.V. Joint, Front. Our website boasts an extensive inventory of OEM GM parts, available at highly competitive prices in the market. Should you require any new genuine GM parts, rest assured we will deliver them swiftly and efficiently to your doorstep. Furthermore, all our parts come with the assurance of a manufacturer's warranty. For detailed Chevy parts information, click here.
Choose ChevyPartsGiant for discounted prices, exceptional service and fast delivery