ChevyParts
My Garage
My Account
Cart
OEM 2000 Cadillac Eldorado Door Lock Actuator
Power Door Lock Actuator- Select Vehicle by Model
- Select Vehicle by VIN
Select Vehicle by Model
orMake
Model
Year
Select Vehicle by VIN
For the most accurate results, select vehicle by your VIN (Vehicle Identification Number).
7 Door Lock Actuators found


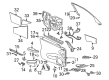
2000 Cadillac Eldorado Door Jamb Switch Part Number: 25664288
$85.37 MSRP: $128.76You Save: $43.39 (34%)Ships in 1-2 Business DaysProduct Specifications- Other Name: Actuator Kit, Door Lock; Trunk Lock Actuator Motor; Door Lock Actuator; Lock Actuator; Electric and Vacuum Door Locks; End Gate Electrical Actuator Kit.
- Position: Rear
- Replaces: 16627973, 25664020, 16632015, 16636561, 22144363, 3635350
- Item Weight: 0.70 Pounds
- Item Dimensions: 6.1 x 4.3 x 4.1 inches
- Condition: New
- Fitment Type: Direct Replacement
- SKU: 25664288
- Warranty: This genuine part is guaranteed by GM's factory warranty.


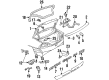
2000 Cadillac Eldorado Door Jamb Switch Part Number: 25664287
$86.48 MSRP: $130.44You Save: $43.96 (34%)Ships in 1-2 Business DaysProduct Specifications- Other Name: Actuator Kit, Door Lock; Door Lock Actuator; Lock Actuator; Actuator; Actuator Kit, Door Electric And Vacuum Locks; Actuator Kit, Door And End Gate Electrical
- Position: Rear
- Replaces: 16636560, 16627972, 22144360, 16624970, 22144362, 3635351, 16632014, 25664019
- Item Weight: 0.70 Pounds
- Item Dimensions: 6.1 x 4.1 x 4.1 inches
- Condition: New
- Fitment Type: Direct Replacement
- SKU: 25664287
- Warranty: This genuine part is guaranteed by GM's factory warranty.


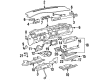
2000 Cadillac Eldorado Lock Cylinder, Black, Rear Part Number: 20513755
$35.28 MSRP: $52.51You Save: $17.23 (33%)Product Specifications- Other Name: Lock, Rear Compartment Lid Or Tail Gate Latch; Trunk Lock Assembly; Rear Compartment Lid Latch; Tail Gate Latch; Ajar Release Latch.
- Position: Rear
- Item Weight: 0.80 Pounds
- Item Dimensions: 6.2 x 3.3 x 3.1 inches
- Condition: New
- Fitment Type: Direct Replacement
- SKU: 20513755
- Warranty: This genuine part is guaranteed by GM's factory warranty.


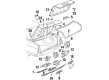
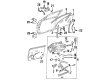
2000 Cadillac Eldorado Lock Actuator, Rear Part Number: 25809368
Product Specifications- Other Name: Actuator, Rear Compartment Lid Pulldown; Trunk Lock Actuator Motor; Door Lock Actuator; Door Lock; Motor Actuator; Electric Pull Down Assembly; Rear Compartment Lid Release Or Ajar.
- Position: Rear
- Replaces: 16633850, 15819935
- Item Weight: 1.70 Pounds
- Item Dimensions: 8.2 x 5.3 x 5.3 inches
- Condition: New
- Fitment Type: Direct Replacement
- SKU: 25809368
- Warranty: This genuine part is guaranteed by GM's factory warranty.


2000 Cadillac Eldorado Lock, Rear Part Number: 20513752
$57.21 MSRP: $85.15You Save: $27.94 (33%)Product Specifications- Other Name: Lock, Rear Compartment Lid Or Tail Gate Latch; Trunk Latch; Door Lock; Latch; Rear Compartment Lid or Tail Gate Release Ajar
- Position: Rear
- Item Weight: 0.70 Pounds
- Item Dimensions: 6.4 x 3.3 x 3.1 inches
- Condition: New
- Fitment Type: Direct Replacement
- SKU: 20513752
- Warranty: This genuine part is guaranteed by GM's factory warranty.

 Product Specifications
- Other Name: Latch Kit, Front Side Door; Door Latch Assembly; Door Lock; Lock; Latch
- Position: Front Passenger Side
- Item Weight: 1.10 Pounds
- Item Dimensions: 6.1 x 4.2 x 4.2 inches
- Condition: New
- Fitment Type: Direct Replacement
- SKU: 12537470
- Warranty: This genuine part is guaranteed by GM's factory warranty.
- Product Specifications
- Other Name: Latch Kit, Front Side Door; Door Latch Assembly; Door Lock; Lock; Latch
- Position: Front Driver Side
- Replaces: 12373145
- Item Weight: 1.10 Pounds
- Item Dimensions: 6.3 x 4.1 x 4.1 inches
- Condition: New
- Fitment Type: Direct Replacement
- SKU: 12537471
- Warranty: This genuine part is guaranteed by GM's factory warranty.
2000 Cadillac Eldorado Door Lock Actuator
With a comprehensive array of OEM 2000 Cadillac Eldorado Door Lock Actuator, from fuel pumps to door handles, our website is a one-stop-shop for your needs. All our genuine 2000 Cadillac Eldorado Door Lock Actuator are backed by the manufacturer's warranty and are offered at competitive prices in the market. Rest assured, you can shop with complete confidence.
2000 Cadillac Eldorado Door Lock Actuator Parts and Q&A
- Q: How to replace the power door lock actuator on 2000 Cadillac Eldorado?A: The first step to change the power door lock actuator involves removing the lock assembly. Begin by detaching the actuator from the lock assembly using the 2 TORX(R) fasteners before removering the actuator unit. Install new power actuator after checking that the latch remains in complete openness and pushing all lock actuator teeth against the actuator arm for lock assembly safety. The plastic teeth of the lock switch require positioning to meet the lock assembly teeth while using force to push them towards the actuator arm. Check that the rubber bumper from the actuating arm properly rests on the specified part of the actuating arm before installing the new actuator to the lock assembly. Secure the actuating arm together with bumper into the locking lever before setting the lock switch teeth to match the gear tooth fork bolt and its fastener holes. Use two TORX(R) fasteners to fasten them at 8 N.m (71 lb in). Users need to operate the lock assembly manually by applying force to the fork bolt which should establish a full closure with a proper locking mechanism. The lock switch along with actuator requires electrical connection after which their functionality needs testing. Placement and mounting of the lock carrier must be checked before installing the lock assembly.
Related 2000 Cadillac Eldorado Parts
 2000 Cadillac Eldorado Emblem
 2000 Cadillac Eldorado Door Handle
 2000 Cadillac Eldorado Door Lock
 2000 Cadillac Eldorado Door Moldings
 2000 Cadillac Eldorado Door Seal
 2000 Cadillac Eldorado Door Striker
 2000 Cadillac Eldorado Liftgate Hinge
 2000 Cadillac Eldorado Tailgate Latch
 2000 Cadillac Eldorado Tailgate Lock
 2000 Cadillac Eldorado Trunk Latch
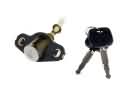 2000 Cadillac Eldorado Trunk Lock Cylinder
 2000 Cadillac Eldorado Weather Strip