ChevyParts
My Garage
My Account
Cart
OEM 2006 GMC Canyon Emblem
Badge- Select Vehicle by Model
- Select Vehicle by VIN
Select Vehicle by Model
orMake
Model
Year
Select Vehicle by VIN
For the most accurate results, select vehicle by your VIN (Vehicle Identification Number).
7 Emblems found


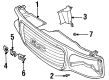
2006 GMC Canyon Letter Part Number: 15634643
$68.00 MSRP: $97.30You Save: $29.30 (31%)Ships in 1-2 Business DaysProduct Specifications- Other Name: Emblem Kit, Radiator Grille; Emblem; Nameplate; Emblem Kit, Radiator Grille And Front End Ornamentation
- Item Weight: 0.40 Pounds
- Item Dimensions: 4.1 x 2.7 x 2.7 inches
- Condition: New
- Fitment Type: Direct Replacement
- SKU: 15634643
- Warranty: This genuine part is guaranteed by GM's factory warranty.


2006 GMC Canyon Letter Part Number: 15634639
$30.77 MSRP: $45.79You Save: $15.02 (33%)Ships in 1-2 Business DaysProduct Specifications- Other Name: Emblem Kit, Radiator Grille; Emblem; Nameplate; Emblem Kit, Radiator Grille And Front End Ornamentation
- Item Weight: 0.50 Pounds
- Item Dimensions: 4.2 x 2.7 x 2.7 inches
- Condition: New
- Fitment Type: Direct Replacement
- SKU: 15634639
- Warranty: This genuine part is guaranteed by GM's factory warranty.

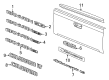
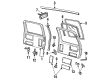
2006 GMC Canyon Nameplate, Rear Part Number: 15926160
$83.85 MSRP: $119.97You Save: $36.12 (31%)Ships in 1-3 Business DaysProduct Specifications- Other Name: Emblem, End Gate And Rear Door Decoration; Plate, End Gate And Rear Door Decoration
- Position: Rear
- Replaces: 15207240
- Item Weight: 0.30 Pounds
- Item Dimensions: 17.2 x 1.7 x 0.3 inches
- Condition: New
- Fitment Type: Direct Replacement
- SKU: 15926160
- Warranty: This genuine part is guaranteed by GM's factory warranty.

2006 GMC Canyon Nameplate, Rear Part Number: 10355873
$103.32 MSRP: $153.78You Save: $50.46 (33%)Ships in 1-3 Business DaysProduct Specifications- Other Name: Emblem, End Gate And Rear Door Decoration; Plate Assembly, Cab And Load Carrier Outer Side Decoration; Plate, End Gate And Rear Door Decoration
- Position: Rear
- Replaces: 15207239
- Item Weight: 0.30 Pounds
- Item Dimensions: 2.0 x 14.5 x 0.4 inches
- Condition: New
- Fitment Type: Direct Replacement
- SKU: 10355873
- Warranty: This genuine part is guaranteed by GM's factory warranty.

2006 GMC Canyon Nameplate Part Number: 84674406
$54.03 MSRP: $80.42You Save: $26.39 (33%)Ships in 1-3 Business DaysProduct Specifications- Other Name: Plate Assembly-End Gate Divider Name *Chrome; Emblem, End Gate And Rear Door Decoration; Plate, End Gate And Rear Door Decoration
- Replaces: 22884137, 15195869, 15029627
- Condition: New
- Fitment Type: Direct Replacement
- SKU: 84674406
- Warranty: This genuine part is guaranteed by GM's factory warranty.

2006 GMC Canyon Letter Part Number: 15634641
$25.40 MSRP: $39.76You Save: $14.36 (37%)Ships in 1-2 Business DaysProduct Specifications- Other Name: Emblem Kit, Radiator Grille; Emblem; Nameplate; Emblem Kit, Radiator Grille And Front End Ornamentation
- Item Weight: 0.40 Pounds
- Item Dimensions: 3.4 x 3.1 x 3.1 inches
- Condition: New
- Fitment Type: Direct Replacement
- SKU: 15634641
- Warranty: This genuine part is guaranteed by GM's factory warranty.

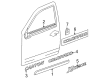
2006 GMC Canyon Emblem Part Number: 84689784
$11.42 MSRP: $17.00You Save: $5.58 (33%)Ships in 1-3 Business DaysProduct Specifications- Other Name: Emblem, Front Side Door; Decal; Nameplate; Emblem, Cab, Load Carrier, Rear End, Door, Quarter Panel, Fender, Rocker Panel, Side Step.
- Replaces: 15223483, 15223484
- Condition: New
- Fitment Type: Direct Replacement
- SKU: 84689784
- Warranty: This genuine part is guaranteed by GM's factory warranty.
2006 GMC Canyon Emblem
With a comprehensive array of OEM 2006 GMC Canyon Emblem, from fuel pumps to door handles, our website is a one-stop-shop for your needs. All our genuine 2006 GMC Canyon Emblem are backed by the manufacturer's warranty and are offered at competitive prices in the market. Rest assured, you can shop with complete confidence.
2006 GMC Canyon Emblem Parts and Q&A
- Q: How to replace the door emblem/nameplate on 2006 GMC Canyon?A: To change the door emblem/nameplate on Canyon, one should collect the required instruments: Heat Gun (J 25070) and 3M(TM) scotch brite molding adhesive remover (3M(TM) P/N 07501). Start by using tape along the door emblem to protect and align. Use the Heat Gun (J 25070) from a distance of 152 (6 in) to heat the emblem/nameplate in circular motion around for approximately 30 seconds. Gently pry off the emblem/nameplate using a plastic, flat-bladed tool and wipe any adhesive residue from the door panel and back of the emblem/nameplate with the 3M adhesive remover. Clean the door surface with varnish makers and painters (VMP) naptha. In case it is not marked where to place it, cover with tape and lay down 251 mm (9.88 in) below on the door and 157 mm (6.18 in) at the forehead of the door to make sure it is placed correctly. Open the adhesive backing of the emblem/nameplate using the Heat Gun (J 25070) and warm the door surface to a minimum 21°C (70°F), while never touching the adhesive backing of the emblem/nameplate. Carefully remove the backing from the front end of the emblem/nameplate and press it onto the door panel until you can take off the backing while pressing the emblem/nameplate onto the door panel. Roll the emblem/name plate manually to ensure its proper adhesion and inspect it to see if it's bonded before lifting off the tape from the area around the door emblem.
Related 2006 GMC Canyon Parts
 2006 GMC Canyon Tailgate Latch
 2006 GMC Canyon Cup Holder
 2006 GMC Canyon Door Moldings
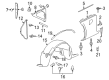
 2006 GMC Canyon Front Cross-Member
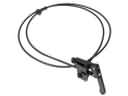 2006 GMC Canyon Hood Cable
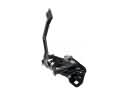 2006 GMC Canyon Hood Latch
 2006 GMC Canyon Lift Support
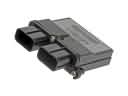 2006 GMC Canyon Occupant Detection Sensor
 2006 GMC Canyon Seat Cushion Pad
 2006 GMC Canyon Weather Strip
 2006 GMC Canyon Window Crank Handles
 2006 GMC Canyon Wiper Blade