ChevyParts
My Garage
My Account
Cart
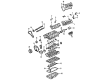
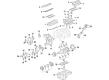
OEM 2009 Cadillac SRX Camshaft
Cam- Select Vehicle by Model
- Select Vehicle by VIN
Select Vehicle by Model
orMake
Model
Year
Select Vehicle by VIN
For the most accurate results, select vehicle by your VIN (Vehicle Identification Number).
8 Camshafts found


2009 Cadillac SRX Drive Shaft Part Number: 12577790
$72.85Ships in 1-2 Business DaysProduct Specifications- Other Name: Shaft-Camshaft Intermediate Drive; Timing Gear; Intermediate Shaft; Timing Gear Set; Shaft, Engine
- Replaces: 12559014
- Item Weight: 1.50 Pounds
- Item Dimensions: 7.0 x 4.3 x 4.5 inches
- Condition: New
- Fitment Type: Direct Replacement
- SKU: 12577790
- Warranty: This genuine part is guaranteed by GM's factory warranty.

2009 Cadillac SRX Intake Camshaft Part Number: 12563833
$203.39 MSRP: $356.83You Save: $153.44 (43%)Ships in 1-2 Business DaysProduct Specifications- Other Name: Camshaft, Engine; Camshaft
- Item Weight: 5.20 Pounds
- Item Dimensions: 22.8 x 3.4 x 3.6 inches
- Condition: New
- Fitment Type: Direct Replacement
- SKU: 12563833
- Warranty: This genuine part is guaranteed by GM's factory warranty.


2009 Cadillac SRX Camshaft Part Number: 19431713
$268.36 MSRP: $422.26You Save: $153.90 (37%)Ships in 1-3 Business DaysProduct Specifications- Other Name: Camshaft Assembly, Intake; Camshaft, Engine
- Replaces: 12603535, 12609252, 12625989, 19420582, 12603545, 12604374, 12632195, 19420031
- Item Weight: 5.40 Pounds
- Item Dimensions: 30.6 x 2.1 x 2.1 inches
- Condition: New
- SKU: 19431713
- Warranty: This genuine part is guaranteed by GM's factory warranty.
2009 Cadillac SRX Intake Camshaft Part Number: 12565168
$214.82 MSRP: $338.00You Save: $123.18 (37%)Ships in 1-3 Business DaysProduct Specifications- Other Name: Camshaft, Engine; Camshaft
- Item Weight: 5.40 Pounds
- Item Dimensions: 23.7 x 3.4 x 3.6 inches
- Condition: New
- Fitment Type: Direct Replacement
- SKU: 12565168
- Warranty: This genuine part is guaranteed by GM's factory warranty.
2009 Cadillac SRX Exhaust Camshaft Part Number: 12565172
$97.33 MSRP: $184.09You Save: $86.76 (48%)Ships in 1-2 Business DaysProduct Specifications- Other Name: Camshaft, Engine; Camshaft
- Item Weight: 5.30 Pounds
- Item Dimensions: 28.7 x 3.5 x 3.4 inches
- Condition: New
- Fitment Type: Direct Replacement
- SKU: 12565172
- Warranty: This genuine part is guaranteed by GM's factory warranty.
2009 Cadillac SRX Exhaust Camshaft Part Number: 12565171
$105.88 MSRP: $175.24You Save: $69.36 (40%)Ships in 1-2 Business DaysProduct Specifications- Other Name: Camshaft, Engine; Camshaft
- Item Weight: 5.20 Pounds
- Item Dimensions: 28.1 x 3.4 x 3.4 inches
- Condition: New
- Fitment Type: Direct Replacement
- SKU: 12565171
- Warranty: This genuine part is guaranteed by GM's factory warranty.


2009 Cadillac SRX Camshaft Part Number: 12625986
$28.90 MSRP: $45.26You Save: $16.36 (37%)Product Specifications- Other Name: Camshaft Assembly-Intake; Camshaft, Engine
- Replaces: 12632193, 12604377, 12603544, 12609250
- Item Weight: 4.30 Pounds
- Item Dimensions: 3.3 x 3.4 x 28.1 inches
- Condition: New
- Fitment Type: Direct Replacement
- SKU: 12625986
- Warranty: This genuine part is guaranteed by GM's factory warranty.

2009 Cadillac SRX Camshaft Part Number: 12625990
Product Specifications- Other Name: Camshaft, Engine
- Replaced by: 19420030
- Item Weight: 4.20 Pounds
- Item Dimensions: 21.8 x 3.2 x 3.2 inches
- Condition: New
- Fitment Type: Direct Replacement
- SKU: 12625990
- Warranty: This genuine part is guaranteed by GM's factory warranty.
2009 Cadillac SRX Camshaft
With a comprehensive array of OEM 2009 Cadillac SRX Camshaft, from fuel pumps to door handles, our website is a one-stop-shop for your needs. All our genuine 2009 Cadillac SRX Camshaft are backed by the manufacturer's warranty and are offered at competitive prices in the market. Rest assured, you can shop with complete confidence.
2009 Cadillac SRX Camshaft Parts and Q&A
- Q: How to replace the left side camshaft on 2009 Cadillac SRX?A: The replacement of a left side Camshaft begins with upper Intake Manifold and lower Intake Manifold extraction. Remove the left bank Camshaft cover together with Camshaft sensors that service both the exhaust and intake sides. Proceed to eliminate the Camshaft position actuator solenoid from the system. The crankshaft balancer rotates clockwise only and users should use the balancer bolt to position the camshafts into neutral. This positions the Camshaft flats even with the Camshaft cover rail. Use an open-end wrench on the hex-shaped component of the Camshaft to stop rotation and then loose the Camshaft position actuator bolt. Place the en-48313 (Timing Chain Retention Tool) legs into retracted position before inserting the tool between Camshaft actuators with the bottom line adjacent to Cylinder Head surface. Turn the t-shaped handle of the en-48313 to expand its legs partially while moving one leg behind the Timing Chain Guide until they touch the chain without becoming tight. Apply hand pressure to the en-48313 while rotating the camshafts towards each other to obtain Timing Chain slack. Write down the marks on the Timing Chain before you detach it alongside the Camshaft position actuators. The Camshaft position actuator bolt needs removal as well as the camshafts themselves. Install the Camshaft position actuators to camshafts based on their marked alignment with Timing Chain marks and perform Camshaft bearing cap and Camshaft installation. Retire the en-48313 component before you set up and tighten the Camshaft position actuators. Install first the intake Camshaft position actuator solenoid and the Camshaft sensors and then substitute the Camshaft cover and upper Intake Manifold with the lower Intake Manifold.
Related 2009 Cadillac SRX Parts
 2009 Cadillac SRX Crankshaft
 2009 Cadillac SRX Crankshaft Gear
 2009 Cadillac SRX Crankshaft Seal
 2009 Cadillac SRX Crankshaft Thrust Washer Set
 2009 Cadillac SRX Dipstick
 2009 Cadillac SRX Engine Mount
 2009 Cadillac SRX Engine Mount Bracket
 2009 Cadillac SRX Oil Pan Baffle
 2009 Cadillac SRX Oil Pump
 2009 Cadillac SRX Valve Cover Gasket
 2009 Cadillac SRX Valve Stem Oil Seal
 2009 Cadillac SRX Variable Timing Adjuster Magnet