ChevyParts
My Garage
My Account
Cart
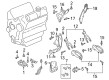
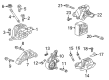
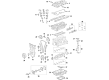
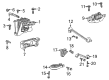
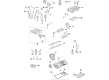
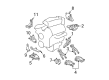
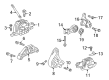
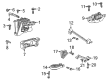
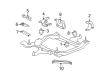
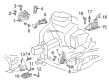
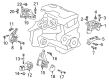
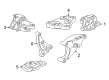
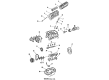
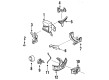
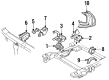
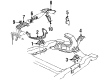
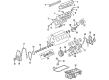
OEM Buick Engine Mount Bracket
Engine Mount- Select Vehicle by Model
- Select Vehicle by VIN
Select Vehicle by Model
orMake
Model
Year
Select Vehicle by VIN
For the most accurate results, select vehicle by your VIN (Vehicle Identification Number).
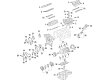
180 Engine Mount Brackets found

Buick Strut Mount Part Number: 10232891
$137.10 MSRP: $195.31You Save: $58.21 (30%)Ships in 1-2 Business DaysProduct Specifications- Other Name: Bracket, Engine Lift; Torque Strut Mount; Motor Mount; Mount Bracket; Strut Bracket; Strut Mount Bracket; Strut Lower Bracket; Bracket, Engine Mounting

Buick Mount Bracket Part Number: 84065976
$74.29 MSRP: $116.35You Save: $42.06 (37%)Ships in 1-3 Business DaysProduct Specifications- Other Name: Bracket, Engine Mounting; Engine Mount Bracket; Motor Mount

Buick Transmission Mount Part Number: 84584452
$67.44 MSRP: $105.62You Save: $38.18 (37%)Ships in 1-3 Business DaysProduct Specifications- Other Name: Bracket, Transmission Mounting Support; Motor Mount; Transmission Mount Bracket; Lower Bracket; Rear Trans Mount
- Position: Rear
- Replaced by: 85558397

Buick Strut Bracket Part Number: 60006233
$29.38 MSRP: $46.02You Save: $16.64 (37%)Ships in 1-2 Business DaysProduct Specifications- Other Name: Bracket, Transmission Mounting Support; Transmission Mount Bracket
- Replaces: 42481300

Buick Motor Mount Part Number: 60003412
$85.75 MSRP: $134.31You Save: $48.56 (37%)Ships in 1-3 Business DaysProduct Specifications- Other Name: Mount, Engine Mounting; Engine Mount Bracket; Side Mount
- Replaced by: 60006090

Buick Mount Bracket, Driver Side Part Number: 15250907
$11.48 MSRP: $48.93You Save: $37.45 (77%)Ships in 1-2 Business DaysProduct Specifications- Other Name: Bracket, Engine Mounting; Engine Mount Bracket; Motor Mount; Upper Bracket
- Position: Driver Side
- Replaces: 10312091

Buick Motor Mount Brace Part Number: 23182727
$9.79 MSRP: $15.34You Save: $5.55 (37%)Ships in 1-3 Business DaysProduct Specifications- Other Name: Brace, Engine Mounting; Engine Mount Bracket; Motor Mount

Buick Mount Support Part Number: 60002266
$63.20 MSRP: $99.01You Save: $35.81 (37%)Ships in 1-3 Business DaysProduct Specifications- Other Name: Bracket-Engine Mount Engine Side; Engine Mount Bracket; Motor Mount; Bracket, Engine Mounting
- Replaced by: 60006091

Buick Rear Mount Bracket Part Number: 25840456
$94.47 MSRP: $147.99You Save: $53.52 (37%)Ships in 1-3 Business DaysProduct Specifications- Other Name: Bracket, Engine Mounting; Engine Mount Torque Strut; Engine Mount Bracket; Engine Torque Mount; Motor Mount
- Position: Rear

Buick Mount Bracket Part Number: 23221646
$55.07 MSRP: $86.27You Save: $31.20 (37%)Ships in 1-3 Business DaysProduct Specifications- Other Name: Bracket-Engine Mount Engine Side; Engine Mount Bracket; Motor Mount; Bracket, Engine Mounting

Buick Motor Mount Part Number: 84499830
$84.09 MSRP: $143.16You Save: $59.07 (42%)Ships in 1-3 Business DaysProduct Specifications- Other Name: Mount, Engine Mounting; Engine Mount Bracket; Side Mount; Mount; Mount, Engine Mount Dampening
- Replaces: 23221635

Buick Mount Bracket Part Number: 13248508
$83.08 MSRP: $130.14You Save: $47.06 (37%)Ships in 1-3 Business DaysProduct Specifications- Other Name: Bracket, Engine Mounting

Buick Support Brace Part Number: 42481285
$5.94 MSRP: $9.31You Save: $3.37 (37%)Ships in 1-3 Business DaysProduct Specifications- Other Name: Brace, Engine Mounting; Motor Mount

Buick Mount Bracket Part Number: 95383823
$181.43 MSRP: $285.49You Save: $104.06 (37%)Ships in 1-3 Business DaysProduct Specifications- Other Name: Bracket, Engine Mounting; Engine Mount Bracket; Motor Mount

Buick Mount Bracket Part Number: 22532358
Product Specifications- Other Name: Bracket; Engine Mount Torque Strut; Engine Mount Bracket; Motor Mount; Front Mount Bracket; Support; Bracket, Engine Mounting
Buick Mount Bracket, Front Part Number: 24503529
Product Specifications- Other Name: Bracket Assembly-Engine Front Mount; Engine Mount Bracket; Motor Mount; Motor Mount Bracket; Engine Bracket; Motor Mount Front Bracket; Bracket, Engine Mounting
- Position: Front

Buick Strut Front Bracket Part Number: 52362018
Product Specifications- Other Name: Bracket, Engine Lift; Engine Mount Bracket; Motor Mount; Bracket, Engine Mounting

Buick Strut Bracket Part Number: 22639634
Product Specifications- Other Name: Bracket, Engine Mounting; Engine Mount Torque Strut; Engine Mount Bracket; Motor Mount; Torque Strut Mount Bracket; Motor Mount Rear Bracket; Torque Strut Bracket

Buick Mount Bracket Part Number: 10066634
Product Specifications- Other Name: Bracket, Engine Lift; Engine Mount Torque Strut; Engine Mount Bracket; Motor Mount; Strut Bracket; Torque Strut Bracket; Strut Rear Bracket; Bracket, Engine Mounting

Buick Motor Mount, Front Passenger Side Part Number: 15788793
$170.87 MSRP: $268.88You Save: $98.01 (37%)Product Specifications- Other Name: Front Mount; Engine Mount Bracket; Mount
- Position: Front Passenger Side
| Page 1 of 9 |Next >
1-20 of 180 Results
Buick Engine Mount Bracket
Want to cut long-term maintenance and repair costs? Choose OEM Engine Mount Bracket. Those parts deliver top durability you can trust. On our site, you'll find a huge catalog of genuine Buick parts. Prices are unbeatable, so you can keep more in your pocket. Every OEM Buick Engine Mount Bracket includes a manufacturer's warranty. You can also get an easy return policy that keeps buying risk free. Fast delivery, get your car on the road quickly. It's simple to search, compare, and order. Stop guessing about quality or fit. Order today and save with parts that last.
Buick Engine Mount Bracket Parts Questions & Experts Answers
- Q: How to replace the right engine mount bracket on Buick LeSabre?A:The correct procedure to replace the right Engine Mount Bracket starts with elevating and supporting the vehicle. The right front fascia extension needs removal followed by suitable engine assembly suspension using a jack. Once you remove the right Engine Mount nut from its bracket you can allow the engine to move downward through slight reduction of the jack height. Initial steps involve removing three fasteners from the right Engine Mount Bracket that attaches to the engine and subsequent elimination of the right Engine Mount Bracket stud and bracket itself. You should install the right Engine Mount Bracket by positioning it on the front Engine Mount stud and engine and apply thread lock compound gm p/n 12345493 or equivalent to the right Engine Mount Bracket bolts. The installer should install the two lower right Engine Mount Bracket bolts loosely before applying thread lock gm p/n 12345493 or equivalent to the right Engine Mount Bracket stud. You should install the right Engine Mount Bracket stud to the engine before tightening it to 8 nm (71 inch lbs.). Set the right Engine Mount Bracket nut on the engine before fastening the right Engine Mount brackets at 60 nm (44 ft. Lbs.). The right Engine Mount Bracket requires installation of its nut joined to the right Engine Mount Bracket. Torque this fastener to 80 nm (59 ft. Lbs.). As the final step place the engine support jack into storage while installing the right front fascia extension and lowering the vehicle.
- Q: How to replace the Engine Mount Bracket on Buick Regal?A:The replacement process for Engine Mount and bracket starts with disconnecting the negative Battery Cable followed by removing the fuel injector sight shield then the Drive Belt. Prior to removal the technician will disconnect the electrical connector of intake air temperature (IAT) sensor and separate the air inlet duct from the Throttle Body. By disconnecting the right and left Engine Mount struts you should lift and support the vehicle from there. Start by removing the right front wheel and tire and then uninstall the right engine splash shield retainers along with its splash shield. The power steering oil cooler pipe brackets need to be detached from the frame before removing the A/C Compressor together with its mounting bracket which must be secured after completing the discharge process on the system. First remove the Catalytic Converter situated on the right side Exhaust Manifold then detach the Engine Mount lower nuts which fasten into the frame assembly. The installation of engine support fixture j 28467-b shall proceed after lowering the vehicle to lift the engine. Raising the vehicle enables workers to remove the left front Engine Mount bracket bolts and right rear Engine Mount bracket bolts that secure the engine. First secure the frame with jack stands afterward loosen the bolts on the left frame side before removing the right side bolts to lower the frame down for Engine Mount bracket removal. Complete the process by installing the Engine Mount to the Engine Mount bracket after removing the bracket and Engine Mount and the upper Engine Mount nuts. Fasten the Engine Mount upper nuts to 78 nm (58 ft. Lbs.) before installing the Engine Mount alongside bracket to the engine. Start with hand tightening the bracket bolts at the right rear and left front positions before finishing with bolt torque at 102 nm (75 ft. Lbs.). Put the frame in its normal position by using jack stands and apply torque of 180 nm (133 ft. Lbs.) to both right and left side frame bolts. Begin with a vehicle elevation then perform engine descent using the engine support fixture (J 28467-90A). Repeat the lifting process after which install the frame-side Engine Mount nuts and apply torque until reaching 78 nm at 58 ft. Lbs. Begin by installing the A/C Compressor bracket before adding bolts which need a torque of 50 nm (37 ft. Lbs.). Move on to install the A/C Compressor along with mounting nuts secured at 30 nm (22 ft. Lbs.). The power steering oil cooler pipe brackets should be reinstalled to the frame while the right engine splash shield and retainers along with the Catalytic Converter are positioned to the right side Exhaust Manifold. Finally place the proper front right tire along with its wheel onto the vehicle and lower it down while removing the support fixture for the engine and then reinstall the struts which support the engine before positioning the fuel injector sight shield in place and reestablish the negative Battery Cable connection. The general procedure ends with an air inlet duct installation to the Throttle Body and the connection of iat sensor electrical wiring followed by Drive Belt fitting and replacement of the fuel injector sight shield before reattaching the negative Battery Cable.
- Q: How to replace the right engine mount bracket on Buick LaCrosse?A:The replacement of right Engine Mount brackets begins by taking out the Engine Mount and upper nuts attached to the Engine Mount. The second step requires you to separate the Engine Mount Bracket from its connection with the Engine Mount. The installation process begins with mounting the Engine Mount Bracket to the Engine Mount while following the fastener notice in service precautions then fasten the upper nuts to 53 nm (39 ft. Lbs.). Finally, reinstall the Engine Mount.


Related Buick Parts
 Buick Head Gasket
 Buick Camshaft
 Buick Camshaft Seal
 Buick Coolant Filter
 Buick Crankshaft Seal
 Buick Lash Adjuster
 Buick Oil Filler Cap
 Buick Piston Ring
 Buick Timing Chain Guide
 Buick Timing Chain Tensioner
 Buick Valve Cover Grommet
 Buick Valve Stem Oil Seal