ChevyParts
My Garage
My Account
Cart
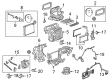
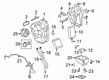
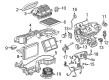
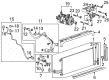
OEM Cadillac A/C Expansion Valve
Air Conditioning Expansion Valve- Select Vehicle by Model
- Select Vehicle by VIN
Select Vehicle by Model
orMake
Model
Year
Select Vehicle by VIN
For the most accurate results, select vehicle by your VIN (Vehicle Identification Number).
28 A/C Expansion Valves found


Cadillac Expansion Valve Part Number: 22799445
$54.91 MSRP: $112.84You Save: $57.93 (52%)Ships in 1-2 Business DaysProduct Specifications- Other Name: Valve Kit, Air Conditioner Expansion Refrigerant; A/C Expansion Valve; Valve Kit, A/C Expansion Refrigerant


Cadillac Expansion Valve, Green Line Part Number: 52495729
$85.31 MSRP: $175.32You Save: $90.01 (52%)Ships in 1-2 Business DaysProduct Specifications- Other Name: Valve Kit, Air Conditioner Evaporator; A/C Expansion Valve; Valve Kit, A/C Expansion Refrigerant; Valve, A/C Expansion Refrigerant; Valve Kit, A/C Evaporator


Cadillac Expansion Valve Part Number: 20897791
$52.76 MSRP: $94.22You Save: $41.46 (44%)Product Specifications- Other Name: Valve Kit, Air Conditioner Expansion Refrigerant; A/C Expansion Valve; Valve Kit, A/C Expansion Refrigerant

Cadillac Drain Tube Part Number: 84689029
$25.80 MSRP: $46.09You Save: $20.29 (45%)Ships in 1-3 Business DaysProduct Specifications- Other Name: Valve, Air Conditioner Evaporator; Valve, A/C Evaporator Core Housing

Cadillac Expansion Valve Part Number: 84609902
$67.95 MSRP: $121.34You Save: $53.39 (44%)Ships in 1-3 Business DaysProduct Specifications- Other Name: Valve Kit, Air Conditioner Expansion Refrigerant; A/C Expansion Valve; Valve Kit, A/C Expansion Refrigerant

Cadillac Expansion Valve Part Number: 86594094
$60.68 MSRP: $108.36You Save: $47.68 (44%)Ships in 1-2 Business DaysProduct Specifications- Other Name: Valve Kit, Air Conditioner Expansion Refrigerant; Valve Kit, A/C Expansion Refrigerant

Cadillac Expansion Valve Part Number: 84689039
$15.69 MSRP: $29.46You Save: $13.77 (47%)Ships in 1-3 Business DaysProduct Specifications- Other Name: Valve Kit-Auxiliary A/C Evaporator Thermal Expansion; A/C Expansion Valve; Valve Kit, A/C Evaporator

Cadillac Expansion Valve Part Number: 84835412
$28.98 MSRP: $54.41You Save: $25.43 (47%)Ships in 1-3 Business DaysProduct Specifications- Other Name: Valve Kit, Air Conditioner Expansion Refrigerant; A/C Expansion Valve; Valve Kit, A/C Evaporator
- Replaced by: 84956146

Cadillac Expansion Valve Part Number: 84751077
$39.86 MSRP: $118.01You Save: $78.15 (67%)Product Specifications- Other Name: Valve Kit, Air Conditioner Expansion Refrigerant; A/C Expansion Valve
- Replaces: 84081131

Cadillac Expansion Valve Part Number: 84055918
$98.52 MSRP: $178.32You Save: $79.80 (45%)Ships in 1-2 Business DaysProduct Specifications- Other Name: Valve Kit, Air Conditioner Expansion Refrigerant; A/C Expansion Valve; Valve Kit, A/C Expansion Refrigerant

Cadillac Expansion Valve Part Number: 84104355
$57.89 MSRP: $118.95You Save: $61.06 (52%)Ships in 1-2 Business DaysProduct Specifications- Other Name: Valve Kit, Air Conditioner Expansion Refrigerant; A/C Expansion Valve; Valve Kit, A/C Evaporator

Cadillac Expansion Valve Part Number: 84445413
$39.02 MSRP: $80.21You Save: $41.19 (52%)Ships in 1-2 Business DaysProduct Specifications- Other Name: Valve Kit-Auxiliary A/C Evaporator Thermal Expansion; A/C Expansion Valve; Valve Kit, A/C Evaporator
- Replaces: 23224321, 84157367

Cadillac Expansion Valve Part Number: 23224322
$89.36 MSRP: $183.63You Save: $94.27 (52%)Ships in 1-2 Business DaysProduct Specifications- Other Name: Valve Kit-Auxiliary A/C Evaporator Thermal Expansion; A/C Expansion Valve; Valve Kit, A/C Expansion Refrigerant; Valve Kit, A/C Evaporator
Cadillac Expansion Valve Part Number: 84055932
$99.48 MSRP: $180.06You Save: $80.58 (45%)Ships in 1-2 Business DaysProduct Specifications- Other Name: Valve Kit, Air Conditioner Expansion Refrigerant; A/C Expansion Valve; Valve Kit, A/C Expansion Refrigerant

Cadillac Expansion Valve Part Number: 22816195
$50.79 MSRP: $150.31You Save: $99.52 (67%)Ships in 1-2 Business DaysProduct Specifications- Other Name: Valve, Air Conditioner Evaporator; A/C Expansion Valve; Valve, A/C Expansion Refrigerant; Valve, A/C Evaporator

Cadillac Expansion Valve Part Number: 20782085
$44.68 MSRP: $91.83You Save: $47.15 (52%)Ships in 1-2 Business DaysProduct Specifications- Other Name: Valve Kit, Air Conditioner Expansion Refrigerant; A/C Expansion Valve; Valve Kit, A/C Expansion Refrigerant


Cadillac Expansion Valve Part Number: 89018980
$76.89 MSRP: $137.30You Save: $60.41 (44%)Product Specifications- Other Name: Valve Kit, A/C Evaporator Thermal Expansion; A/C Expansion Valve; Valve Kit, A/C Expansion Refrigerant
- Replaces: 89018639

Cadillac Expansion Valve Part Number: 9119416
Product Specifications- Other Name: Valve, A/C Evaporator Thermostat Expansion; A/C Expansion Valve; Valve, A/C Expansion Refrigerant

Cadillac Expansion Valve Part Number: 25740393
Product Specifications- Other Name: Valve Kit, A/C Evaporator Thermal Expansion; A/C Expansion Valve; Thermistor; Valve Kit, A/C Expansion Refrigerant

Cadillac Expansion Valve Part Number: 19129799
Product Specifications- Other Name: Valve Assembly, Auxiliary A/C Evaporator Thermal Expansion; A/C Expansion Valve; Valve, A/C Expansion Refrigerant
- Replaces: 88957406
| Page 1 of 2 |Next >
1-20 of 28 Results
Cadillac A/C Expansion Valve
Want to cut long-term maintenance and repair costs? Choose OEM A/C Expansion Valve. Those parts deliver top durability you can trust. On our site, you'll find a huge catalog of genuine Cadillac parts. Prices are unbeatable, so you can keep more in your pocket. Every OEM Cadillac A/C Expansion Valve includes a manufacturer's warranty. You can also get an easy return policy that keeps buying risk free. Fast delivery, get your car on the road quickly. It's simple to search, compare, and order. Stop guessing about quality or fit. Order today and save with parts that last.
Cadillac A/C Expansion Valve Parts Questions & Experts Answers
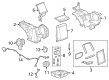
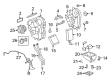
- Q: How to properly install an A/C Expansion Valve on Cadillac CTS?A:Starting the air conditioning Evaporator thermal expansion valve replacement requires first removing the hvac module. Before disposal the insulation should be taken off from the thermal expansion valve (TXV). The replacement of the air conditioning Evaporator thermal expansion valve begins by unscrewing the hvac line clamp screw and hvac line clamp. The process ends with taking out the bolts that fasten the txv to the Evaporator. Pull the txv straight out from the Evaporator core by detaching the line bracket until it separates from the a/c lines. Apply lubrication on the o-rings before connecting the lines to the txv and gently slide the txv onto the Evaporator core until it reaches full position. Mount the txv line bracket on the Evaporator core while following the specified fastener precautionary steps. Use bolts with torque of 3.5 nm (31 lb in) to secure the txv to the Evaporator. Reattach the hvac line clamp by fastening the clamp screw to 1 nm (8 lb in). To complete the installation you should reinstall the hvac module followed by new insulation applied to the affected lines and txv.
- Q: How to replace the A/C Expansion Valve in an A/C system on Cadillac SRX?A:After obtaining the refrigerant from the a/c system you can begin replacing the A/C Expansion Valve (TXV). The removal process begins with taking away both the i/p retainer and insulation material from the A/C Expansion Valve. Begin the procedure by first removing the hvac line clamp screw before taking away the hvac line clamp. Then unfasten the A/C Expansion Valve to Evaporator bolts followed by the A/C Expansion Valve line bracket. First disconnect and then carefully straighten out the A/C Expansion Valve from the Evaporator core before removing it from the a/c lines while disposing of all the o-rings. Start with o-ring application before attaching the a/c lines to the A/C Expansion Valve unit during installation tasks. Fix the A/C Expansion Valve onto the Evaporator core by using an A/C Expansion Valve line bracket for installation security. Begin by installing the hvac line clamp followed by securing the A/C Expansion Valve to Evaporator bolts at 3.5 n.m (31 lb in) while tightening the screw of the clamp to 1 n.m (9 lb in). The installation process ends with positioning insulation on lines and A/C Expansion Valve followed by the installation of the i/p retainer and evacuation of the system and conclusion of a leak test through the fittings by using the halogen leak detector (J 39400-A).
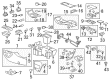
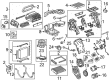
- Q: How to Properly Service and Replace an A/C Expansion Valve on Cadillac XLR?A:Before installing the thermal expansion valve (TXV) the first step is to recover the refrigerant from the air conditioning system. The second step requires uninstalling the rear Evaporator line assembly. After recovering refrigerant you should remove the txv to Evaporator core mounting bolts then detach the txv from the Evaporator before removing it from the vehicle. The technician needs to eliminate the Evaporator core seal washers and cap installation or protect the core with tape. Begin the installation process by removing cap or tape from the Evaporator core and then add new seal washers. Before installation of the txv to the Evaporator core ensure the mounting bolts achieve a torque setting of 7 n.m (62 lb in). Replace the rear Evaporator line assembly afterward evacuate the a/c system and recharge it. A final leak test on the component fittings must be done with the use of halogen leak detector (J 39400-A).


Related Cadillac Parts
 Cadillac Blower Motor
 Cadillac Blower Motor Resistor
 Cadillac Heater Core
 Cadillac A/C Accumulator
 Cadillac A/C Compressor Cut-Out Switches
 Cadillac A/C Condenser
 Cadillac A/C Hose
 Cadillac A/C Idler Pulley
 Cadillac A/C Service Cap
 Cadillac A/C Switch
 Cadillac Air Temperature Sensor
 Cadillac Evaporator