ChevyParts
My Garage
My Account
Cart
OEM Cadillac A/C Switch
Air Conditioning Switch- Select Vehicle by Model
- Select Vehicle by VIN
Select Vehicle by Model
orMake
Model
Year
Select Vehicle by VIN
For the most accurate results, select vehicle by your VIN (Vehicle Identification Number).
227 A/C Switches found

Cadillac Control Switch Knob Part Number: 3548715
$13.11Product Specifications- Other Name: Knob Assembly-Auxiliary Blower Switch; Knob, Blower Air Inlet

Cadillac Control Switch, Gray Part Number: 25754560
$59.81 MSRP: $434.10You Save: $374.29 (87%)Ships in 1-2 Business DaysProduct Specifications- Other Name: Control, Heater And Air Conditioner Control; Control Assembly; Control, Heater And A/C Control; Control, Heater Control
- Replaces: 25747325, 25687282, 25746335

Cadillac Heater Control, Front Part Number: 19370231
$237.42 MSRP: $373.56You Save: $136.14 (37%)Product Specifications- Other Name: Control Assembly, Heater & A/C (W/Front Seat Heater & Cushion Vent F; Climate Control Module; Blower Control Switch; Dash Control Unit
- Position: Front
- Replaces: 15910864, 25809868, 25928681, 25811055, 25936307, 15926354

Cadillac Heater Control, Front Part Number: 20921721
$295.77 MSRP: $526.74You Save: $230.97 (44%)Product Specifications- Other Name: Control Assembly-Heater & A/C (W/Front Seat Heater; Climate Control Module; Blower Control Switch; Dash Control Unit; Control, A/C Instrument Panel
- Position: Front

Cadillac Switch Part Number: 12199058
Product Specifications- Other Name: Switch, Air Conditioner Electric Temperature And Motor Control; Switch, A/C Electric Temperature And Motor Control; Switch, Heater Control

Cadillac Temperature Control Part Number: 16209335
Product Specifications- Other Name: Switch, Air Conditioner Electric Temperature And Motor Control; Blower Control Switch; Blower Motor Switch; Switch, A/C Electric Temperature And Motor Control
Cadillac Blower Motor Switch Part Number: 16209345
Product Specifications- Other Name: Switch, Air Conditioner Electric Temperature And Motor Control; Blower Control Switch; Switch, A/C Electric Temperature And Motor Control

Cadillac Blower Motor Switch Part Number: 15687027
Product Specifications- Other Name: Switch Assembly-Auxiliary Heater; Climate Control Module; Blower Control Switch; Switch; Switch, Heater Control

Cadillac Temperature Control Part Number: 16181185
Product Specifications- Other Name: Control, Auxiliary Heater & A/C; Climate Control Module; Control Unit; Heater & A/C Control; Control, A/C Instrument Panel; Control, Heater Control
 Product Specifications
- Other Name: Control Assembly, Heater & A/C (W/Driver Seat & Passenger Seat Heater); Climate Control Module
- Position: Driver Side Passenger Side
- Replaces: 25936296

Cadillac Heater Control Part Number: 16240135
Product Specifications- Other Name: Control, Heater And Air Conditioner Control; Climate Control Module; Blower Control Switch; Dash Control Unit; Control, Heater Control
- Replaces: 16199075

Cadillac Radio Control Part Number: 15850811
Product Specifications- Other Name: Control, Heater & A/C (W/Amplitude Modulation/Frequency Modulation Stereo Radio); Control, A/C Instrument Panel; Control, Heater Control; Control, Radio Receiver
- Replaces: 10358083, 15204784, 15767147
Cadillac Heater Control, Driver Side Part Number: 25928678
Product Specifications- Other Name: Control Assembly-Heater & A/C (W/Driver Seat & P; Climate Control Module; Blower Control Switch
- Position: Driver Side
- Replaces: 15910862, 15926351, 25809865
Cadillac Heater Control, Front Part Number: 19370222
Product Specifications- Other Name: Control Assembly, Heater & A/C (W/Front Seat Heater & Cushion Vent F; Climate Control Module; Blower Control Switch; Dash Control Unit; Control, A/C Instrument Panel
- Position: Front
- Replaces: 20921720
Cadillac Heater Control, Driver Side Part Number: 25809867
Product Specifications- Other Name: Control Assembly-Heater & A/C (W/Driver Seat & P; Climate Control Module; Blower Control Switch
- Position: Driver Side
- Replaces: 15926353, 15911822
Cadillac Heater Control, Driver Side Part Number: 15910863
Product Specifications- Other Name: Control Assembly-Heater & A/C (W/Driver Seat & P; Climate Control Module; Blower Control Switch; Dash Control Unit
- Position: Driver Side

Cadillac Heater Control, Front Part Number: 22866555
$235.74 MSRP: $419.08You Save: $183.34 (44%)Product Specifications- Other Name: Control Assembly-Heater & A/C (W/Front Seat Heater; Climate Control Module; Blower Control Switch; Dash Control Unit; Control, A/C Instrument Panel
- Position: Front
- Replaces: 20921719
Cadillac Heater Control, Front Part Number: 20878804
Product Specifications- Other Name: Control Assembly-Heater & A/C (W/Front Seat Heater; Climate Control Module; Blower Control Switch; Dash Control Unit; Control, A/C Instrument Panel
- Position: Front


Cadillac Control Module Part Number: 16180786
Product Specifications- Other Name: Programmer, Air Conditioner Electric Temperature And Motor Control; A/C Programmer; Programmer, A/C Electric Temperature And Motor Control
- Replaces: 16210961, 16192686

Cadillac Control Module Part Number: 16231496
Product Specifications- Other Name: Programmer Assembly-Heater & A/C; A/C Programmer; Programmer, A/C Electric Temperature And Motor Control
- Replaces: 16210756, 16251306
| Page 1 of 12 |Next >
1-20 of 227 Results
Cadillac A/C Switch
Want to cut long-term maintenance and repair costs? Choose OEM A/C Switch. Those parts deliver top durability you can trust. On our site, you'll find a huge catalog of genuine Cadillac parts. Prices are unbeatable, so you can keep more in your pocket. Every OEM Cadillac A/C Switch includes a manufacturer's warranty. You can also get an easy return policy that keeps buying risk free. Fast delivery, get your car on the road quickly. It's simple to search, compare, and order. Stop guessing about quality or fit. Order today and save with parts that last.
Cadillac A/C Switch Parts Questions & Experts Answers
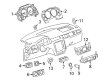
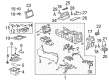
- Q: How to service and repair the front auxiliary A/C Switch assembly on Cadillac Escalade?A:Start servicing the front auxiliary control assembly by unscrewing the console roof then extracting the console from its headliner position. First disconnect all electrical connectors of the console then remove the console from the vehicle. Begin detachment of the hvac control assembly from the console by pressing the 4 tabs positioned on the back of the assembly. Begin installation by mounting the hvac control assembly onto the console followed by plugging the electrical connectors back into the console. Install the console back on the headliner before securing it to the overhead console screw until it achieves 2 n.m (18 lb in) torque.
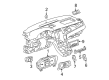
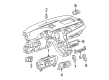
- Q: How to replace the A/C Switch control module on Cadillac CTS?A:A screw behind the ashtray should be removed before commencing HVAC Control Module replacement. Start by pulling each side outward until the HVAC Control Module trim plate becomes free. After that disconnect the HVAC Control Module electrical connector and the ash tray electrical connector. Remove the HVAC Control Module screws before you take away the HVAC Control Module. Secure the HVAC Control Module into the trim plate through its screws and tighten them to 2 n.m (18 lb in). After reconnecting the HVAC Control Module electrical connector and the ash tray electrical connector users must apply pressure on the trim plate until its tabs find proper engagement. Screw the nut behind the ashtray while applying 2 n.m (18 lb in) torque.
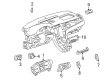
- Q: How to replace the A/C Switch control module on Cadillac XLR?A:Start by disconnecting the battery then remove the i/p accessory trim plate before unfastening the HVAC Control Module retaining screws to extract the component. Install the HVAC Control Module onto the i/p trim plate according to the fastener notice then secure the module with retaining screws tight to 1.6 n.m (14 lb in). Start by connecting electric cables to the hvac control unit then install the i/p accessory assembly before restoring power to the system. Adjustments of HVAC Control Module controls during self-calibration should always stay unchanged because improper system performance might result. Engine operation needs to continue for a minimum of one minute for the calibration process to finish successfully.


Related Cadillac Parts
 Cadillac Cabin Air Filter
 Cadillac Blower Motor
 Cadillac Blower Motor Resistor
 Cadillac Heater Core
 Cadillac A/C Compressor
 Cadillac A/C Compressor Cut-Out Switches
 Cadillac A/C Condenser
 Cadillac A/C Service Cap
 Cadillac A/C System Valve Core
 Cadillac Air Temperature Sensor
 Cadillac Ambient Temperature Sensor
 Cadillac Blower Control Switches