ChevyParts
My Garage
My Account
Cart
OEM Cadillac A/C Hose
Air Conditioning Hose- Select Vehicle by Model
- Select Vehicle by VIN
Select Vehicle by Model
orMake
Model
Year
Select Vehicle by VIN
For the most accurate results, select vehicle by your VIN (Vehicle Identification Number).
263 A/C Hoses found


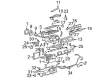
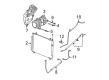
Cadillac Discharge Hose Part Number: 25759699
$85.62 MSRP: $175.96You Save: $90.34 (52%)Ships in 1-2 Business DaysProduct Specifications- Other Name: Hose, Air Conditioner Compressor; A/C Refrigerant Liquid Hose; A/C Hose; A/C Hoses; Hose, A/C Compressor
- Replaces: 25733472


Cadillac Front A/C Tube Part Number: 23108201
$73.03 MSRP: $137.14You Save: $64.11 (47%)Ships in 1-2 Business DaysProduct Specifications- Other Name: Tube, Air Conditioner Refrigerant (All Metal); A/C Refrigerant Liquid Hose; A/C Hose; Tube, A/C Refrigerant (All Metal)


Cadillac A/C Hoses Part Number: 25743031
$11.18 MSRP: $20.85You Save: $9.67 (47%)Product Specifications- Other Name: Hose, Air Conditioner Compressor; A/C Refrigerant Liquid Hose; A/C Hose; Suction Hose; Hose, A/C Compressor


Cadillac Tube Part Number: 52468304
$7.41 MSRP: $13.92You Save: $6.51 (47%)Ships in 1-2 Business DaysProduct Specifications- Other Name: Tube, Air Conditioner Blower Motor Cooling; A/C Refrigerant Liquid Hose; A/C Hose; Tube, A/C Blower Motor Cooling; Tube, Heater Motor Cooling; Tube, Heater Blower Motor

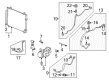
Cadillac Liquid & Suction Hose Assembly. Part Number: 23323370
$53.36 MSRP: $157.96You Save: $104.60 (67%)Ships in 1-2 Business DaysProduct Specifications- Other Name: Hose, Air Conditioner Refrigerant (Metal And Rubber Sections); A/C Refrigerant Liquid Hose; A/C Hose; Rear A/C Tube; Hose, A/C Refrigerant (Metal And Rubber Sections)
- Replaced by: 84341888

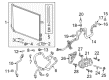
Cadillac Suction & Discharge Hose Assembly Part Number: 84852343
$122.28 MSRP: $361.94You Save: $239.66 (67%)Ships in 1-3 Business DaysProduct Specifications- Other Name: Hose Kit-Auxiliary A/C Evaporator; A/C Refrigerant Liquid Hose; A/C Hose; Hose Kit, A/C Compressor And Condenser

Cadillac Discharge Hose Part Number: 84498819
$70.89 MSRP: $209.84You Save: $138.95 (67%)Ships in 1-2 Business DaysProduct Specifications- Other Name: Hose, Air Conditioner Refrigerant (Metal And Rubber Sections); Suction Hose; Rear A/C Tube; Hose, A/C Refrigerant (Metal And Rubber Sections)
- Replaces: 84341884, 23111445

Cadillac Discharge Hose Part Number: 23296967
$93.12 MSRP: $174.87You Save: $81.75 (47%)Ships in 1-2 Business DaysProduct Specifications- Other Name: Hose, Air Conditioner Refrigerant (Metal And Rubber Sections); A/C Refrigerant Liquid Hose; A/C Hose; Rear A/C Tube; Hose, A/C Refrigerant (Metal And Rubber Sections)

Cadillac A/C Tube Part Number: 19418050
$77.45 MSRP: $144.53You Save: $67.08 (47%)Ships in 1-2 Business DaysProduct Specifications- Other Name: Tube Assembly, A/C Condenser; A/C Refrigerant Liquid Hose; A/C Hose; Tube, A/C Refrigerant (All Metal)
- Replaces: 25859130

Cadillac Discharge Hose Part Number: 84498820
$117.76 MSRP: $221.14You Save: $103.38 (47%)Ships in 1-2 Business DaysProduct Specifications- Other Name: Hose, Air Conditioner Refrigerant (Metal And Rubber Sections); A/C Refrigerant Liquid Hose; A/C Hose; Suction Hose; Rear A/C Tube; Hose, A/C Refrigerant (Metal And Rubber Sections)
- Replaces: 23228913, 22858115, 84341885
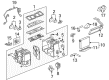
Cadillac Discharge Hose Part Number: 84498818
$123.09 MSRP: $231.16You Save: $108.07 (47%)Product Specifications- Other Name: Hose, Air Conditioner Refrigerant (Metal And Rubber Sections); A/C Refrigerant Liquid Hose; A/C Hose; Suction Hose; Rear A/C Tube; Hose, A/C Refrigerant (Metal And Rubber Sections)
- Replaces: 84341883, 23108203
Cadillac Discharge Hose Part Number: 84498822
$130.45 MSRP: $236.10You Save: $105.65 (45%)Ships in 1-2 Business DaysProduct Specifications- Other Name: Hose, Air Conditioner Refrigerant (Metal And Rubber Sections); A/C Refrigerant Liquid Hose; A/C Hose; Suction Hose; Rear A/C Tube; Hose, A/C Refrigerant (Metal And Rubber Sections)
- Replaces: 22878732, 23228915, 84341887

Cadillac Discharge Hose Part Number: 19169340
$112.28 MSRP: $230.72You Save: $118.44 (52%)Ships in 1-2 Business DaysProduct Specifications- Other Name: Hose Assembly, A/C Compressor; A/C Refrigerant Liquid Hose; A/C Hose; Hose, A/C Compressor
- Replaces: 25709380

Cadillac A/C Tube Part Number: 25745132
$151.67 MSRP: $274.52You Save: $122.85 (45%)Ships in 1-2 Business DaysProduct Specifications- Other Name: Tube, Air Conditioner Refrigerant (All Metal); A/C Refrigerant Liquid Hose; A/C Hose; Tube, A/C Refrigerant (All Metal)

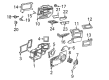
Cadillac Outlet Tube Part Number: 25876660
$45.03 MSRP: $92.55You Save: $47.52 (52%)Ships in 1-2 Business DaysProduct Specifications- Other Name: Tube, Air Conditioner Refrigerant (All Metal); A/C Refrigerant Liquid Hose; A/C Hose; Front A/C Tube; Tube, A/C Refrigerant (All Metal)

Cadillac Liquid & Suction Hose Assembly. Part Number: 23108200
$75.29 MSRP: $136.26You Save: $60.97 (45%)Ships in 1-2 Business DaysProduct Specifications- Other Name: Tube, Air Conditioner Refrigerant (All Metal); A/C Refrigerant Liquid Hose; A/C Hose; Front A/C Tube; Tube, A/C Refrigerant (All Metal)

Cadillac Liquid & Suction Hose Assembly. Part Number: 22893424
$86.07 MSRP: $155.76You Save: $69.69 (45%)Ships in 1-2 Business DaysProduct Specifications- Other Name: Tube, Air Conditioner Refrigerant (All Metal); A/C Refrigerant Liquid Hose; A/C Hose; Front A/C Tube; Tube, A/C Refrigerant (All Metal)


Cadillac Discharge Hose Part Number: 25742863
Product Specifications- Other Name: Hose, Air Conditioner Compressor; A/C Refrigerant Liquid Hose; A/C Hose; A/C Hoses; Hose, A/C Compressor


Cadillac Discharge Hose Part Number: 22752064
Product Specifications- Other Name: Hose, Air Conditioner Compressor; A/C Refrigerant Liquid Hose; A/C Hose; Hose, A/C Compressor
- Replaces: 25892337


Cadillac Evaporator Tube Part Number: 15043169
Product Specifications- Other Name: Hose Assembly-Auxiliary A/C Evaporator; A/C Refrigerant Liquid Hose; A/C Hose
- Replaced by: 19330875
| Page 1 of 14 |Next >
1-20 of 263 Results
Cadillac A/C Hose
Want to cut long-term maintenance and repair costs? Choose OEM A/C Hose. Those parts deliver top durability you can trust. On our site, you'll find a huge catalog of genuine Cadillac parts. Prices are unbeatable, so you can keep more in your pocket. Every OEM Cadillac A/C Hose includes a manufacturer's warranty. You can also get an easy return policy that keeps buying risk free. Fast delivery, get your car on the road quickly. It's simple to search, compare, and order. Stop guessing about quality or fit. Order today and save with parts that last.
Cadillac A/C Hose Parts Questions & Experts Answers
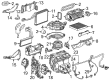
- Q: How to replace the A/C Hose in an A/C system on Cadillac CTS?A:The first step to replace the condenser tube involves recovering the refrigerant from the system. You need to start by recovering the refrigerant before moving on to remove both the air cleaner assembly with the a/c quick connect fitting from the liquid line. The first step involves lifting the vehicle before front air deflector removal. First you should remove the condenser tube to condenser retaining bolt but after that you need to disconnect the condenser tube from the fan shroud retainer clip, the condenser and the liquid line before disconnecting the a/c pressure sensor electrical connector for condenser tube removal. You should remove the a/c pressure sensor next before discarding its o-rings. Install new o-rings to the condenser tube then connect the a/c pressure sensor before attaching the condenser tube. The installation involves using the same sequence to connect the a/c pressure sensor electrical connector with the condenser tube leading to the liquid line and the condenser unit while also clipping it into the fan shroud retainer. Screw the condenser tube to the condenser-retaining bolt before torquing it to 9 n.m (80 lb in). After lowering the vehicle you should put back the front air deflector then finish by mounting the a/c quick connect fitting to the liquid line and the air cleaner assembly. The last step involves strengthening the a/c system by evacuation and recharging after testing all component fittings with the halogen leak detector (J 39400-A).
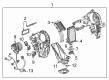
- Q: How to Replace an A/C Hose in the Evaporator Tube System on Cadillac Escalade?A:First recover the refrigerant before separating the evaporator from its tube by removing its nut. After that disconnect the evaporator tube. First disconnect the evaporator tube from the auxiliary A/C tube by removing its nut when equipped. The vehicle requires removal of both the right park/turn signal lamp together with the grille as the initial step. First disconnect the evaporator tube from the condenser and remove the evaporator tube nut from the condenser then proceed to take off the evaporator tube from the vehicle. All existing sealing washers need to be thrown out while each open connection needs to be properly sealed. New sealing washers should be used to connect the evaporator tube to the condenser before installing the evaporator tube nut to the condenser while tightening it to 16 N.m (12 lb ft). Replace the grille followed by the right park/turn signal lamp into position. Attach the evaporator tube to the auxiliary A/C tube through new sealing washers after installing the evaporator tube nut to the auxiliary A/C tube while tightening it to 16 N.m (12 lb ft). You should install the evaporator tube to the evaporator then place the evaporator tube nut to the evaporator before tightening it to 16 N.m (12 lb ft). Evacuate and recharge the system while conducting a leak test on components' fittings by using the Halogen Leak Detector (J 39400-A).
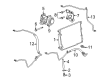
- Q: How to Change the A/C Hose in a Cadillac XLR?A:The first step to install a new air conditioning evaporator front tube is to extract refrigerant from the a/c system. Discharge the battery power after detaching the a/c tube connector at the evaporator rear line assembly. The distributer of the front evaporator inlet line needs disconnection from the body retaining clip as well as from the refrigerant pressure sensor electrical connector . Raise and support the vehicle before removing the front evaporator inlet line to A/C Condenser lower bolt but ensure to cap or tape open a/c components to avoid contamination. Use hacksaw pliers to disconnect front evaporator line inlet from A/C Condenser then remove washing seal then tape up or apply a cap on the open A/C Condenser. Lower the vehicle while you disconnect the front evaporator inlet line from the evaporator rear line assembly and discard the o-rings by capping or taping the evaporator rear line assembly. The front evaporator inlet line removal requires you to disconnect surge tank outlet hose and inlet heater hose from the underhood junction box retainer clip. To set up the front evaporator inlet line users must first attach it to the vehicle then connect surge tank outlet hose and inlet heater hose at the underhood junction box retainer clip. Apply new o-rings on the rear evaporator line assembly and then remove the front evaporator rear-line assembly cap or tape. Raise the vehicle after joining the evaporator rear line assembly to the front evaporator inlet line and then remove the cap or tape from the A/C Condenser. The front evaporator inlet line requires a new sealing washer before connection to the A/C Condenser which must be tightened to 16 nm (12 lb ft). Lower the vehicle position and connect the front evaporator inlet line to the body retaining clip and at the same time install the refrigerant pressure sensor electrical connector . Before rehanging the battery the a/c tube connector installation will take place at the evaporator rear line assembly followed by an evacuation-charging process and leak test of component fittings using j 39400-a.


Related Cadillac Parts
 Cadillac Cabin Air Filter
 Cadillac A/C Accumulator
 Cadillac A/C Clutch
 Cadillac A/C Compressor Cut-Out Switches
 Cadillac A/C Condenser
 Cadillac A/C Orifice Tube
 Cadillac A/C Switch
 Cadillac Air Temperature Sensor
 Cadillac Ambient Temperature Sensor
 Cadillac Evaporator
 Cadillac HVAC Control Module
 Cadillac HVAC Pressure Switch