ChevyParts
My Garage
My Account
Cart
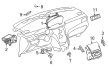
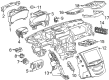
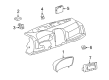
OEM Cadillac HVAC Control Module
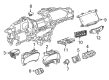
Heater Control Assembly- Select Vehicle by Model
- Select Vehicle by VIN
Select Vehicle by Model
orMake
Model
Year
Select Vehicle by VIN
For the most accurate results, select vehicle by your VIN (Vehicle Identification Number).
67 HVAC Control Modules found

Cadillac Heater Control Part Number: 13594969
$33.93 MSRP: $63.72You Save: $29.79 (47%)Ships in 1-2 Business DaysProduct Specifications- Other Name: Control Assembly-Heater & A/C Remote; Climate Control Module; Blower Control Switch; Control, Heater And A/C Control

Cadillac Heater Control Part Number: 84214111
$251.86 MSRP: $472.98You Save: $221.12 (47%)Ships in 1-2 Business DaysProduct Specifications- Other Name: Control Assembly-Heater & A/C User Interface; Climate Control Module; Blower Control Switch; Dash Control Unit
- Replaced by: 84447808


Cadillac Control Module Part Number: 16047800
$180.58 MSRP: $326.84You Save: $146.26 (45%)Ships in 1-2 Business DaysProduct Specifications- Other Name: Ambient Temperature Sensor; Air Temperature Sensor; Power Module; In-Car Sensor; Module
- Replaced by: 12484912

Cadillac Blower Motor Resistor Part Number: 84488485
$39.23 MSRP: $70.05You Save: $30.82 (44%)Ships in 1-3 Business DaysProduct Specifications- Other Name: Module Assembly-Blower Motor Control; Module; Module, A/C Electric Temperature And Motor Control; Module, Heater Control
Cadillac Control Module Part Number: 13589028
$120.43 MSRP: $226.17You Save: $105.74 (47%)Ships in 1-2 Business DaysProduct Specifications- Other Name: Control Assembly-Heater & A/C Remote; Climate Control Module; Blower Control Switch; Heater Control; Control, Heater And A/C Control
- Replaces: 13587259, 13588178

Cadillac Module Part Number: 84428986
$71.58 MSRP: $129.56You Save: $57.98 (45%)Ships in 1-2 Business DaysProduct Specifications- Other Name: Control Assembly-Heater & A/C Remote; Control, Heater And A/C Control
- Replaces: 13508457
Cadillac Control Module Part Number: 13506233
$89.82 MSRP: $168.68You Save: $78.86 (47%)Ships in 1-2 Business DaysProduct Specifications- Other Name: Control Assembly-Heater & A/C Remote; Climate Control Module; Blower Control Switch; Heater Control; Control, Heater And A/C Control

Cadillac Heater Control Part Number: 84295779
$235.93 MSRP: $423.20You Save: $187.27 (45%)Ships in 1-3 Business DaysProduct Specifications- Other Name: Control Assembly-Heater & A/C User Interface; Climate Control Module; Blower Control Switch; Dash Control Unit
- Replaced by: 85759686
Cadillac Control Module Part Number: 84428981
$84.49 MSRP: $158.66You Save: $74.17 (47%)Ships in 1-2 Business DaysProduct Specifications- Other Name: Control Assembly-Heater & A/C Remote; Heater Control; Module; Control, Heater And A/C Control
- Replaces: 13508454
Cadillac Control Module Part Number: 13589027
$130.28 MSRP: $244.65You Save: $114.37 (47%)Ships in 1-2 Business DaysProduct Specifications- Other Name: Control Assembly-Heater & A/C Remote; Climate Control Module; Blower Control Switch; Heater Control; Control, Heater And A/C Control
- Replaces: 13588179

Cadillac Temperature Control Part Number: 84890593
$205.43 MSRP: $368.50You Save: $163.07 (45%)Ships in 1-3 Business DaysProduct Specifications- Other Name: Control Assembly-Heater & A/C User Interface; Climate Control Module; Blower Control Switch; Heater Control; Dash Control Unit
- Replaced by: 84975102
Cadillac Heater Control Part Number: 84428987
$93.25 MSRP: $168.78You Save: $75.53 (45%)Product Specifications- Other Name: Control Assembly-Heater & A/C Remote; Climate Control Module; Blower Control Switch; Module; Control, Heater And A/C Control
- Replaces: 13508445
Cadillac Control Module Part Number: 84237330
$81.41 MSRP: $152.88You Save: $71.47 (47%)Ships in 1-2 Business DaysProduct Specifications- Other Name: Control Assembly-Heater & A/C Remote; Control, Heater And A/C Control
- Replaces: 84097844, 13595250
Cadillac Module Part Number: 13590949
$93.80 MSRP: $167.50You Save: $73.70 (44%)Ships in 1-2 Business DaysProduct Specifications- Other Name: Control Assembly-Heater & A/C Remote; Control, Heater And A/C Control

Cadillac Heater Control Part Number: 25770602
$166.51 MSRP: $418.90You Save: $252.39 (61%)Ships in 1-2 Business DaysProduct Specifications- Other Name: Control Assembly-Heater & A/C; Climate Control Module; Blower Control Switch; Dash Control Unit
Cadillac Control Module Part Number: 84237329
$84.50 MSRP: $158.67You Save: $74.17 (47%)Ships in 1-2 Business DaysProduct Specifications- Other Name: Control Assembly-Heater & A/C Remote; Climate Control Module; Blower Control Switch; Heater Control
- Replaces: 84097843
Cadillac Control Module Part Number: 13506234
$92.10 MSRP: $172.97You Save: $80.87 (47%)Ships in 1-2 Business DaysProduct Specifications- Other Name: Control Assembly-Heater & A/C Remote; Climate Control Module; Blower Control Switch; Heater Control; Control, Heater And A/C Control

Cadillac Module Part Number: 84464948
$127.53 MSRP: $230.82You Save: $103.29 (45%)Ships in 1-2 Business DaysProduct Specifications- Other Name: Control Assembly-Heater & A/C Remote; Control, Heater And A/C Control
- Replaces: 13594260, 84130198, 84193149, 84313290

Cadillac Heater Control Part Number: 13598193
$129.51 MSRP: $266.14You Save: $136.63 (52%)Ships in 1-2 Business DaysProduct Specifications- Other Name: Control Assembly-Heater & A/C Remote; Climate Control Module; Blower Control Switch; Dash Control Unit; Controller
- Replaced by: 13516018
Cadillac Heater Control Part Number: 84097844
$81.41 MSRP: $152.88You Save: $71.47 (47%)Ships in 1-2 Business DaysProduct Specifications- Other Name: Control Assembly-Heater & A/C Remote; Climate Control Module; Blower Control Switch; Control, Heater And A/C Control
- Replaced by: 84237330
| Page 1 of 4 |Next >
1-20 of 67 Results
Cadillac HVAC Control Module
Want to cut long-term maintenance and repair costs? Choose OEM HVAC Control Module. Those parts deliver top durability you can trust. On our site, you'll find a huge catalog of genuine Cadillac parts. Prices are unbeatable, so you can keep more in your pocket. Every OEM Cadillac HVAC Control Module includes a manufacturer's warranty. You can also get an easy return policy that keeps buying risk free. Fast delivery, get your car on the road quickly. It's simple to search, compare, and order. Stop guessing about quality or fit. Order today and save with parts that last.
Cadillac HVAC Control Module Parts Questions & Experts Answers
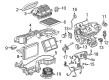
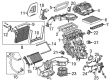
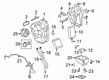
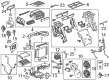
- Q: How to Service and Repair the HVAC Control Module on Cadillac Escalade?A:The removal of the right rear quarter trim panel is the initial step in the servicing of Control Module HVAC. Remove the retaining screws securing the processor and also disconnect the electrical connector from the auxiliary blower motor processor. Remove the auxiliary blower motor processor from the auxiliary HVAC module. Installation: Reinstall the auxiliary blower motor processor on to the auxiliary HVAC module with retaining screws tightened to 1,6 N.m (14 lb in). Connect the electrical connector back to the auxiliary blower motor processor and install right rear quarter trim panel.
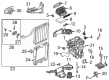
- Q: How to properly remove and install the auxiliary HVAC Control Module on Cadillac DeVille?A:A flat bladed tool will pry out the top of the auxiliary HVAC Control Module before you can remove it from the Center Console/seat and disconnect the electrical connector to finally remove the module from the vehicle. Installation starts by connecting the electrical connector to the auxiliary HVAC Control Module followed by fitting the module bottom into the console and pushing it in at the top to lock the control into place within the console and seat.
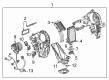
- Q: How to replace the HVAC control module on Cadillac SRX?A:Installation of the new HVAC Control Module should begin with switching off the engine and performing the parking brake followed by selecting the lowest transmission gear. Understanding the HVAC Control Module requires pulling outward on both right and left sides after unscrewing the ashtray support. Remove the HVAC Control Module electrical connector while also removing the ash tray electrical connector. Screws securing the HVAC Control Module need removal before extraction of the module. Set the HVAC Control Module within the trim plate before installing HVAC Control Module screws and tighten them to 2 n.m (18 lb in). Install the HVAC Control Module electrical connector then the ash tray electrical connector. Set the trim plate until all tabs lock in. Next apply a screw behind the ashtray to 2 n.m (18 lb in) tension. To finish the installation space the transmission into park and release the parking brake. The control module references (Testing and Inspection/Programming and Relearning) will provide information regarding programming and setup.


Related Cadillac Parts
 Cadillac Cabin Air Filter
 Cadillac Blower Motor
 Cadillac Blower Motor Resistor
 Cadillac A/C Compressor
 Cadillac A/C Expansion Valve
 Cadillac A/C Hose
 Cadillac A/C Switch
 Cadillac A/C System Valve Core
 Cadillac Air Temperature Sensor
 Cadillac Ambient Temperature Sensor
 Cadillac Evaporator
 Cadillac HVAC Pressure Switch