ChevyParts
My Garage
My Account
Cart
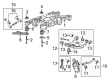
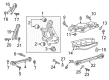
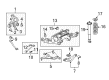
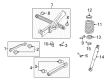
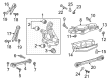
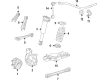
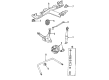
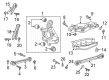
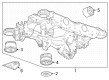
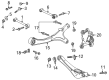
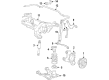
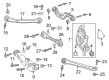
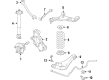
OEM Cadillac Trailing Arm
Trailing Control Arm- Select Vehicle by Model
- Select Vehicle by VIN
Select Vehicle by Model
orMake
Model
Year
Select Vehicle by VIN
For the most accurate results, select vehicle by your VIN (Vehicle Identification Number).
83 Trailing Arms found


Cadillac Lower Control Arm, Rear Driver Side Part Number: 15853188
$246.48 MSRP: $406.05You Save: $159.57 (40%)Ships in 1-2 Business DaysProduct Specifications- Other Name: Arm, Rear Axle Control Arm; Suspension Control Arm and Ball Joint Assembly; Control Arm Assembly; Control Arm
- Position: Rear Driver Side


Cadillac Trailing Arm, Rear Lower Part Number: 84356289
$27.00 MSRP: $44.47You Save: $17.47 (40%)Ships in 1-2 Business DaysProduct Specifications- Other Name: Link Assembly-Rear Suspension Lower Trailing; Control Arm; Lower Arm; Link, Rear Axle Control Arm; Arm, Rear Axle Control Arm
- Position: Rear Lower
- Replaces: 22934959


Cadillac Upper Control Arm, Rear Driver Side Part Number: 15267619
$121.39 MSRP: $199.96You Save: $78.57 (40%)Ships in 1-2 Business DaysProduct Specifications- Other Name: Arm, Rear Axle Control Arm; Suspension Control Arm and Ball Joint Assembly; Control Arm Assembly; Control Arm
- Position: Rear Driver Side
- Replaces: 25766117


Cadillac Upper Control Arm, Rear Part Number: 15767252
$98.75 MSRP: $154.69You Save: $55.94 (37%)Ships in 1-3 Business DaysProduct Specifications- Other Name: Arm, Rear Axle Upper Control; Suspension Control Arm; Control Arm; Arm, Rear Axle Control Arm
- Position: Rear Upper
- Replaces: 15133164, 15208540

Cadillac Upper Control Arm, Rear Passenger Side Part Number: 15267620
$124.73 MSRP: $198.03You Save: $73.30 (38%)Ships in 1-2 Business DaysProduct Specifications- Other Name: Arm, Rear Axle Control Arm; Suspension Control Arm and Ball Joint Assembly; Control Arm Assembly; Control Arm
- Position: Rear Passenger Side
- Replaces: 25766118

Cadillac Lateral Link, Rear Part Number: 84522112
$53.51 MSRP: $83.84You Save: $30.33 (37%)Ships in 1-3 Business DaysProduct Specifications- Other Name: Link, Rear Axle; Integral Link; Lateral Arm; Link Rod
- Position: Rear

Cadillac Lower Control Arm, Rear Part Number: 84522113
$72.62 MSRP: $113.76You Save: $41.14 (37%)Product Specifications- Other Name: Arm, Rear Axle Control Arm; Control Arm
- Position: Rear

Cadillac Control Arm, Rear Part Number: 25710739
$760.02 MSRP: $1201.24You Save: $441.22 (37%)Ships in 1-2 Business DaysProduct Specifications- Other Name: Arm Assembly-Rear Suspension Control; Arm, Rear Axle Control Arm
- Position: Rear

Cadillac Trailing Arm, Rear Part Number: 84965151
$23.18 MSRP: $36.30You Save: $13.12 (37%)Ships in 1-3 Business DaysProduct Specifications- Other Name: Arm Assembly-Rear Suspension Trailing; Control Arm; Lower Arm; Arm, Rear Axle Control Arm
- Position: Rear
- Replaces: 84252037

Cadillac Trailing Arm, Rear Lower Part Number: 85542453
$50.15 MSRP: $78.57You Save: $28.42 (37%)Ships in 1-3 Business DaysProduct Specifications- Other Name: Link Assembly-Rear Suspension Lower Trailing; Lower Arm; Link, Rear Axle Control Arm
- Position: Rear Lower
- Replaced by: 85084532

Cadillac Lower Control Arm, Rear Passenger Side Part Number: 84728686
$83.20 MSRP: $142.87You Save: $59.67 (42%)Ships in 1-2 Business DaysProduct Specifications- Other Name: Arm, Rear Axle Control Arm; Control Arm
- Position: Rear Passenger Side
Cadillac Lower Control Arm, Rear Passenger Side Part Number: 84522114
$72.62 MSRP: $113.76You Save: $41.14 (37%)Product Specifications- Other Name: Arm, Rear Axle Control Arm; Control Arm
- Position: Rear Passenger Side

Cadillac Trailing Arm, Rear Upper Passenger Side Part Number: 84825929
$56.10 MSRP: $71.55You Save: $15.45 (22%)Ships in 1-3 Business DaysProduct Specifications- Other Name: Link Assembly-Rear Suspension Upper Trailing; Link, Rear Axle Control Arm
- Position: Rear Upper Passenger Side
- Replaced by: 85071253

Cadillac Trailing Arm, Rear Upper Part Number: 84339416
$48.85 MSRP: $76.53You Save: $27.68 (37%)Ships in 1-3 Business DaysProduct Specifications- Other Name: Link Assembly-Rear Suspension Upper Trailing; Suspension Trailing Arm; Link, Rear Axle Control Arm
- Position: Rear Upper
- Replaces: 23326917, 84086328

Cadillac Trailing Arm, Rear Passenger Side Part Number: 84591015
$103.08 MSRP: $177.05You Save: $73.97 (42%)Ships in 1-3 Business DaysProduct Specifications- Other Name: Arm Assembly-Rear Suspension Trailing; Arm, Rear Axle Control Arm
- Position: Rear Passenger Side

Cadillac Trailing Arm, Rear Lower Part Number: 84380557
$62.21 MSRP: $105.91You Save: $43.70 (42%)Ships in 1-2 Business DaysProduct Specifications- Other Name: Link Assembly-Rear Suspension Lower Trailing; Suspension Trailing Arm; Control Arm; Lower Arm; Link, Rear Axle Control Arm
- Position: Rear Lower
- Replaces: 22978381
Cadillac Lower Control Arm, Rear Driver Side Part Number: 84728685
$83.20 MSRP: $142.87You Save: $59.67 (42%)Ships in 1-3 Business DaysProduct Specifications- Other Name: Arm, Rear Axle Control Arm; Control Arm
- Position: Rear Driver Side

Cadillac Lower Control Arm, Rear Passenger Side Part Number: 20777472
$102.03 MSRP: $167.00You Save: $64.97 (39%)Ships in 1-2 Business DaysProduct Specifications- Other Name: Arm, Rear Axle Control Arm; Suspension Control Arm; Control Arm
- Position: Rear Passenger Side
- Replaces: 15267638

Cadillac Upper Control Arm, Rear Part Number: 84826379
$49.53 MSRP: $77.60You Save: $28.07 (37%)Product Specifications- Other Name: Arm, Rear Axle Control Arm; Control Arm
- Position: Rear
- Replaces: 84522115

Cadillac Lower Control Arm, Rear Part Number: 84496960
$76.76 MSRP: $131.82You Save: $55.06 (42%)Ships in 1-2 Business DaysProduct Specifications- Other Name: Arm, Rear Axle Control Arm; Control Arm
- Position: Rear
- Replaces: 84380558
| Page 1 of 5 |Next >
1-20 of 83 Results
Cadillac Trailing Arm
Want to cut long-term maintenance and repair costs? Choose OEM Trailing Arm. Those parts deliver top durability you can trust. On our site, you'll find a huge catalog of genuine Cadillac parts. Prices are unbeatable, so you can keep more in your pocket. Every OEM Cadillac Trailing Arm includes a manufacturer's warranty. You can also get an easy return policy that keeps buying risk free. Fast delivery, get your car on the road quickly. It's simple to search, compare, and order. Stop guessing about quality or fit. Order today and save with parts that last.
Cadillac Trailing Arm Parts Questions & Experts Answers
- Q: How to replace the trailing arm on Cadillac CTS?A:To replace the Trailing Arm, one first needs to raise and support the vehicle, after which the tire and wheel should be removed. Use a suitable jack to support the lower Control Arm and unbolt the brake pipe bracket retaining nuts and remove the brake pipe bracket from the mounting studs. Secondly, undo the lower Control Arm to the knuckle mounting bolt and the Trailing Arm to the knuckle mounting nut and bolt. Attach the frame to a suitable jack, unload the rear frame of the vehicle's front bolts, and lift and support the front of the vehicle's rear frame. Then, undo the Trailing Arm to the rear frame mounting bolt and nut before removing the Trailing Arm. Installation starts with the installation of the Trailing Arm and then the Trailing Arm to the frame mounting bolt and nut torqued at 90 nm (66 ft. Lbs.). Take away the support from the frame and put it into place before placing the front bolts at the rear frame and tightening it to 265 nm (195 ft. Lbs.). Second, install the Trailing Arm to the knuckle mounting bolt and nut, and tighten the bolt to 175 nm (129 ft. Lbs.). Mount the brake pipe bracket on to mounting studs and fasten them by the means of the standard hexagon nuts and tighten them to the standard torque of 10 nm(89 inch lbs.). Mount the lower Control Arm to the knuckle and tighten the lower Control Arm to the knuckle mounting bolt to 175 nm (129 ft. Lbs.). Finally, tire and wheel install and lower vehicle.
- Q: How to replace the trailing arm on Cadillac STS?A:To remove Trailing Arm, first raise and prop the vehicle. Take off the tire and wheel, and remove the automatic level control link from the upper Control Arm. Then, remove the brake pipe bracket to retain nuts and remove the bracket from mounting studs. Support the lower Control Arm with the suitable jack and then remove the trailing link to knuckle nut and bolt. After taking the jack out, position the frame using a suitable jack properly, and undo the front bolts from the frame to drop the front of the back frame. Disassemble the trailing link off the frame nut and bolt and then pull the trailing link out of the vehicle. For installation, start off by loosely installing the trailers link to vehicle then the trailing link to frame bolt and nut. Lift the frame with an appropriate jack, bearing in mind fastener caution guidelines. Install the front bolts into the frame and tighten them to 265 nm (195 lb ft) and then remove the jack. Support the lower Control Arm with appropriate jack, for alignment of the trailing link and knuckle and bolt on the trailing link into the knuckle bolt and nut. For tightening: tighten the trailing link to frame nut to 150 nm (111 lb ft) and trailing link to knuckle mounting bolt to 170 nm(125 lb ft). Attach the brake pipe bracket to the mounting studs, using the retaining nuts and tightening them to 10 nm (89 ft lb), then attach the automatic level control link to the upper Control Arm. Finally, filter them and reinstall the tire and wheel before lowering the vehicle.
- Q: How to replace the trailing arm on Cadillac SRX?A:To replace the Trailing Arm lift up and support the vehicle with the tire and the wheel. Unbolt the automatic level control link from the top Control Arm, brake pipe bracket retaining nuts, and remove the brake pipe bracket from the mounting studs. Support the lower Control Arm with an appropriate jack then unknap nut and bolt the leading link to knuckle. After removing the jack, put the frame on a suitable jack and take out the front bolts of the frame in order to bring down the front of the rear frame. Then, remove the trailing link to the frame nut and bolt and pull the trailing link out of the vehicle. Instead for installation, start by disjointing the loosely installation of the trailing link to the vehicle but also disjointing the trailing link to frame bolt and nut. Lift the frame using a suitable jack and bolt the front bolts to the frame, making sure to tighten (265 N.m [195 lb ft]), it. Take off the jack and support the lower Control Arm using an appropriate jack for the alignment of the trailing link and the knuckle. Mount the trailing link to knuckle bolt and nut, tightening the trailing link to frame nut to 150 n.m (111 lb ft) and the trailing link to knuckle mounting bolt to 170 n.m (125 lb ft). Reinstall the brake pipe mounting bracket onto the mounting studs and fixture with the retaining nuts tightening them with a torque of 10 n.m (89 lb in). Finally, connect the automatic level control link to the upper Control Arm, re-install the tyre and wheel, and bring the vehicle down.


Related Cadillac Parts
 Cadillac Wheel Bearing
 Cadillac Axle Beam Mount
 Cadillac Axle Pivot Bushing
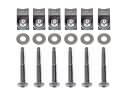 Cadillac Bed Mounting Hardware
 Cadillac Coil Springs
 Cadillac Control Arm Bolt
 Cadillac Control Arm Bracket
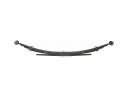 Cadillac Leaf Spring
 Cadillac Shock and Strut Boot
 Cadillac Spindle
 Cadillac Sway Bar Kit
 Cadillac Trailing Arm Bushing