ChevyParts
My Garage
My Account
Cart
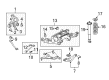
OEM Cadillac STS Trailing Arm
Trailing Control Arm- Select Vehicle by Model
- Select Vehicle by VIN
Select Vehicle by Model
orMake
Model
Year
Select Vehicle by VIN
For the most accurate results, select vehicle by your VIN (Vehicle Identification Number).
8 Trailing Arms found


Cadillac STS Upper Control Arm, Rear Passenger Side Part Number: 15267620
$124.73 MSRP: $198.03You Save: $73.30 (38%)Ships in 1-2 Business Days
Cadillac STS Upper Control Arm, Rear Driver Side Part Number: 15267619
$121.39 MSRP: $199.96You Save: $78.57 (40%)Ships in 1-2 Business Days
Cadillac STS Trailing Arm, Rear Passenger Side Part Number: 25721399
Cadillac STS Trailing Arm, Rear Passenger Side Part Number: 25716672
Cadillac STS Trailing Arm, Rear Driver Side Part Number: 25716671

Cadillac STS Lower Control Arm, Rear Driver Side Part Number: 25716669
Cadillac STS Trailing Arm, Rear Driver Side Part Number: 25716358
Cadillac STS Trailing Arm
Want to cut long-term maintenance and repair costs? Choose OEM Trailing Arm. Those parts deliver top durability you can trust. On our site, you'll find a huge catalog of genuine Cadillac STS parts. Prices are unbeatable, so you can keep more in your pocket. Every OEM Cadillac STS Trailing Arm includes a manufacturer's warranty. You can also get an easy return policy that keeps buying risk free. Fast delivery, get your car on the road quickly. It's simple to search, compare, and order. Stop guessing about quality or fit. Order today and save with parts that last.
The Trailing Arm is an important part of the Cadillac STS's state-of-the-art trailing-link suspension system where it has the lead thrust arm in affecting the linking of the axle to the chassis. Established for reliability and dependability, General Motors' Trailing Arm lessens axle movement upsetting to the vehicle and hence improving steadiness and control. Cadillac STS has used multiple trailing-arm suspensions in its models such as standard and what is referred to as the semi trailing arm suspension helpful in enhancing the car's performance and even the cargo space. This has been so since the Cadillac STS was introduced in 1988 as a mid-size luxury sedan; the Trailing Arm is central in the much hailed driving characteristics. The Trailing Arm usually has several links and a Panhard rod systematically used to give it the necessary side stiffness for stable ride quality even at high speeds. This component contributes not only the efficiency of the Cadillac STS but also impacts the safety of the car; moreover, the extra demanding feature of the car is the Lane Departure System and Blind Spot Alert besides the stability contributing Trailing Arm. Indeed, the Trailing Arm can be identified as quite original in the context of automotive market because the car has a rather sturdy construction and is one of those cars that contributed significantly to the Cadillac STS's reputation of being a luxury sports sedan. All in all, Cadillac Trailing Arm of the car model STS clearly demonstrates Cadillac's principle of making every STS model on the road a superior one.
Cadillac STS Trailing Arm Parts and Q&A
- Q: How to replace the trailing arm on Cadillac STS?A:First, lift and support the vehicle; remove tire and wheel to change the Trailing Arm. Remove the upper Control Arm, first detaching the automatic level control link and then the brake pipe bracket retaining nuts and afterward detach the bracket from the mounting studs. Lift up the lower Control Arm using a suitable jack and unfasten the trailing link to knuckle nut and bolt. After the jack is removed, provide the frame with an appropriate jack and undo the front bolts of the frame to bring down the rear frame front. Next, take off the trailing link to frame nut and bolt, and it out of the vehicle. For install, put back the trailing link in the vehicle placed loosely before tightening it. Mount the trailing link to the frame bolt and nut, and lift up the frame with an adequate jack. Mount the front bolts to the frame and tighten them to 265 nm (195 ft. Lbs.). Pull out the jack and prop up the lower Control Arm with an appropriate jack for alignment of a trailing link and knuckle. Mount the trailing link to knuckle bolt and nut, tightening the trailing link to frame nut to 150 nm (111 ft. Lbs) and the trailing link to knuckle mounting bolt to 170 nm (125 ft. Lbs). Reconnect the brake pipe bracket to the mounting studs, tightening the bracket nuts to 10 nm (89 inch lbs.). Finally, reinstall the automatic level control link to the upper Control Arm, replace the tire and wheel, and lower the vehicle.

Related Cadillac STS Parts
 Cadillac STS Coil Spring Insulator
 Cadillac STS Coil Springs
 Cadillac STS Control Arm
 Cadillac STS Control Arm Bracket
 Cadillac STS Lateral Arm
 Cadillac STS Lateral Link
 Cadillac STS Ride Height Sensor
 Cadillac STS Steering Knuckle
 Cadillac STS Sway Bar Bracket
 Cadillac STS Sway Bar Bushing
 Cadillac STS Sway Bar Kit
 Cadillac STS Sway Bar Link