ChevyParts
My Garage
My Account
Cart
OEM Cadillac XLR Rear Crossmember
Rear Suspension Crossmember- Select Vehicle by Model
- Select Vehicle by VIN
Select Vehicle by Model
orMake
Model
Year
Select Vehicle by VIN
For the most accurate results, select vehicle by your VIN (Vehicle Identification Number).
2 Rear Crossmembers found

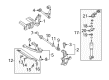
Cadillac XLR Suspension Crossmember, Rear Part Number: 25795639
Cadillac XLR Suspension Crossmember, Rear Part Number: 15864493
Cadillac XLR Rear Crossmember
Want to cut long-term maintenance and repair costs? Choose OEM Rear Crossmember. Those parts deliver top durability you can trust. On our site, you'll find a huge catalog of genuine Cadillac XLR parts. Prices are unbeatable, so you can keep more in your pocket. Every OEM Cadillac XLR Rear Crossmember includes a manufacturer's warranty. You can also get an easy return policy that keeps buying risk free. Fast delivery, get your car on the road quickly. It's simple to search, compare, and order. Stop guessing about quality or fit. Order today and save with parts that last.
Cadillac XLR Rear Crossmember Parts and Q&A
- Q: How to replace the Rear Crossmember in the rear suspension on Cadillac XLR?A:Begin crossmember replacement by elevating the vehicle then supporting it before taking off wheels and tires. Attentively disconnect wheel speed sensors harness connectors and inner tie rod end studs from the Rear Crossmember and the lower Control Arms from the crossmember. Raise and support the rear drive shafts alongside the rear suspension knuckles before you remove the transverse spring. A transmission jack must support the crossmember while you remove the lower nuts from the transaxle mount. Disconnect both electrical harnesses and connectors alongside all brake pipes from the crossmember. You must maintain support under the transaxle while using hand tools to remove the Rear Crossmember mounting nuts through the transmission jack setup. Discard all crossmember mounting nuts after you remove the crossmember framework from its vehicle position. Align the new crossmember's dowel pins to frame rail holes before positioning the transaxle mount studs to face the crossmember. The installation requires new crossmember nuts and their tightness must reach 110 n.m (81 lb ft). After taking out the transmission jack from the Transmission Pan you must reinstall all electrical harnesses and connectors before connecting the brake pipes to their retainers in the crossmember. The installation requires placement of the transaxle mount lower nuts in addition to the transverse spring and lower control arms and the inner tie rod end studs in the crossmember. The wheel speed sensors harness connector needs to be reconnected while installing the tire and wheel assemblies before ultimately lowering the vehicle.

Related Cadillac XLR Parts
 Cadillac XLR Alignment Bolt
 Cadillac XLR Coil Springs
 Cadillac XLR Control Arm
 Cadillac XLR Lateral Link
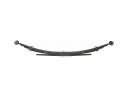 Cadillac XLR Leaf Spring
 Cadillac XLR Ride Height Sensor
 Cadillac XLR Shock Absorber
 Cadillac XLR Sway Bar Bracket
 Cadillac XLR Sway Bar Bushing
 Cadillac XLR Trailing Arm
 Cadillac XLR Wheel Bearing
 Cadillac XLR Wheel Hub