ChevyParts
My Garage
My Account
Cart
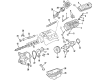
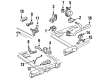
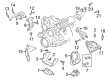
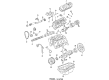
OEM Chevrolet Lumina Engine Mount
Engine Motor Mount- Select Vehicle by Model
- Select Vehicle by VIN
Select Vehicle by Model
orMake
Model
Year
Select Vehicle by VIN
For the most accurate results, select vehicle by your VIN (Vehicle Identification Number).
29 Engine Mounts found


Chevrolet Lumina Motor Mount Part Number: 10448575
$69.62 MSRP: $118.53You Save: $48.91 (42%)Ships in 1-3 Business Days
Chevrolet Lumina Strut Mount Part Number: 10114751
$13.11 MSRP: $17.11You Save: $4.00 (24%)

Chevrolet Lumina Mount Bracket Part Number: 10321856


Chevrolet Lumina Strut Bracket, Driver Side Part Number: 24503458


Chevrolet Lumina Strut Mount Part Number: 10230877
$4.05 MSRP: $6.35You Save: $2.30 (37%)

Chevrolet Lumina Mount Bracket Part Number: 10216970

Chevrolet Lumina Mount Bracket Part Number: 24504390

Chevrolet Lumina Torque Strut Part Number: 10199229


Chevrolet Lumina Mount Bracket Part Number: 10137340
Chevrolet Lumina Mount Bracket Part Number: 10185131

Chevrolet Lumina Strut Bracket Part Number: 10066637
Chevrolet Lumina Strut Part Number: 10223927

Chevrolet Lumina Strut Brace Part Number: 10066643

Chevrolet Lumina Mount Bracket Part Number: 10199269

Chevrolet Lumina Mount Bracket Part Number: 10162007

Chevrolet Lumina Mount, Driver Side Part Number: 10056753
Chevrolet Lumina Mount Bracket, Passenger Side Part Number: 14094810

Chevrolet Lumina Strut Bracket, Passenger Side Part Number: 24507211
Chevrolet Lumina Torque Strut Part Number: 22188849
Chevrolet Lumina Mount Bracket, Passenger Side Part Number: 14097634
| Page 1 of 2 |Next >
1-20 of 29 Results
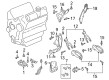
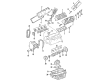
Chevrolet Lumina Engine Mount
Want to cut long-term maintenance and repair costs? Choose OEM Engine Mount. Those parts deliver top durability you can trust. On our site, you'll find a huge catalog of genuine Chevrolet Lumina parts. Prices are unbeatable, so you can keep more in your pocket. Every OEM Chevrolet Lumina Engine Mount includes a manufacturer's warranty. You can also get an easy return policy that keeps buying risk free. Fast delivery, get your car on the road quickly. It's simple to search, compare, and order. Stop guessing about quality or fit. Order today and save with parts that last.
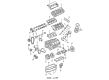
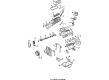
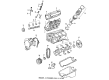
The Chevrolet Lumina Engine Mount is a fastener of great importance famous for its sturdiness and efficacy necessary for diversification of the Chevrolet Lumina models manufactured between 1989 and 2013. This Engine Mount serves two essential functions: transmission- it on the one hand isolates noise and vibrations arising from the operation of the engine while at the same time providing the necessary support on the engine and transaxle within the car's chassis. Besides, this isolation contributes to not only the comfort of riding but also employing safety for driving and avoiding possible harm to the components. The Chevrolet Lumina has applied several Engine Mounts like rubber Engine Mount, fluid-filled hydraulic Engine Mount, and a recent advanced electronic active Engine Mount. Of each of the types, the active mounts are such that have their stiffness settings dependant of the engine speed, thus offering optimal damping of vibrations. Support for Lumina models allows the drivers to gain the safety and efficiency, which make Chevrolet Lumina Engine Mount unique in automotive retail. Its general body structure and engineering are sound and this conforms to the Chevrolet's standard of quality in its cars; making the Lumina a dependable car for drivers. Regarding its quality, the Chevrolet Lumina Engine Mount features both comfort and safety that are highly considered in a vehicle and clearly defines the brand's commitment in inventiveness and excellence in bringing superiority in performance, making it as one of the Chevrolet's trusted part.
Chevrolet Lumina Engine Mount Parts and Q&A
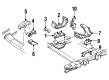
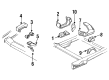
- Q: How to replace the engine mount on Chevrolet Lumina?A:A replacement of the Engine Mount requires the first step to be disconnecting the negative cable from the battery. After disconnecting power the remove throttle body air inlet duct followed by the Engine Mount struts. Suspend the vehicle at appropriate height with engine support fixture (J28467-B) and combine it with engine support adapters (J28467-9OA) and engine support adapter leg set (J36462-A). In the replacement process you must first take out the right (rear) Exhaust Manifold three-way catalytic converter pipe as well as the right front wheel with tire and right engine splash shield. The next step requires you to remove Engine Mount lower nuts before lifting the engine with universal engine support fixture and uninstalling the Engine Mount bracket-to-Oil Pan bolts. Begin by removing the Engine Mount along with the Engine Mount bracket before removing Engine Mount upper nuts and the Engine Mount from the Engine Mount bracket. Your first step for installation involves mounting the Engine Mount onto the Engine Mount bracket followed by fastening upper Engine Mount nuts at 47 nm (35 ft. Lbs.). Surely you can install the Engine Mount bracket together with the Engine Mount to the Oil Pan before you fasten the bolts to 58 nm (43 ft. Lbs.). Position the engine into place before installing its lower mount nuts while torquing each to 43 nm (32 ft. Lbs.). Spare pieces include the right engine splash shield alongside the right front wheel and tire assembly together with connection of the three-way catalytic converter pipe to the right (rear) exhaust manifold. To conclude this process lower the vehicle then remove the engine support fixture while installing Engine Mount struts and the throttle body air inlet duct before connecting the battery ground cable.

Related Chevrolet Lumina Parts
 Chevrolet Lumina Camshaft
 Chevrolet Lumina Dipstick Tube
 Chevrolet Lumina Head Gasket
 Chevrolet Lumina Oil Pan
 Chevrolet Lumina Piston
 Chevrolet Lumina Piston Ring
 Chevrolet Lumina Rocker Shaft Spring Kit
 Chevrolet Lumina Rod Bearing
 Chevrolet Lumina Timing Belt
 Chevrolet Lumina Timing Chain
 Chevrolet Lumina Valve Cover Gasket
 Chevrolet Lumina Valve Stem Oil Seal