ChevyParts
My Garage
My Account
Cart
OEM Chevrolet Malibu Canister Purge Valves
Fuel Tank Evaporator Purge Control Valve- Select Vehicle by Model
- Select Vehicle by VIN
Select Vehicle by Model
orMake
Model
Year
Select Vehicle by VIN
For the most accurate results, select vehicle by your VIN (Vehicle Identification Number).
15 Canister Purge Valves found


Chevrolet Malibu PCV Valve Part Number: 12608378
$31.84 MSRP: $59.80You Save: $27.96 (47%)Ships in 1-2 Business Days


Chevrolet Malibu Solenoid Valve Part Number: 1997278
$35.15 MSRP: $69.54You Save: $34.39 (50%)


Chevrolet Malibu Solenoid Valve Part Number: 1997201
$35.49 MSRP: $66.21You Save: $30.72 (47%)


Chevrolet Malibu Solenoid Valve, Green Line Part Number: 12597567
$33.29 MSRP: $67.60You Save: $34.31 (51%)


Chevrolet Malibu Solenoid Valve Part Number: 12581282
$36.33 MSRP: $65.74You Save: $29.41 (45%)Ships in 1-2 Business Days


Chevrolet Malibu Solenoid Valve Part Number: 25932571
$28.12 MSRP: $50.22You Save: $22.10 (45%)Ships in 1-2 Business Days


Chevrolet Malibu Solenoid Valve, Green Line Part Number: 13575701
$32.99 MSRP: $61.96You Save: $28.97 (47%)Ships in 1-2 Business Days


Chevrolet Malibu Purge Valve Part Number: 12632174
$34.10 MSRP: $64.04You Save: $29.94 (47%)Ships in 1-2 Business Days
Chevrolet Malibu Solenoid Valve Part Number: 85123399
$39.49 MSRP: $80.20You Save: $40.71 (51%)Ships in 1-2 Business Days
Chevrolet Malibu Solenoid Valve Part Number: 84524035
$21.74 MSRP: $40.82You Save: $19.08 (47%)Ships in 1-2 Business Days
Chevrolet Malibu Purge Valve Part Number: 55509566
$40.32 MSRP: $72.00You Save: $31.68 (44%)Ships in 1-3 Business Days
Chevrolet Malibu Purge Valve Part Number: 19432443
$50.06 MSRP: $101.68You Save: $51.62 (51%)Ships in 1-2 Business Days
Chevrolet Malibu Purge Valve Part Number: 12638819
$30.27 MSRP: $56.84You Save: $26.57 (47%)Ships in 1-2 Business Days


Chevrolet Malibu Purge Valve Part Number: 1997297
Chevrolet Malibu Solenoid Valve Part Number: 1997210
Chevrolet Malibu Canister Purge Valves
Want to cut long-term maintenance and repair costs? Choose OEM Canister Purge Valves. Those parts deliver top durability you can trust. On our site, you'll find a huge catalog of genuine Chevrolet Malibu parts. Prices are unbeatable, so you can keep more in your pocket. Every OEM Chevrolet Malibu Canister Purge Valves includes a manufacturer's warranty. You can also get an easy return policy that keeps buying risk free. Fast delivery, get your car on the road quickly. It's simple to search, compare, and order. Stop guessing about quality or fit. Order today and save with parts that last.
Chevrolet Malibu Canister Purge Valves Parts Questions & Experts Answers
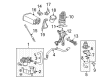
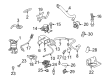
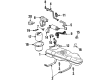
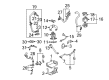
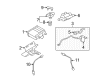
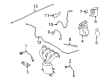
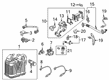
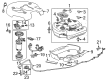
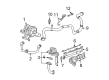
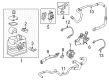
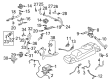
- Q: How to replace the canister purge valves on Chevrolet Malibu?A:Start replacement of the evaporative emission canister purge solenoid valve by removing the air cleaner outlet duct. Begin by removing the generator battery control module cover when needed. The procedure starts with discarding the engine wiring harness connector from the evap canister purge solenoid valve then moving to the disconnect process of both quick connect fittings from chassis and engine evap lines. Begin by unbolt first the evap canister purge valve bracket bolt then remove its bracket before splitting the valve free from the bracket. Check the evap canister purge valve ports to confirm no carbon leaks occur. Replace the evap canister along with its necessary components when loose carbon is detected in order to eliminate carbon particles. Follow these steps for installation: position the evap canister purge valve with its bracket to the Cylinder Head before tightening the bracket bolt to 25 nm (18 lb ft). Connect the engine evap quick connect fitting to the solenoid valve first and then proceed with the chassis evap quick connect fitting attachment. First reconnect the solenoid valve's wiring harness electrical connector from the engine harness and reinstall the generator battery control module cover (if needed) before installing the air cleaner outlet duct.

Related Chevrolet Malibu Parts
 Chevrolet Malibu PCV Valve
 Chevrolet Malibu Air Inject Check Valve
 Chevrolet Malibu EGR Filter
 Chevrolet Malibu EGR Tube
 Chevrolet Malibu EGR Vacuum Solenoid
 Chevrolet Malibu EGR Valve Gasket
 Chevrolet Malibu Exhaust Gas Temperature Sensor
 Chevrolet Malibu Exhaust Heat Shield
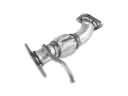 Chevrolet Malibu Exhaust Pipe
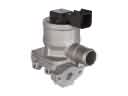 Chevrolet Malibu Secondary Air Injection Check Valve
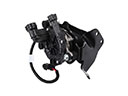 Chevrolet Malibu Secondary Air Injection Pump
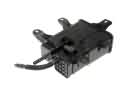 Chevrolet Malibu Vapor Canister