ChevyParts
My Garage
My Account
Cart
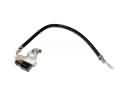
OEM Chevrolet Suburban 1500 Battery Cable
Car Battery Cable- Select Vehicle by Model
- Select Vehicle by VIN
Select Vehicle by Model
orMake
Model
Year
Select Vehicle by VIN
For the most accurate results, select vehicle by your VIN (Vehicle Identification Number).
20 Battery Cables found


Chevrolet Suburban 1500 Positive Cable Part Number: 22850357
$50.07 MSRP: $109.32You Save: $59.25 (55%)Ships in 1-2 Business Days


Chevrolet Suburban 1500 Battery Cable Part Number: 25875320
$79.85 MSRP: $174.34You Save: $94.49 (55%)Ships in 1-2 Business Days


Chevrolet Suburban 1500 Positive Cable Part Number: 25814777
$65.45 MSRP: $142.91You Save: $77.46 (55%)Ships in 1-2 Business Days


Chevrolet Suburban 1500 Battery Cable Part Number: 20943125
$34.17 MSRP: $64.16You Save: $29.99 (47%)Ships in 1-2 Business Days

Chevrolet Suburban 1500 Negative Cable Part Number: 15321212
$201.86 MSRP: $440.74You Save: $238.88 (55%)Ships in 1-2 Business Days


Chevrolet Suburban 1500 Battery Cable Part Number: 22790285
$68.95 MSRP: $149.26You Save: $80.31 (54%)Ships in 1-2 Business Days

Chevrolet Suburban 1500 Negative Cable Part Number: 22846469
$55.81 MSRP: $104.80You Save: $48.99 (47%)Ships in 1-2 Business Days

Chevrolet Suburban 1500 Battery Cable Part Number: 20771932
$25.04 MSRP: $46.70You Save: $21.66 (47%)Ships in 1-2 Business DaysChevrolet Suburban 1500 Battery Cable Part Number: 20774386
$75.34 MSRP: $164.49You Save: $89.15 (55%)Ships in 1-2 Business Days
Chevrolet Suburban 1500 Negative Cable Part Number: 22846470
$167.67 MSRP: $312.86You Save: $145.19 (47%)
Chevrolet Suburban 1500 Ground Cable Part Number: 23219941
$14.84 MSRP: $26.86You Save: $12.02 (45%)Ships in 1-2 Business Days
Chevrolet Suburban 1500 Ground Cable Part Number: 20776810
$14.00 MSRP: $26.30You Save: $12.30 (47%)Ships in 1-2 Business Days


Chevrolet Suburban 1500 Negative Cable Part Number: 15321221


Chevrolet Suburban 1500 Negative Cable Part Number: 22846471
$71.71 MSRP: $128.06You Save: $56.35 (44%)


Chevrolet Suburban 1500 Positive Cable Part Number: 15372005


Chevrolet Suburban 1500 Positive Cable Part Number: 15321247
Chevrolet Suburban 1500 Negative Cable Part Number: 15321207

Chevrolet Suburban 1500 Negative Cable Part Number: 22846476

Chevrolet Suburban 1500 Positive Cable Part Number: 25862354

Chevrolet Suburban 1500 Positive Cable Part Number: 19117211
Chevrolet Suburban 1500 Battery Cable
Want to cut long-term maintenance and repair costs? Choose OEM Battery Cable. Those parts deliver top durability you can trust. On our site, you'll find a huge catalog of genuine Chevrolet Suburban 1500 parts. Prices are unbeatable, so you can keep more in your pocket. Every OEM Chevrolet Suburban 1500 Battery Cable includes a manufacturer's warranty. You can also get an easy return policy that keeps buying risk free. Fast delivery, get your car on the road quickly. It's simple to search, compare, and order. Stop guessing about quality or fit. Order today and save with parts that last.
Chevrolet Suburban 1500 Battery Cable Parts Questions & Experts Answers
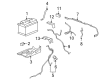
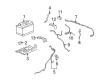
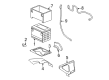
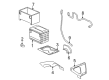
- Q: How to remove and install the positive battery cable on Chevrolet Suburban 1500?A:The process to remove the positive Battery Cable begins by taking off both the negative cable first followed by the positive cable from the battery. You need to disconnect the positive cable from the engine wiring harness junction block before taking out the Battery Cable junction block from its bracket position. The negative cable attachment needs removal from its retaining clip on the positive cable so you can remove the nut from the generator back. After this you must disconnect the positive Battery Cable from the generator itself. Lift and sustain the automobile while unscrewing the four bolts that bind the positive cable to the engine framework before disengaging it from the power steering accessory bracket (4WD 15 series). Ultimately disconnect the positive Battery Cable by removing the nut from the Starter positive terminal and the positive cable from the Starter. After that, detach the Starter's retention clip before finalizing with the Starter cable removal. Begin the installation sequence by attaching the positive Battery Cable to the retention clip followed by the Starter where the nut should be tightened to 16 n.m (12 lb ft). Install and tighten four bolts on the positive cable until they reach 12 n.m (106 lb in) engine torque before connecting the cable to the power steering accessory bracket (4WD 15 series). Lower down the vehicle and secure the positive Battery Cable to the generator by tightening its nut to 18 n.m (13 lb ft). After connecting the negative cable to its retaining clip on the positive cable users must install the Battery Cable junction block onto the junction block bracket before securing the positive Battery Cable to the engine wiring harness junction block by tightening its bolt to 9 n.m (80 lb in). Complete the installation by attaching the positive Battery Cable to the battery then tightening the bolt to 17 n.m (13 lb ft) and finally connect the negative Battery Cable while tightening its bolt to 17 n.m (13 lb ft).