ChevyParts
My Garage
My Account
Cart
OEM GMC Car Speakers
Audio Speakers- Select Vehicle by Model
- Select Vehicle by VIN
Select Vehicle by Model
orMake
Model
Year
Select Vehicle by VIN
For the most accurate results, select vehicle by your VIN (Vehicle Identification Number).
172 Car Speakers found


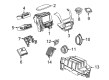
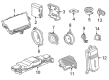
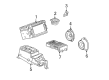
GMC Instrument Panel Speaker Part Number: 22753377
$16.98 MSRP: $31.89You Save: $14.91 (47%)Ships in 1-2 Business DaysProduct Specifications- Other Name: Speaker Assembly-Radio; Speaker, Radio Receiver


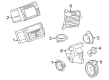
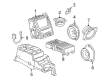
GMC Front Driver Speaker Part Number: 10366739
$84.75 MSRP: $159.16You Save: $74.41 (47%)Ships in 1-2 Business DaysProduct Specifications- Other Name: Speaker, Radio Front Side Door; Woofer; Speaker, Radio Auxiliary Speakers
- Position: Front
- Replaces: 15082693, 15059141

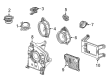
GMC Woofer Part Number: 23122029
$116.78 MSRP: $207.58You Save: $90.80 (44%)Ships in 1-2 Business DaysProduct Specifications- Other Name: Speaker, Radio Auxiliary Speakers
- Position: Front


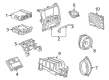
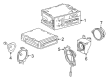
GMC Instrument Panel Speaker, Front Part Number: 87825443
$2.33 MSRP: $4.16You Save: $1.83 (44%)Ships in 1-2 Business DaysProduct Specifications- Other Name: Speaker Assembly, Radio Front; Speaker; Speaker, Radio Receiver
- Position: Front
- Replaces: 85136583

GMC Front Driver Speaker Part Number: 84577107
$10.83 MSRP: $19.34You Save: $8.51 (44%)Ships in 1-2 Business DaysProduct Specifications- Other Name: Speaker Assembly-Radio Front Side Door; Speaker, Radio Auxiliary Speakers
- Position: Front

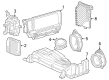
GMC Windshield Pillar Speaker, Front Part Number: 23223696
$17.02 MSRP: $31.95You Save: $14.93 (47%)Ships in 1-2 Business DaysProduct Specifications- Other Name: Speaker Assembly-Radio Front; Instrument Panel Speaker; Speaker; Speaker, Radio Receiver
- Position: Front

GMC Instrument Panel Speaker, Front Part Number: 84019237
$8.96 MSRP: $16.00You Save: $7.04 (44%)Ships in 1-2 Business DaysProduct Specifications- Other Name: Speaker Assembly-Radio Front; Quarter Panel Speaker; Speaker; Speaker, Radio Auxiliary Speakers; Speaker, Radio Receiver
- Position: Front

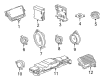
GMC Windshield Pillar Speaker Part Number: 10400063
$32.77 MSRP: $61.13You Save: $28.36 (47%)Product Specifications- Other Name: Speaker, Radio Speaker; Tweeter; Speaker, Radio Auxiliary Speakers; Speaker, Radio Receiver
- Replaces: 12450292, 10439791, 15212376

GMC Speaker Part Number: 23316985
$181.10 MSRP: $327.80You Save: $146.70 (45%)Ships in 1-2 Business DaysProduct Specifications- Other Name: Speaker, Radio Auxiliary Speakers
- Position: Front
- Replaces: 15122608

GMC Speaker Part Number: 84776627
$232.62 MSRP: $417.24You Save: $184.62 (45%)Ships in 1-3 Business DaysProduct Specifications- Other Name: Speaker, Radio Auxiliary Speakers; Woofer


GMC Rear Speaker Part Number: 15054683
Product Specifications- Other Name: Speaker, Radio Auxiliary Speakers; Speaker
- Position: Rear Upper

GMC Rear Driver Speaker Part Number: 25856948
Product Specifications- Other Name: Speaker, Radio Auxiliary Speakers
- Position: Rear
- Replaces: 15186671

GMC Woofer, Rear Part Number: 15766432
Product Specifications- Other Name: Speaker Assembly-Radio Rear; Speaker, Radio Auxiliary Speakers
- Position: Rear
- Replaces: 15747920, 15760319

GMC Speaker Part Number: 15738403
Product Specifications- Other Name: Speaker, Radio Auxiliary Speakers
- Position: Rear

GMC Rear Driver Speaker, Driver Side Part Number: 15082199
Product Specifications- Other Name: Speaker, Radio Auxiliary Speakers
- Position: Driver Side
GMC Rear Driver Speaker Part Number: 15082200
Product Specifications- Other Name: Speaker, Radio Auxiliary Speakers
- Position: Rear

GMC Front Driver Speaker Part Number: 15060849
Product Specifications- Other Name: Speaker, Radio Front Side Door; Speaker, Radio Auxiliary Speakers
- Position: Front

GMC Woofer Part Number: 84053770
Product Specifications- Other Name: Speaker, Radio Auxiliary Speakers
- Position: Front
- Replaces: 25915806
GMC Woofer Part Number: 15902129
Product Specifications- Other Name: Speaker, Radio Auxiliary Speakers
- Position: Front
- Replaces: 15186666
GMC Woofer Part Number: 15060878
Product Specifications- Other Name: Speaker, Radio Auxiliary Speakers
| Page 1 of 9 |Next >
1-20 of 172 Results
GMC Car Speakers
Want to cut long-term maintenance and repair costs? Choose OEM Car Speakers. Those parts deliver top durability you can trust. On our site, you'll find a huge catalog of genuine GMC parts. Prices are unbeatable, so you can keep more in your pocket. Every OEM GMC Car Speakers includes a manufacturer's warranty. You can also get an easy return policy that keeps buying risk free. Fast delivery, get your car on the road quickly. It's simple to search, compare, and order. Stop guessing about quality or fit. Order today and save with parts that last.
GMC Car Speakers Parts Questions & Experts Answers
- Q: How to replace the front side door car speakers on GMC Canyon?A:The first step to install the front side door speaker involves taking away the front door trim panel. The first step requires you to remove the screw which holds the speaker to the door and proceed with careful speaker extraction along with each of the two tabs from the door's slots. Disconnect the speaker electrical connector. Connect the speaker electrical connection at the start and then slide the two tabs from the speaker into their designated slots in the door. Fasten the door-mounted speaker with the screw and tighten it to 2.5 n.m (22 lb in). Completion of the installation process requires installing the front door trim panel.
- Q: How to replace the front door car speakers on GMC Sierra 1500?A:Start the door speaker replacement process by taking away the trim panel. After that, use your finger to press in the discreet tab located at the top of the speaker to easily detach it and separate it from the connector cable. To install the new speaker, first attach the electrical connector and then press the speaker squarely into the housing. Once all the parts are back in place, test the speaker by turning on the system.
- Q: How to replace the rear pillar car speakers on GMC Yukon?A:Before doing anything else, remove the garnish from the back, take out the speaker and separate all the necessary cables. First, attach the wires to the connectors, then set the speaker in place and secure it, finally repeating the installation of the garnish molding to complete the job. In the end, check that the component operates as expected.


Related GMC Parts
 GMC Bumper
 GMC Cup Holder
 GMC Door Latch Assembly
 GMC Door Lock Actuator
 GMC Shift Knob
 GMC Automatic Transmission Shift Indicator
 GMC Center Console Base
 GMC Door Moldings
 GMC Instrument Panel Light Bulb
 GMC Parking Assist Distance Sensor
 GMC Weather Strip
 GMC Window Crank Handles
Browse GMC Car Speakers by Models
Acadia Sierra 1500 Yukon Canyon Sierra 2500 HD Terrain Envoy Sonoma Typhoon Syclone C1500 Envoy XL Envoy XUV Jimmy K1500 S15 S15 Jimmy Safari Savana 2500 Savana 3500 Sierra 2500 Sierra 3500 Yukon XL Acadia Limited C2500 C3500 G2500 K2500 K3500 P3500 Savana 1500 Yukon XL 1500 C1500 Suburban C2500 Suburban G1500 G3500 Hummer EV Pickup K1500 Suburban K2500 Suburban P2500 Sierra 1500 Classic Sierra 1500 HD Sierra 1500 HD Classic Sierra 2500 HD Classic Sierra 3500 Classic Sierra 3500 HD Yukon XL 2500