ChevyParts
My Garage
My Account
Cart
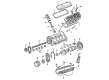
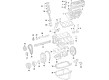
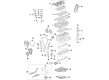
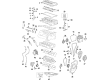
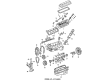
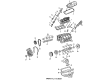
OEM GMC Timing Chain
Engine Timing Chain- Select Vehicle by Model
- Select Vehicle by VIN
Select Vehicle by Model
orMake
Model
Year
Select Vehicle by VIN
For the most accurate results, select vehicle by your VIN (Vehicle Identification Number).
31 Timing Chains found


GMC Timing Chain Part Number: 10114177
$112.41 MSRP: $176.87You Save: $64.46 (37%)Ships in 1-3 Business DaysProduct Specifications- Other Name: Chain, Engine Timing


GMC Timing Chain Part Number: 14087014
$55.75 MSRP: $94.91You Save: $39.16 (42%)Ships in 1-2 Business DaysProduct Specifications- Other Name: Chain, Engine Timing


GMC Timing Chain Part Number: 24577247
$67.40 MSRP: $105.12You Save: $37.72 (36%)Ships in 1-2 Business DaysProduct Specifications- Other Name: Chain, Engine Timing
- Replaces: 24576828, 14062702


GMC Timing Chain Part Number: 12672278
$65.08 MSRP: $111.78You Save: $46.70 (42%)Ships in 1-3 Business DaysProduct Specifications- Other Name: Chain, Engine Timing
- Replaces: 12660118


GMC Timing Chain Part Number: 12458911
$56.00 MSRP: $87.74You Save: $31.74 (37%)Product Specifications- Other Name: Chain Kit, Engine Timing; Timing Gear Set; Timing Drive Package


GMC Timing Chain Part Number: 12637743
$54.18 MSRP: $93.04You Save: $38.86 (42%)Ships in 1-2 Business DaysProduct Specifications- Other Name: Chain, Engine Timing; Chain Guide; Secondary Chain
- Replaces: 12633452, 12683547, 12616608

GMC Timing Chain Part Number: 12671642
$50.22 MSRP: $78.67You Save: $28.45 (37%)Ships in 1-3 Business DaysProduct Specifications- Other Name: Chain, Engine Timing
GMC Timing Chain Part Number: 10128485
$43.02 MSRP: $64.53You Save: $21.51 (34%)Ships in 1-2 Business DaysProduct Specifications- Other Name: Chain, Engine Timing
- Product Specifications
- Other Name: Chain, Engine Crankshaft And Camshaft Balancer; Balance Shaft Chain; Timing Chain

GMC Timing Chain Part Number: 14022647
$87.49 MSRP: $148.95You Save: $61.46 (42%)Product Specifications- Other Name: Chain, Engine Timing

 Product Specifications
- Other Name: Chain Assembly-Oil Pump Drive; Chain, Engine Oil Pump
GMC Timing Chain Part Number: 12694716
$39.97 MSRP: $62.63You Save: $22.66 (37%)Ships in 1-3 Business DaysProduct Specifications- Other Name: Chain, Engine Timing; Secondary Chain; Chain; Chain, Engine Oil Pump
- Replaces: 12647896


GMC Timing Chain Part Number: 89060443
$104.13 MSRP: $163.10You Save: $58.97 (37%)Ships in 1-3 Business DaysProduct Specifications- Other Name: Chain Kit, Engine Timing; Timing Gear Set; Timing Drive Package

GMC Timing Chain Part Number: 55515943
$30.22 MSRP: $47.32You Save: $17.10 (37%)Product Specifications- Other Name: Chain, Engine Timing
- Replaces: 55489217
 Product Specifications
- Other Name: Chain Assembly-Oil Pump Drive; Chain, Engine Oil Pump
 Product Specifications
- Other Name: Chain, Engine Crankshaft And Camshaft Balancer; Balance Shaft Chain; Timing Chain
GMC Timing Chain Part Number: 55495936
$54.62 MSRP: $85.55You Save: $30.93 (37%)Product Specifications- Other Name: Chain, Engine Timing

GMC Timing Chain Part Number: 55489211
$15.27 MSRP: $23.91You Save: $8.64 (37%)Ships in 1-3 Business DaysProduct Specifications- Other Name: Chain, Engine Timing

GMC Timing Chain Part Number: 14103224
$17.92 MSRP: $28.07You Save: $10.15 (37%)Product Specifications- Other Name: Chain, Engine Timing

GMC Timing Chain Part Number: 14102670
Product Specifications- Other Name: Chain, Engine Timing
| Page 1 of 2 |Next >
1-20 of 31 Results
GMC Timing Chain
Want to cut long-term maintenance and repair costs? Choose OEM Timing Chain. Those parts deliver top durability you can trust. On our site, you'll find a huge catalog of genuine GMC parts. Prices are unbeatable, so you can keep more in your pocket. Every OEM GMC Timing Chain includes a manufacturer's warranty. You can also get an easy return policy that keeps buying risk free. Fast delivery, get your car on the road quickly. It's simple to search, compare, and order. Stop guessing about quality or fit. Order today and save with parts that last.
GMC Timing Chain Parts Questions & Experts Answers
- Q: How to replace the timing chain and sprockets on GMC Canyon?A:To replace the Timing Chain and sprockets, you should first remove the camshaft cover, then remove camshaft position (CMP) sensor and the engine front cover. Rotate the Crankshaft clockwise until the #1 Piston is at top dead center (TDC) on the compression stroke, ensuring the word delphi on the exhaust camshaft position actuator is parallel with the cylinder head to cam cover mating surface. The camshaft holding tool (J 44221) should be installed to the back of the camshafts, take the tension off of the Timing Chain by moving the tension shoe down and place a tee in the tensioner holding the shoe stationary. Remove and discard the exhaust camshaft position actuator bolt, take away the exhaust camshaft position actuator and the other intake camshaft sprocket bolt and finally the intake camshaft sprocket. Next, extract the Timing Chain, as well as the sprocket from the Crankshaft, then wash and examine the Timing Chain and the sprockets. For installation, ensure the #1 Piston is at tdc, then install the Crankshaft sprocket onto the Crankshaft snout. Mention the dark link of the Timing Chain with the timing of the intake camshaft according to the sprocket, allowing the chain down through the cylinder head to and attach it to the Crankshaft sprocket, align the dark link according to the timing. Mount the intake camshaft sprocket on the intake camshaft and fasten it using new bolt tightened to 20 nm (15 ft. Lbs) and then fasten it additional 100 degrees by using the angle meter (J 450.59). Make sure the camshaft actuator is advanced fully before you put the exhaust camshaft actuator in position, ensuring that you align the dark link with the timing mark of the actuator sprocket. Mount the exhaust cam actuator to the exhaust cam and bolt it with a new bolt that is tightened to 25 nm (18 ft. Lbs.)and then rotate the bolt an additional 135 degrees using the angle meter (J 450.59). Deny the tee from the Timing Chain tensioner in order to have a tension, next remove the camshaft holding tool (J 44221) from the camshafts. Make sure to align the dark links on the Timing Chain to the marks on the sprockets, and finally, attach the engine front cover, the camshaft position (CMP) sensor, and the camshaft cover.
- Q: How to replace the LH secondary camshaft timing chain on GMC Acadia?A:Start replacing the left Timing Chain by uninstalling spark plugs first then the engine front cover. Start by removing the right bank Timing Chain and after that remove the primary camshaft drive chain. First remove the left bank Timing Chain Tensioner, shoe, guide, and the camshaft intermediate drive chain idler before proceeding with the left bank Timing Chain itself. All components for camshaft timing drives must receive a clean-up treatment while you will need to replace any units that show signs of wear. Begin installation by placing the left bank Timing Chain first and follow the steps with the camshaft intermediate drive chain idler then Timing Chain guide and shoe then tensioner. The primary camshaft drive chain should be installed before the right bank Timing Chain after engine front cover reattachment and Spark Plug installation.
- Q: How to replace the timing chain and sprockets on GMC Sierra 1500?A:In order to lift the Timing Chain and the sprockets, you will need to remove the Oil Pump while rotating the Crankshaft in order to achieve the position where the Crankshaft and the camshaft sprockets have their timing markings aligned while not turning the Crankshaft assembly after the Timing Chain has been removed so as not to damage the piston assemblies or valves. Then remove the bolts of the camshaft sprocket and camshaft sprocket and Timing Chain. Being dependent on the j8433 (Two Jaw Puller), jr41816-2 (Crankshaft End Protector), and j41558 (Crankshaft Sprocket Remover), remove the Crankshaft sprocket before removing the Crankshaft sprocket key if needed. If necessary, clean and check the Timing Chain and sprockets. For the installation, it is necessary to put the key into crank shaft keyway and tap it to situate it until ends do not come out. Lay the Crankshaft sprocket onto the front of the Crankshaft, so that the Crankshaft key aligns with the sprocket keyway, and use the j41665 (Crankshaft Balancer and Sprocket Installer) to fully seat the sprocket against the Crankshaft flange. Rotate the Crankshaft sprocket until the alignment mark is at 12 o'clock position, align the camshaft sprocket locating pin to the camshaft sprocket's hole, the teeth of the sprocket engage with the Timing Chain, the alignment marks on the sprockets align correctly in which camshaft sprocket in 6 o'clock, and Crankshaft in 12 o'clock. Mount the camshaft sprocket and the Timing Chain, making sure to move the camshaft or Crankshaft sprocket to align the timing mark. Lastly, install the camshaft sprocket bolts which can be tightened to 35 nm (26 ft. Lbs.), and reinstall the Oil Pump.


Related GMC Parts
 GMC Oil Filter
 GMC Head Gasket
 GMC Timing Belt
 GMC Balance Shaft Gear
 GMC Belt Tensioner Bolt
 GMC Crankshaft
 GMC Crankshaft Thrust Washer Set
 GMC Dipstick Tube
 GMC Engine Mount Torque Strut
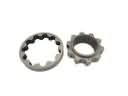 GMC Oil Pump Rotor Set
 GMC Timing Belt Tensioner
 GMC Valve Cover Grommet
Browse GMC Timing Chain by Models
Acadia Sierra 1500 Yukon Canyon Sierra 2500 HD Terrain Envoy Sonoma Typhoon Caballero C1500 Envoy XL Envoy XUV Jimmy K1500 S15 S15 Jimmy Safari Savana 2500 Savana 3500 Sierra 2500 Sierra 3500 Yukon XL Acadia Limited C2500 C3500 G2500 K2500 K3500 Savana 1500 Yukon XL 1500 C1500 Suburban C2500 Suburban G1500 G3500 K1500 Suburban K2500 Suburban P2500 R1500 R1500 Suburban R2500 R2500 Suburban R3500 Sierra 1500 Classic Sierra 1500 HD Sierra 1500 HD Classic Sierra 1500 Limited Sierra 2500 HD Classic Sierra 3500 Classic Sierra 3500 HD V1500 V1500 Suburban V2500 V2500 Suburban V3500 Yukon XL 2500