ChevyParts
My Garage
My Account
Cart
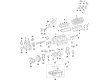
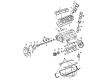
OEM GMC Yukon Engine Mount
Engine Motor Mount- Select Vehicle by Model
- Select Vehicle by VIN
Select Vehicle by Model
orMake
Model
Year
Select Vehicle by VIN
For the most accurate results, select vehicle by your VIN (Vehicle Identification Number).
22 Engine Mounts found


GMC Yukon Motor Mount, Driver Side Part Number: 84175583
$111.09 MSRP: $189.13You Save: $78.04 (42%)


GMC Yukon Motor Mount Part Number: 15854941
$170.53 MSRP: $292.89You Save: $122.36 (42%)


GMC Yukon Motor Mount Part Number: 15854939
$125.35 MSRP: $215.28You Save: $89.93 (42%)


GMC Yukon Motor Mount, Passenger Side Part Number: 84175582
$121.90 MSRP: $209.35You Save: $87.45 (42%)

GMC Yukon Motor Mount Part Number: 15529450
$51.94 MSRP: $89.19You Save: $37.25 (42%)Ships in 1-2 Business Days

GMC Yukon Mount Bracket, Passenger Side Part Number: 15113847
$47.39 MSRP: $80.69You Save: $33.30 (42%)Ships in 1-2 Business Days


GMC Yukon Motor Mount, Passenger Side Part Number: 15829208
$101.77 MSRP: $173.26You Save: $71.49 (42%)Ships in 1-2 Business Days


GMC Yukon Motor Mount, Driver Side Part Number: 15829207
$101.77 MSRP: $173.26You Save: $71.49 (42%)
GMC Yukon Motor Mount, Passenger Side Part Number: 84718753
$87.96 MSRP: $137.75You Save: $49.79 (37%)Ships in 1-2 Business Days

GMC Yukon Motor Mount, Driver Side Part Number: 85151357
$60.64 MSRP: $94.96You Save: $34.32 (37%)Ships in 1-3 Business Days
GMC Yukon Mount Bracket, Passenger Side Part Number: 85126631
$16.98 MSRP: $26.60You Save: $9.62 (37%)GMC Yukon Mount Bracket, Driver Side Part Number: 23353404
$17.26 MSRP: $27.03You Save: $9.77 (37%)Ships in 1-3 Business DaysGMC Yukon Motor Mount, Driver Side Part Number: 84924369
$60.64 MSRP: $94.96You Save: $34.32 (37%)GMC Yukon Motor Mount, Passenger Side Part Number: 85151356
$60.84 MSRP: $95.27You Save: $34.43 (37%)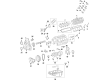
GMC Yukon Motor Mount, Driver Side Part Number: 85608074
$78.63 MSRP: $133.87You Save: $55.24 (42%)
GMC Yukon Motor Mount, Passenger Side Part Number: 85608073
$87.96 MSRP: $137.75You Save: $49.79 (37%)


GMC Yukon Mount Bracket Part Number: 15719194
GMC Yukon Motor Mount Part Number: 15592505

GMC Yukon Motor Mount Part Number: 15659675
GMC Yukon Mount Bracket, Driver Side Part Number: 15113849
$59.70 MSRP: $93.50You Save: $33.80 (37%)
| Page 1 of 2 |Next >
1-20 of 22 Results
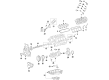
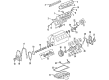
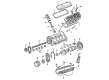
GMC Yukon Engine Mount
Want to cut long-term maintenance and repair costs? Choose OEM Engine Mount. Those parts deliver top durability you can trust. On our site, you'll find a huge catalog of genuine GMC Yukon parts. Prices are unbeatable, so you can keep more in your pocket. Every OEM GMC Yukon Engine Mount includes a manufacturer's warranty. You can also get an easy return policy that keeps buying risk free. Fast delivery, get your car on the road quickly. It's simple to search, compare, and order. Stop guessing about quality or fit. Order today and save with parts that last.
GMC Yukon Engine Mount Parts and Q&A
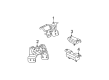
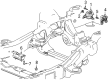
- Q: How to replace the left engine mount on a 2WD on GMC Yukon?A:The first step to replace the left Engine Mount of a 2wd vehicle involves removing the air cleaner outlet duct. The first step is to lower the vehicle before you access the Engine Mount to frame bolts . Lift the vehicle to reach halfway in the air. During the left wheelhouse liner removal proceed with caution because the engine must not rest on crankshaft balancer or Oil Pan. Position a screw type adjustable jack underneath the tab that extends from the engine block. The wheelhouse opening provides access for removing Engine Mount to engine bolts while an adjustable jack helps elevate the engine marginally for removing the Engine Mount. Position the Engine Mount to the engine before locking the Engine Mount to engine bolts through the wheelhouse opening and tightening them to 50 nm (37 lb ft). After adjusting the engine height you should remove the adjustable jack when the Engine Mount rests completely against the frame. Place the left wheelhouse liner before lowering the vehicle while you install the Engine Mount frame bolts using 65 nm as the tightening torque with the center bolt first and both side bolts afterward. Lower down the vehicle before placing back the air cleaner outlet duct.
- Q: How to replace the right side engine mount on GMC Yukon?A:One needs to remove the air cleaner outlet duct before starting the right side Engine Mount replacement process. The removal sequence begins with displacement of both front drive axle components and bracket from a vehicle with 4wd systems. The next step requires Exhaust Manifold removal and air conditioning (A/C) compressor bracket removal. The removal process starts by discarding all Engine Mount to frame bolts while keeping the motor engine free from ratifying support by crankshaft balancer or Oil Pan. A screw-type adjustable jack positioned under the blocking tab of the engine block allows workers to remove Engine Mount to engine bolts by accessing the wheelhouse opening. The adjustable jack should lift the engine a slight amount for sufficient space to take away the Engine Mount. Position the Engine Mount to the engine and install the Engine Mount to engine bolts through the wheelhouse opening while tightening them to 50 nm (37 lb ft). Drop the engine until it pushes the Engine Mount entirely into position against the frame before removing the supporting jack. Begin by installing the Engine Mount to its frame bolts where torques of 65 nm (48 lb ft) will be applied starting with the middle bolt followed by tightening either side bolt. Install the a/c compressor bracket followed by front drive axle bracket installation and tightening bolts to 90 nm (67 lb ft). After that, tighten the front drive axle bolts. Finally, reinstall the Exhaust Manifold.


Related GMC Yukon Parts
 GMC Yukon Crankshaft Pulley
 GMC Yukon Dipstick
 GMC Yukon Engine Oil Cooler
 GMC Yukon Exhaust Valve
 GMC Yukon Motor And Transmission Mount
 GMC Yukon Oil Cooler
 GMC Yukon Oil Pan Baffle
 GMC Yukon Piston Ring
 GMC Yukon Rocker Arm
 GMC Yukon Timing Belt Tensioner
 GMC Yukon Timing Chain Guide
 GMC Yukon Valve Cover Gasket