ChevyParts
My Garage
My Account
Cart
OEM Buick Century Blend Door Actuator
Air Blend Door Actuator- Select Vehicle by Model
- Select Vehicle by VIN
Select Vehicle by Model
orMake
Model
Year
Select Vehicle by VIN
For the most accurate results, select vehicle by your VIN (Vehicle Identification Number).
7 Blend Door Actuators found


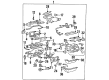
Buick Century Door Actuator Part Number: 89018365
$173.26 MSRP: $356.04You Save: $182.78 (52%)Ships in 1-2 Business Days


Buick Century Controller Part Number: 52472511

Buick Century Door Actuator Part Number: 52487750
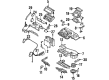
Buick Century Actuator Part Number: 52487607

Buick Century Door Actuator Part Number: 52487593


Buick Century Valve Part Number: 1996694

Buick Century Valve Part Number: 1996693
Buick Century Blend Door Actuator
Our website offers an extensive catalog of genuine Buick Century Blend Door Actuator at unbeatable prices. Every OEM Buick Century Blend Door Actuator comes with a manufacturer's warranty, an easy return policy, and rapid delivery service. Don't miss out on this great opportunity!
Buick Century Blend Door Actuator Parts Questions & Experts Answers
- Q: How to Replace the Blend Door Actuator in a Defroster System on Buick Century?A: In order to replace the defroster actuator, first remove the right instrument panel insulator panel and the i/p compartment. Next, remove the screws from the relay bracket and set it away. Unplug the two vacuum lines from the defroster actuator, and the orange vacuum line from the recirculator actuator, and apply it with a foot Vacuum Pump. Take off the defroster actuator from the case of the hvac module and using the hand Vacuum Pump, you will open up the door of the recirculation actuator all the way. Swing the defroster actuator to the right and up into the gap behind the dash and the hvac module opening, then remove it from the arm of the defroster door. For installation, insert the defroster actuator to the defroster door arm and snap it into the hvac module. Connect the vacuum line to the actuator, remove the hand Vacuum Pump, and reconnect the vacuum line to the actuation to recirculation. Screw the relay bracket and tight it to 1.0 n.m (89 lb-in) and install the i/p compartment and a right instrument insulator panel.

Related Buick Century Parts
 Buick Century Blower Motor Resistor
 Buick Century A/C Compressor
 Buick Century A/C Compressor Cut-Out Switches
 Buick Century A/C Hose
 Buick Century A/C Orifice Tube
 Buick Century A/C Switch
 Buick Century Blower Control Switches
 Buick Century Blower Motor
 Buick Century Evaporator
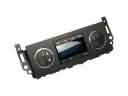 Buick Century HVAC Control Module
 Buick Century HVAC Pressure Switch
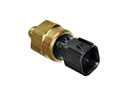 Buick Century Power Steering Pressure Switch