ChevyParts
My Garage
My Account
Cart
OEM Buick Century Door Lock
Power Door Lock Actuator- Select Vehicle by Model
- Select Vehicle by VIN
Select Vehicle by Model
orMake
Model
Year
Select Vehicle by VIN
For the most accurate results, select vehicle by your VIN (Vehicle Identification Number).
33 Door Locks found


Buick Century Lock, Front Driver Side Part Number: 16629727
$189.39 MSRP: $268.69You Save: $79.30 (30%)Ships in 1-2 Business Days


Buick Century Door Jamb Switch Part Number: 25664288
$85.37 MSRP: $128.76You Save: $43.39 (34%)Ships in 1-2 Business Days


Buick Century Door Jamb Switch Part Number: 25664287
$86.48 MSRP: $130.44You Save: $43.96 (34%)Ships in 1-2 Business Days
Buick Century Lock Cylinder Part Number: 12330124
$13.11 MSRP: $18.75You Save: $5.64 (31%)
Buick Century Lock, Rear Passenger Side Part Number: 16636578
$91.52 MSRP: $132.09You Save: $40.57 (31%)Ships in 1-3 Business Days
Buick Century Lock Actuator Part Number: 16640852
$71.70 MSRP: $112.20You Save: $40.50 (37%)Ships in 1-2 Business Days

Buick Century Lock Actuator, Passenger Side Part Number: 22094352


Buick Century Lock, Rear Driver Side Part Number: 16636579


Buick Century Lock, Front Driver Side Part Number: 20696713


Buick Century Lock Assembly, Front Part Number: 16608235

Buick Century Lock Actuator Part Number: 22062740

Buick Century Lock, Rear Driver Side Part Number: 16608185
Buick Century Lock, Front Passenger Side Part Number: 20696712

Buick Century Lock, Rear Passenger Side Part Number: 20696708
Buick Century Lock, Rear Driver Side Part Number: 20696709
Buick Century Lock, Front Passenger Side Part Number: 10091814
Buick Century Lock, Front Driver Side Part Number: 10091815
Buick Century Lock, Front Passenger Side Part Number: 16604908
Buick Century Lock Assembly, Passenger Side Part Number: 16608234
Buick Century Lock, Front Driver Side Part Number: 16604909
| Page 1 of 2 |Next >
1-20 of 33 Results
Buick Century Door Lock
Want to cut long-term maintenance and repair costs? Choose OEM Door Lock. Those parts deliver top durability you can trust. On our site, you'll find a huge catalog of genuine Buick Century parts. Prices are unbeatable, so you can keep more in your pocket. Every OEM Buick Century Door Lock includes a manufacturer's warranty. You can also get an easy return policy that keeps buying risk free. Fast delivery, get your car on the road quickly. It's simple to search, compare, and order. Stop guessing about quality or fit. Order today and save with parts that last.
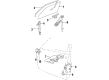
The Door Lock of Buick Century vehicles most function as safety measures; ensuring that the doors in a car remain closed and locked whenever the car is in motion. Over the years, Buick Century has gone through a series of Door Locks and these include basic key type to advanced power type, Remote Key-less Entry and auto locking system. Remote control of the doors is where power door locks are used to unlock and lock all doors at an instance while keyless entry systems come in form of keyless key pads or keyless key fobs. Moreover, automatic locking may be present in the latest models of Buick Century; this system is activated if the car is in gear or the speed is above a certain limit, which increases security matter.
Buick Century Door Lock Parts Questions & Experts Answers
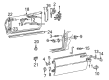
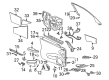
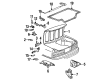
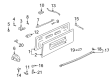
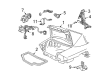
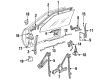
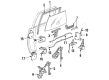
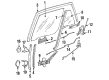
- Q: How to replace the rear door lock with a fork bolt lock design and safety interlock feature on Buick Century?A:The door locks feature a fork bolt design which has a safety interlock to secure the door when the fork bolt strikes the metal piece while enabling interior locking by pulling the knob. The process of replacing the rear door lock begins with trimming the panel and removing the water deflector. The first step includes detaching both the outside handle rod from the lock then removing the inside handle rods from the handle followed by removing the clip which connects the inside handle rods to the door. Open the door and unscrew the three lock screws (1, 2, 3) holding the lock to the door before removing the piece with attached inside handle rods. Close the power source before removing the inside handle rods from the lock. Install the door lock by placing its rods through the door inner panel access hole then connecting the electrical connectors. Apply LOCTITE(R) Blue GM P/N 12345382 or equivalent before fastener installation then secure door lock screws by following the specified tightening pattern (1, 2, 3) which starts with the top screw followed by the bottom and ending with the middle screw and fasten each screw to 10 N.m (89 lb in). Insert a new outside handle rod-to-lock clip onto the door lock lever followed by attaching the outside door handle rod inside the clip to eliminate any free play and fastening the clip cover over the threaded outside door handle rod. After fitting the clip on the inside handle rods you should proceed to connect these rods to the handle. To complete the installation position the water deflector and the trim panel in its correct position.

Related Buick Century Parts
 Buick Century Emblem
 Buick Century Door Hinge
 Buick Century Door Latch Assembly
 Buick Century Door Lock Actuator
 Buick Century Door Lock Cylinder
 Buick Century Door Seal
 Buick Century Door Striker
 Buick Century Liftgate Hinge
 Buick Century Tailgate Latch
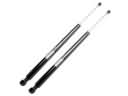 Buick Century Tailgate Lift Support
 Buick Century Trunk Latch
 Buick Century Weather Strip