ChevyParts
My Garage
My Account
Cart
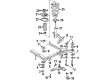
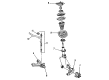
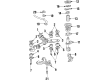
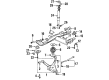
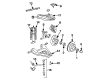
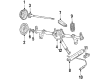
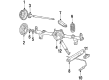
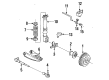
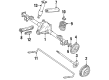
OEM Buick LeSabre Control Arm
Suspension Arm- Select Vehicle by Model
- Select Vehicle by VIN
Select Vehicle by Model
orMake
Model
Year
Select Vehicle by VIN
For the most accurate results, select vehicle by your VIN (Vehicle Identification Number).
17 Control Arms found


Buick LeSabre Control Arm, Driver Side Part Number: 25766511
$195.81 MSRP: $317.79You Save: $121.98 (39%)
Buick LeSabre Control Arm, Passenger Side Part Number: 25766510
$195.81 MSRP: $317.79You Save: $121.98 (39%)
Buick LeSabre Lower Control Arm, Front Passenger Side Part Number: 25554671
$48.00 MSRP: $79.07You Save: $31.07 (40%)Ships in 1-2 Business Days
Buick LeSabre Control Arm, Passenger Side Part Number: 19149203
$48.00 MSRP: $79.07You Save: $31.07 (40%)Ships in 1-2 Business Days

Buick LeSabre Control Arm, Rear Passenger Side Part Number: 25820033


Buick LeSabre Control Arm, Rear Driver Side Part Number: 25820031


Buick LeSabre Control Arm, Driver Side Part Number: 10232819

Buick LeSabre Control Arm, Passenger Side Part Number: 12524201
Buick LeSabre Control Arm, Passenger Side Part Number: 10232820
Buick LeSabre Control Arm, Upper Part Number: 10000910
Buick LeSabre Control Arm, Upper Part Number: 10000904

Buick LeSabre Control Arm, Rear Part Number: 10000887

Buick LeSabre Control Arm, Rear Passenger Side Part Number: 25614698
Buick LeSabre Control Arm, Rear Driver Side Part Number: 25614693
Buick LeSabre Control Arm, Driver Side Part Number: 19149204
Buick LeSabre Control Arm, Driver Side Part Number: 12524204

Buick LeSabre Control Arm, Rear Part Number: 10000334
Buick LeSabre Control Arm
Want to cut long-term maintenance and repair costs? Choose OEM Control Arm. Those parts deliver top durability you can trust. On our site, you'll find a huge catalog of genuine Buick LeSabre parts. Prices are unbeatable, so you can keep more in your pocket. Every OEM Buick LeSabre Control Arm includes a manufacturer's warranty. You can also get an easy return policy that keeps buying risk free. Fast delivery, get your car on the road quickly. It's simple to search, compare, and order. Stop guessing about quality or fit. Order today and save with parts that last.
The Buick LeSabre Control Arm is a crucial part that substantially improves the dependability and efficiency of automobiles. Being one of the most important suspensions between the frame and the wheels, the Control Arm enables efficient movement of the suspension, and the ability to adjust to changes in the road surface. This attribute is special for the Buick LeSabre, a car model that is characterized by its endurance, and sound construction. Applicable to LeSabre manufactured between 1959-2005, the required Control Arm aims at providing support for the Shock and Spring of the car offering it the stability it requires. The fact that the Control Arm has always been of stamped steel, and the later versions use the cast iron or aluminum increases the sturdiness of the model- this move reflects the concern of Buick for quality. Although wear and rusting may call for a replacement period, betterControl Arm bushings and hardwarefor adds up to alignment angles and the mounting strength, at the same rendering a profound impact upon the drive. Thus, the Buick LeSabre Control Arm has become something special in the automotive market owing its performance and durability both on normal road and in fast or high-speed turnings. Even in the efficiency and safety parts with StabiliTrak and developed suspension systems, Buick LeSabre still was appreciated and, of course, becomes one of the company's favorite models.
Buick LeSabre Control Arm Parts Questions & Experts Answers
- Q: How to replace the lower control arm in the front suspension on Buick LeSabre?A:To replace the lower Control Arm of the front suspension, lift and support the vehicle, the tire and wheel and the lastly the stabilizer shaft link. Then, take out the cotter pin and loosen the lower Ball Joint retaining nut from the ball stud, and make sure that the over-extension of the tri-pot joints is avoided, as its internal component separation and failure. Utilise the j43828 Ball Joint separator (J43828) to remove the lower Ball Joint from the Steering Knuckle, after this remove the lower Ball Joint retaining nut and finally the lower control-arm-mounting bolts and nuts that will hold the lower control-arm to the frame. In installation, hook the lower Control Arm to the frame without tightening the Control Arm nuts first. Support vehicle weight with the use of the control arms in order to establish correct trim height prior to installation of the lower bolts, Control Arm and nuts. Mount and tighten the lower Ball Joint and retaining nut to the Steering Knuckle ensuring that it is tightened to 10 nm (89 inch lbs.) and another 180 degrees with at no point being more than two slots away from a cotter pin alignment. Once the cotter pin is in place, install it, reconnect the stabilizer shaft link, tire, and wheel, lower the vehicle, and check the trim height. Finally, adjust the Control Arm bolts in sequence with rear mounting bolt 158 nm 117ft.lbs., and not mounting nut 158 nm 117ft.lbs.

Related Buick LeSabre Parts
 Buick LeSabre Control Arm Bushing
 Buick LeSabre Air Suspension Compressor
 Buick LeSabre Axle Pivot Bushing
 Buick LeSabre Axle Support Bushings
 Buick LeSabre Coil Spring Insulator
 Buick LeSabre Coil Springs
 Buick LeSabre Shock Absorber
 Buick LeSabre Spindle Nut
 Buick LeSabre Steering Knuckle
 Buick LeSabre Sway Bar Bushing
 Buick LeSabre Sway Bar Kit
 Buick LeSabre Wheel Cover