ChevyParts
My Garage
My Account
Cart
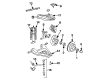
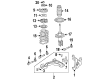
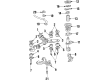
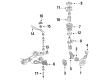
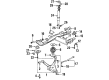
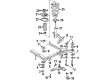
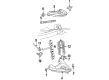
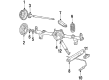
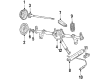
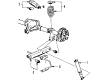
OEM Buick LeSabre Shock Absorber
Suspension Shock Absorber- Select Vehicle by Model
- Select Vehicle by VIN
Select Vehicle by Model
orMake
Model
Year
Select Vehicle by VIN
For the most accurate results, select vehicle by your VIN (Vehicle Identification Number).
24 Shock Absorbers found


Buick LeSabre Shock Absorber Part Number: 88946013
$36.24 MSRP: $64.72You Save: $28.48 (44%)Ships in 1-3 Business Days

Buick LeSabre Strut, Front Part Number: 22064781
$202.08 MSRP: $395.64You Save: $193.56 (49%)Ships in 1 Business Day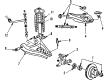
Buick LeSabre Shock Absorber, Front Part Number: 4993745
$36.24 MSRP: $64.72You Save: $28.48 (44%)Ships in 1-3 Business Days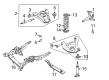
Buick LeSabre Shock Absorber Part Number: 88986629
$56.22 MSRP: $104.92You Save: $48.70 (47%)Ships in 1-2 Business DaysBuick LeSabre Shock Absorber, Front Part Number: 22065201
$56.22 MSRP: $104.92You Save: $48.70 (47%)Ships in 1-2 Business Days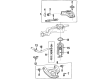
Buick LeSabre Shock Absorber Part Number: 88945188
$48.44 MSRP: $86.50You Save: $38.06 (44%)Ships in 1-3 Business Days
Buick LeSabre Shock Absorber Part Number: 22113667
$179.58 MSRP: $303.91You Save: $124.33 (41%)Ships in 1-2 Business Days
Buick LeSabre Shock Absorber Part Number: 22064179
$256.61 MSRP: $502.41You Save: $245.80 (49%)Ships in 1-2 Business DaysBuick LeSabre Shock Absorber Part Number: 22064310
$146.09 MSRP: $173.95You Save: $27.86 (17%)Ships in 1-2 Business Days

Buick LeSabre Shock Absorber, Rear Part Number: 19299843


Buick LeSabre Macpherson Strut Part Number: 22189454

Buick LeSabre Shock Absorber, Front Part Number: 22064311

Buick LeSabre Macpherson Strut Part Number: 88945833
$79.72 MSRP: $142.36You Save: $62.64 (44%)Buick LeSabre Shock Absorber Part Number: 22064100
Buick LeSabre Shock Absorber Part Number: 22046423

Buick LeSabre Shock Absorber, Rear Part Number: 22064425

Buick LeSabre Shock Absorber, Rear Part Number: 22064426

Buick LeSabre Shock Absorber, Rear Part Number: 22003121

Buick LeSabre Shock Absorber, Rear Part Number: 22064040
Buick LeSabre Shock Absorber, Front Part Number: 22064041
| Page 1 of 2 |Next >
1-20 of 24 Results
Buick LeSabre Shock Absorber
Want to cut long-term maintenance and repair costs? Choose OEM Shock Absorber. Those parts deliver top durability you can trust. On our site, you'll find a huge catalog of genuine Buick LeSabre parts. Prices are unbeatable, so you can keep more in your pocket. Every OEM Buick LeSabre Shock Absorber includes a manufacturer's warranty. You can also get an easy return policy that keeps buying risk free. Fast delivery, get your car on the road quickly. It's simple to search, compare, and order. Stop guessing about quality or fit. Order today and save with parts that last.
Buick LeSabre Shock Absorber is a very important part of the suspension system, and its consistency and efficiency while being used on LeSabre line of Buick car from 1959 to 2005 have demonstrated how important this part is. This Shock Absorber complements the struts by offering enhanced stability and control on the car and greatly reduces lateral bouncing and the impact of shock impulses; both factors greatly enhance ride comfort and dynamic control of the vehicle. The Buick LeSabre has had different shock absorber systems that it has incorporated in its models and different generation of twin tube and mono-tube types have been characterised for their ability in controlling hydraulic fluid for performance under various road conditions. More specifically, the Shock Absorber has PSD, which stand for Position Sensitive Damping, and ASD, which stands for Acceleration Sensitive Damping, which make it respond dynamically for better control and the comfort of the consumers. Advanced technologies such as electrorheological and magnetorheological dampers are additionally introduced, which adds another level of semi-activity and adaptability of the suspensions. These are top of the line designs of shock absorbers that go a long way into boosting of the efficiency of the Buick LeSabre in term of safety and its known longevity. In specific, the adaptability of the Shock Absorber applies to a wide range of models of LeSabre; thus, the automotive industry is assured of a proper protection of the driver in their vehicular excursion by providing a cushioned and a safely secure ride. The technology of the Buick LeSabre is traced from the early designs that paved way to this model, thereby making the Shock Absorber an important component of the beauty and power of Buick, an automobile giant that does not compromise style and superior performance.
Buick LeSabre Shock Absorber Parts and Q&A
- Q: How to properly dispose of a Shock Absorber on Buick LeSabre?A:First, eye protection should be worn when drilling to ensure no injury from metal chips. To determine the completion of the project, after cleaning the suspension strut publish a final post containing references from the original article and an in-text citation with the author's last name. This must be done within a few days of the article's publication. Clamp the strut in the vise with the rod extended horizontally. Drill in the center of End cap at the end cap using a 5mm (3/16 inches bit), so that gas or gaoilraction will escape. use shop towels to absorb oil. Take out the strut from the vise and hang it up in the vertical position having the hole at the bottom over a drain pan. Finally, slide the rod in and out of the tube until the oil is completely drained from the strut.
- Q: How to replace the front shock absorber on Buick LeSabre?A:The first step when changing strut assemblies consists of handling Coil Springs with care to prevent damage to protective coatings because breakage will shorten the components' lifespan. Begin by taking out the bolts holding the strut mounts in place. Lift the vehicle before supporting it on scaffolding to remove tires and wheels. Cut off the abs front wheel speed sensor harness connection and you must remove the speed sensor bracket when present from the strut. Never let go of the knuckle once you remove the bolts connecting the strut to the knuckle because this prevents damage to the Ball Joint and wheel drive shaft. Begin with braking line bracket removal from the strut of the left side before removing strut to knuckle bolts and their nuts to extract the strut. Follow these steps for installation: drop the vehicle then put the strut into its original position. After installing the strut mount into its body bolts use a torque wrench to tighten them to 47 nm (35 ft. Lbs.). Then, elevate the vehicle. Tighten the nuts and the steering knuckle bolts to 147 nm (108 ft. Lbs.) during strut installation. Within the strut assembly connect the Brake Line along with the retaining bolt and when possible install and secure the speed sensor bracket using its retaining bolt. Tighten both components to 17 nm (13 ft. Lbs.). Reconnect the abs sensor harness then replace the tire followed by lowering the vehicle for a final front wheel alignment procedure.


Related Buick LeSabre Parts
 Buick LeSabre Air Suspension Compressor
 Buick LeSabre Ball Joint
 Buick LeSabre Control Arm
 Buick LeSabre Control Arm Bolt
 Buick LeSabre Crossmember Bushing
 Buick LeSabre Front Cross-Member
 Buick LeSabre Lateral Link
 Buick LeSabre Ride Height Sensor
 Buick LeSabre Steering Knuckle
 Buick LeSabre Sway Bar Bracket
 Buick LeSabre Sway Bar Bushing
 Buick LeSabre Wheel Seal