ChevyParts
My Garage
My Account
Cart
OEM Cadillac DTS Shock Absorber
Suspension Shock Absorber- Select Vehicle by Model
- Select Vehicle by VIN
Select Vehicle by Model
orMake
Model
Year
Select Vehicle by VIN
For the most accurate results, select vehicle by your VIN (Vehicle Identification Number).
12 Shock Absorbers found


Cadillac DTS Strut Part Number: 19208029
$120.36 MSRP: $226.17You Save: $105.81 (47%)


Cadillac DTS Shock Absorber, Passenger Side Part Number: 19302769
$575.19 MSRP: $1116.34You Save: $541.15 (49%)Ships in 1-2 Business Days
Cadillac DTS Shock Absorber, Driver Side Part Number: 19302768
$575.19 MSRP: $1116.34You Save: $541.15 (49%)Ships in 1-2 Business Days


Cadillac DTS Shock Absorber, Rear Passenger Side Part Number: 19300026
$313.87 MSRP: $609.18You Save: $295.31 (49%)Ships in 1-2 Business Days


Cadillac DTS Shock Absorber, Rear Driver Side Part Number: 19300025
$313.87 MSRP: $609.16You Save: $295.29 (49%)Ships in 1-2 Business Days

Cadillac DTS Strut Part Number: 19300024
$673.39 MSRP: $1306.92You Save: $633.53 (49%)Ships in 1 Business Day

Cadillac DTS Strut Part Number: 19149151

Cadillac DTS Shock Absorber, Rear Part Number: 22400008
Cadillac DTS Shock Absorber, Rear Part Number: 22400007
Cadillac DTS Shock Absorber, Rear Passenger Side Part Number: 19300033
Cadillac DTS Shock Absorber, Rear Driver Side Part Number: 19300032
Cadillac DTS Shock Absorber, Rear Part Number: 19121822
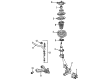
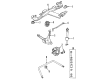
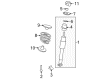
Cadillac DTS Shock Absorber
Want to cut long-term maintenance and repair costs? Choose OEM Shock Absorber. Those parts deliver top durability you can trust. On our site, you'll find a huge catalog of genuine Cadillac DTS parts. Prices are unbeatable, so you can keep more in your pocket. Every OEM Cadillac DTS Shock Absorber includes a manufacturer's warranty. You can also get an easy return policy that keeps buying risk free. Fast delivery, get your car on the road quickly. It's simple to search, compare, and order. Stop guessing about quality or fit. Order today and save with parts that last.
Shock Absorber of Cadillac DTS vehicles is the device accountable for the suspension system for the car, complementing the form of the struts. These components assist in reducing bounce and isolate shock impulses resulting in the enhancement of ride comfort and stability. It has been noted that Cadillac DTS vehicles over the years have incorporated many different kinds of shock absorbers- even dozens- which divided into two main categories- twin-tube and mono-tube- differ from each other by the manner in which hydraulic fluid flow is controlled in response to changes in driving conditions. Subtypes of shock absorbers such as PSD and ASD go deeper into defining the shock absorber's response according to conditions like position or acceleration and other technologies including electrorheological and magnetorheological dampers enable a semi-active and adaptive suspension system to kick in and improve comfort and control.
Cadillac DTS Shock Absorber Parts Questions & Experts Answers
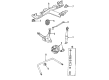
- Q: How to Replace a Shock Absorber (FE1, FE3) on Cadillac DTS?A:Starting the Shock Absorber (FE1, FE3) replacement requires vehicle raising and stable support. Begin by removing the wheel followed by the tire then jack the Control Arm into position for support. Detach the electronic level control air tube and shock electrical connector from the Control Arm while removing all wires from the Control Arm. The Shock Absorber needs removal by unbolting its two connections to the Control Arm before pulling out the trunk trim to reveal access to the upper shock. First detach the upper shock dust cover before you can reach the two nuts along with the shock reinforcement and proceed with the Shock Absorber extraction from the vehicle. Begin installation by placement of the new shock onto the vehicle before mounting its upper component. Set the shock reinforcement and two nuts into their places before securing them at 25 n.m (18 lb ft). Install the shock cover followed by proper placement of the trunk trim. Add lower shock bolts to their positioning and tighten them to 25 n.m (18 lb ft). Afterward, join electronic air control air tube and electrical connector to the Control Arm (FE3 and FE45) routing wiring properly. Fasten the wheel with tire in place while tightening each wheel nut to 125 n.m (80 lb ft). First allow the alc system to perform the arc by enabling the ignition and waiting 45 seconds during which the shock absorbers receive residual pressure. Finally, lower the vehicle.

Related Cadillac DTS Parts
 Cadillac DTS Axle Beam Mount
 Cadillac DTS Coil Spring Insulator
 Cadillac DTS Control Arm
 Cadillac DTS Control Arm Bolt
 Cadillac DTS Control Arm Bracket
 Cadillac DTS Control Arm Bushing
 Cadillac DTS Lateral Link
 Cadillac DTS Spindle Nut
 Cadillac DTS Steering Knuckle
 Cadillac DTS Sway Bar Bushing
 Cadillac DTS Sway Bar Link
 Cadillac DTS Trailing Arm