ChevyParts
My Garage
My Account
Cart
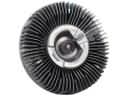
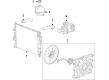
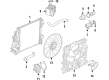
OEM Cadillac Radiator fan
Radiator Cooling Fan- Select Vehicle by Model
- Select Vehicle by VIN
Select Vehicle by Model
orMake
Model
Year
Select Vehicle by VIN
For the most accurate results, select vehicle by your VIN (Vehicle Identification Number).
84 Radiator fans found


Cadillac Fan & Motor Part Number: 84188461
$270.08 MSRP: $555.01You Save: $284.93 (52%)Ships in 1-2 Business DaysProduct Specifications- Other Name: Fan, Engine Cooling; Radiator Fan Assembly; Cooling Fan Assembly; Blade, Engine Cooling
- Replaces: 22980299, 84607949


Cadillac Fan & Motor Part Number: 23419653
$457.89 MSRP: $828.78You Save: $370.89 (45%)Ships in 1-2 Business DaysProduct Specifications- Other Name: Fan Assembly-Engine Cooler; Radiator Fan Assembly; Fan Assembly; Fan, Engine Air Cooling(Electrical)


Cadillac Fan Assembly Part Number: 84001484
$262.19 MSRP: $474.56You Save: $212.37 (45%)Product Specifications- Other Name: Fan Assembly-Engine Cooler; Dual Radiator and Condenser Fan Assembly; Radiator Fan Assembly; Cooling Fan Assembly; Fan Module; Fan, Engine Air Cooling(Electrical)
- Replaced by: 19435356

Cadillac Fan Assembly Part Number: 84798305
$248.95 MSRP: $446.54You Save: $197.59 (45%)Ships in 1-3 Business DaysProduct Specifications- Other Name: Fan Assembly-Engine Cooler; Radiator Fan Assembly; Fan Module

Cadillac Cooling Fan, Driver Side Part Number: 25767915
$36.51 MSRP: $68.56You Save: $32.05 (47%)Ships in 1-2 Business DaysProduct Specifications- Other Name: Blade, Engine Cooling; Dual Radiator and Condenser Fan Assembly; Radiator Fan Assembly; Cooling Fan Assembly; Fan Blade; Fan Assembly; Fan, Engine Air Cooling(Electrical)
- Position: Driver Side
- Replaces: 25728388

Cadillac Fan & Motor Part Number: 85159686
$259.15 MSRP: $464.84You Save: $205.69 (45%)Ships in 1-3 Business DaysProduct Specifications- Other Name: Fan Assembly-Engine Cooler; Fan Assembly; Fan, Engine Air Cooling(Electrical)
- Replaced by: 86578076

Cadillac Fan & Motor Part Number: 84955625
$254.21 MSRP: $455.99You Save: $201.78 (45%)Ships in 1-3 Business DaysProduct Specifications- Other Name: Fan Assembly-Engine Cooler; Radiator Fan Assembly; Fan Assembly; Fan, Engine Air Cooling(Electrical)
- Replaces: 84533009, 84395240
Cadillac Fan Shroud Part Number: 19333232
$396.77 MSRP: $722.72You Save: $325.95 (46%)Ships in 1-2 Business DaysProduct Specifications- Other Name: Fan Assembly, Engine Cooler; Radiator Fan Assembly; Fan Assembly; Fan Module; Fan, Engine Air Cooling(Electrical)
- Replaces: 22855310

Cadillac Fan & Motor Part Number: 23405263
$390.31 MSRP: $733.00You Save: $342.69 (47%)Ships in 1-2 Business DaysProduct Specifications- Other Name: Fan Assembly-Engine Cooler; Radiator Fan Assembly; Fan Module; Fan, Engine Air Cooling(Electrical)

Cadillac Fan Shroud Part Number: 84392557
$362.04 MSRP: $655.26You Save: $293.22 (45%)Product Specifications- Other Name: Fan Assembly-Engine Cooler; Fan Assembly; Fan Module; Fan, Engine Air Cooling(Electrical)
- Replaces: 23347101, 23458695

Cadillac Fan Assembly Part Number: 85156356
$252.36 MSRP: $452.66You Save: $200.30 (45%)Ships in 1-3 Business DaysProduct Specifications- Other Name: Fan Assembly-Engine Cooler; Fan Module; Fan, Engine Air Cooling(Electrical)
- Replaced by: 85080140
- Replaces: 84711610, 84747463, 84798304

Cadillac Fan Blade Part Number: 25750925
$137.76 MSRP: $258.70You Save: $120.94 (47%)Ships in 1-2 Business DaysProduct Specifications- Other Name: Blade, Engine Cooling; Radiator Fan Assembly
Cadillac Fan & Motor Part Number: 85159684
$206.94 MSRP: $425.24You Save: $218.30 (52%)Ships in 1-3 Business DaysProduct Specifications- Other Name: Fan Assembly-Engine Cooler; Fan Assembly; Fan Module; Fan, Engine Air Cooling(Electrical)
- Replaced by: 86578078

Cadillac Cooling Fan, Driver Side Part Number: 21999768
$28.74 MSRP: $52.02You Save: $23.28 (45%)Ships in 1-2 Business DaysProduct Specifications- Other Name: Blade Assembly-Engine Coolant Fan; Dual Radiator and Condenser Fan; Cooling Fan Assembly.; Blade, Engine Cooling
- Position: Driver Side

Cadillac Fan Blade, Passenger Side Part Number: 22830901
$116.98 MSRP: $219.68You Save: $102.70 (47%)Ships in 1-2 Business DaysProduct Specifications- Other Name: Fan Assembly-Engine Cooler; Radiator Fan Assembly; Fan & Motor; Fan, Engine Air Cooling(Electrical)
- Position: Passenger Side

Cadillac Fan & Motor, Passenger Side Part Number: 84580369
$176.93 MSRP: $317.36You Save: $140.43 (45%)Product Specifications- Other Name: Motor Assembly-Engine Cooling Fan; Radiator Fan Assembly; Fan Motor
- Position: Passenger Side
- Replaced by: 86778037

Cadillac Cooling Fan, Passenger Side Part Number: 21999769
$27.89 MSRP: $52.38You Save: $24.49 (47%)Ships in 1-2 Business DaysProduct Specifications- Other Name: Blade, Engine Cooling; Dual Radiator and Condenser Fan Assembly; Radiator Fan Assembly; Cooling Fan Assembly; Fan Blade
- Position: Passenger Side

Cadillac Fan Assembly Part Number: 23347100
$448.49 MSRP: $842.23You Save: $393.74 (47%)Ships in 1-2 Business DaysProduct Specifications- Other Name: Fan Assembly-Engine Cooler; Radiator Fan Assembly; Fan Module; Fan, Engine Air Cooling(Electrical)
- Replaces: 22990704, 23267161

Cadillac Fan Blade, Driver Side Part Number: 20897351
$90.92 MSRP: $170.74You Save: $79.82 (47%)Ships in 1-2 Business DaysProduct Specifications- Other Name: Blade Kit, Engine Cooling; Radiator Fan Assembly; Fan Motor
- Position: Driver Side
Cadillac Fan & Motor Part Number: 84897502
$304.67 MSRP: $546.49You Save: $241.82 (45%)Ships in 1-3 Business DaysProduct Specifications- Other Name: Fan Assembly-Engine Cooler; Radiator Fan Assembly; Fan Assembly; Fan, Engine Air Cooling(Electrical)
- Replaces: 84395241, 84595417
| Page 1 of 5 |Next >
1-20 of 84 Results
Cadillac Radiator fan
Want to cut long-term maintenance and repair costs? Choose OEM Radiator fan. Those parts deliver top durability you can trust. On our site, you'll find a huge catalog of genuine Cadillac parts. Prices are unbeatable, so you can keep more in your pocket. Every OEM Cadillac Radiator fan includes a manufacturer's warranty. You can also get an easy return policy that keeps buying risk free. Fast delivery, get your car on the road quickly. It's simple to search, compare, and order. Stop guessing about quality or fit. Order today and save with parts that last.
Cadillac Radiator fan Parts Questions & Experts Answers
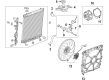
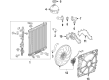
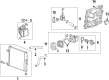
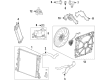
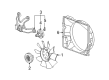
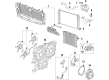
- Q: How to Replace Radiator fan and Fan Motor on Cadillac CTS?A:The replacement process starts with air deflector removal along with disconnecting the auxiliary Radiator fan electrical connector. The transmission cooler quick disconnect tool (J 44827) should be used to separate auxiliary transmission lines without harming either Radiator or transmission or Transmission Oil Cooler. Start by placing auxiliary cooler lines aside and the auxiliary Radiator fan assembly bolts (1, 2) out of the way before removing the lower left auxiliary Radiator fan bolt, the auxiliary Radiator fan assembly bolt and the upper left auxiliary Radiator fan bolt to remove the assembly from the vehicle. You should reinstall the auxiliary fan assembly into the vehicle followed by tightening the lower bolts (1, 2) to 6.5 nm (58 inch lbs.). Attend to the installation of the fan assembly bolt at the specified torque level. After that apply 6.5 nm (58 inch lbs.) to the other auxiliary Radiator fan bolts. Insert the auxiliary transaxle oil cooler line into its place until it secures properly then test its stability by a gentle pull on the line. Install the auxiliary Radiator fan electrical connector before placing back the air deflector. Check the transmission fluid level as the last step of the inspection.
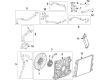
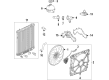
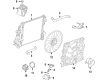
- Q: How to replace the radiator fan on Cadillac DeVille?A:Begin the electric cooling fan replacement by discharging the battery negative cable followed by eliminating the upper Radiator support. Empty the cooling system then strip off the air deflector from the vehicle. Start by taking off the engine oil cooler pipe retaining clip and bolt from the Fan Shroud before lowering the vehicle. Apply the hose clamp remover/installer (J 37097-A) model to detach the inlet Radiator Hose from the Radiator housing. The upper engine oil cooler pipe needs removal from the Radiator before taking out the upper transaxle oil cooler pipe retaining bolt from the Fan Shroud. Use the cooler quick connect tool (J 41623-A) to remove the upper transaxle oil cooler pipe from the Radiator while detached from the plastic cap on its quick connect fitting. First disconnect the harness electrical connections of the Radiator fan motors before removing the clips that affix the harness to the Fan Shroud. The two retainers connecting the a/c discharge hose need removal before the two electric Radiator fan mounting bolts get extracted. Position the Radiator fan assembly to the left side of the vehicle before lifting at the right side until it removes completely in a rightward direction. Position the Radiator fan assembly behind the Radiator and move it towards the right side before pressing downward on the right side until the lower feet of the Fan Shroud match the Radiator mounting tabs. The electric Radiator fan mounting bolts need installation followed by tightening to 6 nm (53 inch lbs.). Insert the connectors of both retainer devices into the outer end of the A/C Hose and reattach all wiring harness plugs to the motors before installing Fan Shroud clips. Insert the upper transaxle oil cooler pipe into the Radiator quick connect fitting while pushing until it clicks before gently checking retention and placing the plastic cap on the connector. Screw the upper transaxle oil cooler pipe retaining bolt into the Fan Shroud position with 6 nm (53 inch lbs.) torque specification. Connect the upper pipe supplying engine oil coolant to the Radiator by tightening its fitting to 18 nm torque. The hose clamp remover/installer (J 37097-A) should be used to attach the inlet Radiator Hose to the Radiator before lifting and supporting the vehicle. Put in the engine oil cooler pipe retaining clip along with bolt to Fan Shroud and fasten the bolt at 6 nm (53 inch lbs.). Put back the air deflector together with lowering the vehicle to install the upper Radiator support. To complete this procedure fill the cooling system then reconnect the battery negative cable and verify engine oil level.
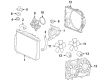
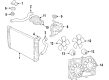
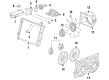
- Q: How to replace the radiator fan and fan shroud without PWM on Cadillac XLR?A:Before working on the Radiator fan replacement without pwm, you must maintain safe practices by avoiding contact with the electric fan area due to start-up hazard. Fan blades and housings that show any bending or damage or cracking must be replaced right away to safeguard against accidents and automobile damage. The first step involves placing the ignition and start switch to off or lock while disconnecting the negative battery cable if tools are expected to touch active electrical terminals. The first step requires uninstalling the Radiator support and following it by unconnecting the engine wiring harness at the Radiator fan shroud and the surge tank outlet hose from its clips. Initiate the repair by supporting the vehicle then extracting the stabilizer shaft and eliminating power supply to the Radiator fan through its electrical connector. Usage of the following steps allows disconnection of the lower transmission oil cooler line from the Radiator along with lifting the Radiator fan and shroud to remove retaining tabs from the Radiator before removing the complete assembly. Start with Radiator fan and shroud that should rest correctly on the Radiator before installing Radiator fan and shroud followed by lower transmission oil cooler line and Radiator fan electrical connector. First lower the vehicle down then install the stabilizer shaft before you attach the surge tank outlet hose to retaining clips on the Radiator fan shroud and complete the installation of the engine wiring harness and Radiator support.