ChevyParts
My Garage
My Account
Cart
OEM Chevrolet Aveo Crankshaft
Crank Shaft- Select Vehicle by Model
- Select Vehicle by VIN
Select Vehicle by Model
orMake
Model
Year
Select Vehicle by VIN
For the most accurate results, select vehicle by your VIN (Vehicle Identification Number).
2 Crankshafts found


Chevrolet Aveo Crankshaft Part Number: 96385403
$384.78 MSRP: $605.46You Save: $220.68 (37%)Ships in 1-3 Business Days
Chevrolet Aveo Crankshaft Part Number: 55569767
$489.02 MSRP: $772.90You Save: $283.88 (37%)Ships in 1-3 Business Days
Chevrolet Aveo Crankshaft
Want to cut long-term maintenance and repair costs? Choose OEM Crankshaft. Those parts deliver top durability you can trust. On our site, you'll find a huge catalog of genuine Chevrolet Aveo parts. Prices are unbeatable, so you can keep more in your pocket. Every OEM Chevrolet Aveo Crankshaft includes a manufacturer's warranty. You can also get an easy return policy that keeps buying risk free. Fast delivery, get your car on the road quickly. It's simple to search, compare, and order. Stop guessing about quality or fit. Order today and save with parts that last.
Chevrolet Aveo Crankshaft Parts Questions & Experts Answers
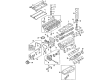
- Q: How to Ensure Proper Crankshaft Installation on Chevrolet Aveo?A:When replacing the Crankshaft, start with removing the engine and the Flywheel bolts further on the Flywheel and then the Flywheel along with the Crankshaft rear oil seal. Mount the engine assembly on the otc 1726 (KM 412) engine overhaul stand first and then remove the upper and lower front Timing Belt cover bolts and covers. Loosen the retaining bolts for the Water Pump and use the 42492-a (KM 421-A) timing belt adjuster to ease off tension from the Timing Belt when removing it. Remove the crankcase ventilation tubes, engine cover bolts, as well as the ignition wires, after which you can remove the valve cover and pieces. Take out the intake and exhaust camshaft gears and bolts and the Timing Belt automatic tensioner and idler pulley. Do it carefully. Disengage the Crankshaft Timing Belt gear, rear Timing Belt cover, Oil Pan, oil pickup tube, and Oil Pump. Remove and mark the connecting rod Crankshaft and Crankshaft bearing caps, and then pull out the crank shaft and upper Crankshaft bearings. Clean anything that needs cleaning, and then install the Crankshaft and bearings, making sure they check clearances and end play. Apply adhesive sealing compound to the rear Crankshaft bearing cap and position the Crankshaft bearings, to be bolted down with new bolts to as specified torque using the 45059 angle meter or km-470-b angular torque gage. Reinstall the connecting Rod Bearings and covers, then the Oil Pump and its parts. Mount the Oil Pan with a gasket keeping in mind to do so in a timely fashion immediately after applying liquid gasket. Reassemble the Timing Belt parts, camshaft gears and from valve cover, tightening all bolts to the required torque. Finally connect the ignition wires, replace the engine cover, mount the engine mount the engine making sure to replacing the Crankshaft rear oil seal with the 36972 (KM 635) Crankshaft rear oil seal installer above it with the Flywheel and attaching the bolts, fully tightening using the 45059 or km-470-b.

Related Chevrolet Aveo Parts
 Chevrolet Aveo Cylinder Head
 Chevrolet Aveo Oil Cooler
 Chevrolet Aveo Timing Belt
 Chevrolet Aveo Coolant Filter
 Chevrolet Aveo Dipstick
 Chevrolet Aveo Drain Plug
 Chevrolet Aveo Intake Valve
 Chevrolet Aveo Lash Adjuster
 Chevrolet Aveo Motor And Transmission Mount
 Chevrolet Aveo Rocker Guide
 Chevrolet Aveo Rocker Shaft Spring Kit
 Chevrolet Aveo Timing Chain Tensioner