ChevyParts
My Garage
My Account
Cart
OEM Chevrolet Equinox Timing Cover
Engine Timing Cover- Select Vehicle by Model
- Select Vehicle by VIN
Select Vehicle by Model
orMake
Model
Year
Select Vehicle by VIN
For the most accurate results, select vehicle by your VIN (Vehicle Identification Number).
8 Timing Covers found


Chevrolet Equinox Oil Pump, Green Line, Front Part Number: 12637040
$196.17 MSRP: $333.95You Save: $137.78 (42%)Ships in 1-2 Business Days
Chevrolet Equinox Timing Cover Part Number: 55575063
$35.66 MSRP: $55.86You Save: $20.20 (37%)Ships in 1-3 Business DaysChevrolet Equinox Timing Cover, Lower Part Number: 55499020
$64.04 MSRP: $100.31You Save: $36.27 (37%)Ships in 1-3 Business Days
Chevrolet Equinox Front Cover Part Number: 25203060
$100.30 MSRP: $157.10You Save: $56.80 (37%)Ships in 1-3 Business Days
Chevrolet Equinox Water Pump, Front Part Number: 12698371
$363.26 MSRP: $571.56You Save: $208.30 (37%)Ships in 1-3 Business Days
Chevrolet Equinox Timing Cover, Front Part Number: 12695111
$89.11 MSRP: $139.58You Save: $50.47 (37%)Ships in 1-2 Business Days


Chevrolet Equinox Front Cover Part Number: 12599771
$157.79 MSRP: $248.27You Save: $90.48 (37%)Chevrolet Equinox Timing Cover, Front Part Number: 12655856
$532.78 MSRP: $841.74You Save: $308.96 (37%)
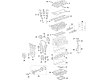
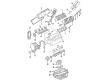
Chevrolet Equinox Timing Cover
Want to cut long-term maintenance and repair costs? Choose OEM Timing Cover. Those parts deliver top durability you can trust. On our site, you'll find a huge catalog of genuine Chevrolet Equinox parts. Prices are unbeatable, so you can keep more in your pocket. Every OEM Chevrolet Equinox Timing Cover includes a manufacturer's warranty. You can also get an easy return policy that keeps buying risk free. Fast delivery, get your car on the road quickly. It's simple to search, compare, and order. Stop guessing about quality or fit. Order today and save with parts that last.
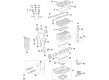
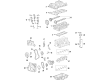
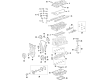
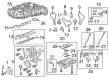
Timing Cover of Chevrolet Equinox vehicles play important part in protecting the timing mechanism of an engine that may include the use of a timing belt, timing chain, or cam belt. Made out of aluminum, plastic or steel the Timing Cover shields the inner parts from destruction by debris. A large number of Chevrolet Equinox Timing Covers feature gaskets that help to boost the defense of timing belt. Depending on the year of manufacture, there are different Timing Covers used in Chevrolet Equinox which has the optimal capability in terms of durability and protection. However, what many vehicle users may not realize is that even the toughest Timing Covers can give out at any time, thus, it is necessary to have them changed as soon as possible to avoid putting other's lives in danger.
Chevrolet Equinox Timing Cover Parts Questions & Experts Answers
- Q: How to replace the engine front timing cover on Chevrolet Equinox?A:You must start by disconnecting the negative Battery Cable when replacing the engine front cover along with removal of the air cleaner assembly. The first step involves installing the engine support fixture followed by Drive Belt removal. Start by draining the cooling system followed by vehicle suspension. Crankshaft balancer, lower belt idler pulley and engine Oil Pan need to be removed from the engine. The procedure starts by removing the left belt idler pulley while also taking out the right Engine Mount Bracket bolts (2-4) and finally extracting the right Engine Mount Bracket. Extract the Water Pump along with the thermostat bypass hose adapter and radiator outlet hose from the engine front cover. First remove bolts holding the engine front cover (2-4) and break the connection between front cover and engine block. Clean the sealing surfaces before placing the engine front cover on with its new gasket . Apply sealer to the lower tabs of the engine front cover gasket creating a minimum bead width of 5.0 mm (0.20 in). Install the gasket by position it on the engine block while aligning with the retaining pins. Use the engine front cover bolts (3, 4) to fasten the cover by applying 55 n.m (41 lb ft) torque and bolt to 27 n.m (20 lb ft). Place the radiator outlet hose in its position along with the thermostat bypass hose adapter and Water Pump. Start by positioning the right Engine Mount Bracket correctly and installing bulges (2-4) with a torque of 55 n.m (41 lb ft). Progress to the Engine Mount Bracket bulges that need 25 n.m (18 lb ft). Install the left belt idler pulley before elevating the vehicle again to fit the engine Oil Pan with the added step of installing the lower belt idler pulley. Put the crankshaft balancer back into place after lowering the vehicle and installing the Drive Belt. Reinstall the air cleaner assembly then restore the negative Battery Cable before removing the engine support fixture. Finally, fill the cooling system.

Related Chevrolet Equinox Parts
 Chevrolet Equinox Cylinder Head
 Chevrolet Equinox Valve Cover Gasket
 Chevrolet Equinox Camshaft Seal
 Chevrolet Equinox Crankshaft Thrust Washer Set
 Chevrolet Equinox Dipstick Tube
 Chevrolet Equinox Lash Adjuster
 Chevrolet Equinox Oil Pan Baffle
 Chevrolet Equinox Oil Pan Gasket
 Chevrolet Equinox Piston
 Chevrolet Equinox Rocker Arm
 Chevrolet Equinox Timing Chain Guide
 Chevrolet Equinox Valve Stem Oil Seal