ChevyParts
My Garage
My Account
Cart
OEM Chevrolet Malibu Timing Cover
Engine Timing Cover- Select Vehicle by Model
- Select Vehicle by VIN
Select Vehicle by Model
orMake
Model
Year
Select Vehicle by VIN
For the most accurate results, select vehicle by your VIN (Vehicle Identification Number).
15 Timing Covers found


Chevrolet Malibu Oil Pump, Green Line, Front Part Number: 12637040
$196.17 MSRP: $333.95You Save: $137.78 (42%)Ships in 1-2 Business Days
Chevrolet Malibu Timing Cover Part Number: 25203953
$67.61 MSRP: $105.91You Save: $38.30 (37%)Ships in 1-3 Business DaysChevrolet Malibu Front Cover Part Number: 12681868
$44.32 MSRP: $69.40You Save: $25.08 (37%)Ships in 1-3 Business Days
Chevrolet Malibu Front Cover Part Number: 12664881
$126.81 MSRP: $199.54You Save: $72.73 (37%)Ships in 1-3 Business Days
Chevrolet Malibu Front Cover Part Number: 25203060
$100.30 MSRP: $157.10You Save: $56.80 (37%)Ships in 1-3 Business Days
Chevrolet Malibu Timing Cover, Front Part Number: 24576620
$5.39 MSRP: $8.44You Save: $3.05 (37%)Ships in 1-3 Business Days
Chevrolet Malibu Timing Cover, Front Part Number: 19181093
$55.14 MSRP: $75.49You Save: $20.35 (27%)Ships in 1-2 Business Days
Chevrolet Malibu Water Pump, Front Part Number: 12698371
$363.26 MSRP: $571.56You Save: $208.30 (37%)Ships in 1-3 Business Days

Chevrolet Malibu Timing Cover, Front Part Number: 12695111
$89.11 MSRP: $139.58You Save: $50.47 (37%)Ships in 1-2 Business Days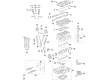
Chevrolet Malibu Timing Cover, Front Part Number: 12690012
$129.63 MSRP: $203.97You Save: $74.34 (37%)


Chevrolet Malibu Timing Cover, Front Part Number: 19209125


Chevrolet Malibu Timing Cover, Front Part Number: 12568797

Chevrolet Malibu Front Cover Part Number: 55569220

Chevrolet Malibu Timing Cover Part Number: 12597155
Chevrolet Malibu Timing Cover, Front Part Number: 12655856
$532.78 MSRP: $841.74You Save: $308.96 (37%)
Chevrolet Malibu Timing Cover
Want to cut long-term maintenance and repair costs? Choose OEM Timing Cover. Those parts deliver top durability you can trust. On our site, you'll find a huge catalog of genuine Chevrolet Malibu parts. Prices are unbeatable, so you can keep more in your pocket. Every OEM Chevrolet Malibu Timing Cover includes a manufacturer's warranty. You can also get an easy return policy that keeps buying risk free. Fast delivery, get your car on the road quickly. It's simple to search, compare, and order. Stop guessing about quality or fit. Order today and save with parts that last.
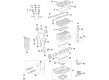
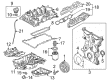
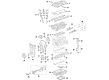
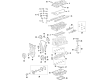
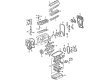
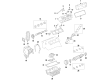
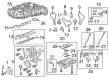
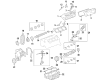
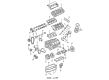
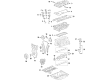
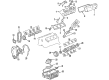
The Timing Cover of Chevrolet Malibu vehicles plays a very important part in protecting the timing mechanism of the car engines, which may incorporate this belt as a timing belt, timing chain or cam belt. Made from materials like aluminum, plastic or steel the Chevrolet Malibu Timing Cover shields the teeth of these components from the ravages of debris. Furthermore, gaskets are also fitted to most Timing Covers to improve on the defense of the timing belt. Throughout the production years of Chester Malibu different types of Timing Covers were used depending on the engines for which they were intended. Nevertheless, Timing Covers like any mechanical parts are capable of failure thus the need to replace them on time to enhance safe operation of the automobile. The Chevrolet Malibu Timing Cover must be kept clean and well maintained in order to prevent damage to an automobile's engine timing mechanism.
Chevrolet Malibu Timing Cover Parts and Q&A
- Q: How to service and repair the timing cover on Chevrolet Malibu?A:The first step to work on the Timing Cover involves disconnecting the negative Battery Cable. The service team should recover a/c refrigerant while also draining down the cooling system. Use the engine support fixture (J28467-360) to detach the Engine Mount assembly along with Engine Mount bracket support, Drive Belt, air cleaner assembly, throttle body tube and power steering liner at the Power Steering Pump. Start by loosening the top two A/C Compressor bolts while removing the generator and its bracket. Then lift and stow the vehicle before removing the right front tire followed by the wheel assembly, right front splash shield, flywheel inspection cover, crankshaft balancer, and Drive Belt tensioner. Disconnect the right wheel speed sensor connector and wire harness from the suspension support before removing the right Ball Joint and stabilizer shaft as well as the A/C Compressor to Oil Pan bolts and Oil Filter and adapter. Start by draining engine oil before removing the Starter motor followed by the Oil Pan and crankshaft sensor. Finally, remove lower front cover bolts. You must lower the vehicle before removing the coolant bypass from the coolant pump and manifold as well as the Radiator Hose from the coolant outlet housing. After you remove front cover and front cover oil seal you need to clean the mating areas of front cover together with Oil Pan and cylinder block by using degreaser. Installation requires placing the front cover gasket followed by gm rtv sealer (GM P/N 1052080 or equivalent) application to both sides of its lower tabs before setting the front cover oil seal. Position the front cover on the engine and fasten its upper two bolts to 21 nm (15 ft. Lbs.). Mount both the Radiator Hose to coolant housing and the coolant bypass pipe to coolant pump and manifold. Raising the vehicle for support allows installation of lower front cover bolts before using a torque wrench to tighten small bolts to 21 nm (15 ft. Lbs.) and large bolts to 47 nm (35 ft. Lbs.). Mount the crankshaft sensor followed by the Oil Pan, starter motor, oil filter before installing the A/C Compressor to Oil Pan bolts and stabilizer shaft then right Ball Joint before final connections of the right wheel speed sensor connector and wire harness. The service technician should install the Drive Belt tensioner and crankshaft balancer followed by the flywheel inspection cover and right splash shield and right front tire and wheel assembly. After lowering the vehicle, install the Power Steering Pump and Drive Belt followed by the A/C Compressor top bolts, engine mount bracket support, engine mount assembly and tighten all 8 mm bolts to 20 nm and all 12 mm bolts to 40 nm. After removing the engine support fixture (J28467-360) add fluid to the cooling system followed by recommended oil to reach the appropriate crankcase level then install the negative Battery Cable.
- Q: How to Replace a Timing Cover on an Engine for Front on Chevrolet Malibu?A:To replace engine front cover, first, remove the drive belt tensioner and the crankshaft balancer. Mount the engine support fixture, and extract the Engine Mount to bracket bolts and Engine Mount to side rail nut before removing the Engine Mount from the engine compartment. Next, you should remove the Engine Mount bracket to engine bolts, as well as the Engine Mount bracket. Take off the engine front cover to water room bolt, lift and support the vehicle and then remove the engine front cover bolts and also the engine front cover. Take away the old engine front cover gasket, and attach a new one on the dowel pins before replacing the engine front cover. Mount the engine front cover bolts and turn them to 25 n.m (18 lb ft), after that lower the vehicle and attach the engine front cover to water pump bolt, tighten up to 25 n.m (18 lb ft). Position the Engine Mount bracket for the engine and insert the long bolts into the forward and lower rear and the short bolt for the upper rear and label them, and tighten them in the order of upper left, lower left, and lower right for 100 n.m (74 lb.ft). Mount the Engine Mount to the engine compartment then mount the Engine Mount to side rail nut while tightening to 100 n.m (74 lb ft). And fix the Engine Mount to bracket bolts and tighten them in a sequence of middle, rear and front of 50 n.m (37 lb ft). Finally, take off the engine support fixture, install the crankshaft balancer, and then install the drive belt pressure-sensitive gizmo.


Related Chevrolet Malibu Parts
 Chevrolet Malibu Dipstick
 Chevrolet Malibu Cam Gear
 Chevrolet Malibu Coolant Filter
 Chevrolet Malibu Crankshaft Gear
 Chevrolet Malibu Dipstick Tube
 Chevrolet Malibu Drain Plug
 Chevrolet Malibu Engine Mount Bracket
 Chevrolet Malibu Oil Cooler
 Chevrolet Malibu Oil Pump
 Chevrolet Malibu Piston
 Chevrolet Malibu Timing Chain Tensioner
 Chevrolet Malibu Timing Cover Gasket