ChevyParts
My Garage
My Account
Cart
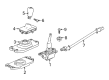
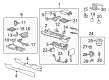
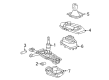
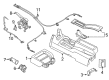
OEM Chevrolet Shift Linkage Boot
Shift Linkage Dust Boot- Select Vehicle by Model
- Select Vehicle by VIN
Select Vehicle by Model
orMake
Model
Year
Select Vehicle by VIN
For the most accurate results, select vehicle by your VIN (Vehicle Identification Number).
57 Shift Linkage Boots found


Chevrolet Lower Plate Part Number: 24265270
$8.06 MSRP: $11.99You Save: $3.93 (33%)Ships in 1-3 Business DaysProduct Specifications- Other Name: Boot-Manual Transmission Control Lever; Boot, Transmission Control Lever


Chevrolet Upper Plate Part Number: 24272333
$8.01 MSRP: $11.91You Save: $3.90 (33%)Product Specifications- Other Name: Boot-Manual Transmission Control Lever; Boot, Transmission Control Lever
- Replaces: 24265269

Chevrolet Shift Boot Part Number: 24263901
$46.28 MSRP: $72.49You Save: $26.21 (37%)Ships in 1-3 Business DaysProduct Specifications- Other Name: Boot, Transmission Control Lever
Chevrolet Shift Boot, Black Part Number: 24261475
$39.73 MSRP: $67.01You Save: $27.28 (41%)Ships in 1-2 Business DaysProduct Specifications- Other Name: Boot, Transmission Control Lever

Chevrolet Boot Part Number: 92193283
$10.63 MSRP: $15.82You Save: $5.19 (33%)Ships in 1-3 Business DaysProduct Specifications- Other Name: Boot-Manual Transmission Control Lever; Shift Boot; Boot, Transmission Control Lever

Chevrolet Shift Boot, Gray Stitch Part Number: 23411180
$127.69 MSRP: $192.64You Save: $64.95 (34%)Ships in 1-2 Business DaysProduct Specifications- Other Name: Boot, Transmission Control Lever
- Replaces: 23174529, 23201112
Chevrolet Shift Boot Part Number: 23201110
$92.32 MSRP: $139.28You Save: $46.96 (34%)Ships in 1-2 Business DaysProduct Specifications- Other Name: Boot Assembly-Manual Transmission Control Lever *Black
- Replaced by: 23411178
Chevrolet Shift Boot Part Number: 23263720
$85.43 MSRP: $128.88You Save: $43.45 (34%)Ships in 1-2 Business DaysProduct Specifications- Other Name: Boot Assembly-Manual Transmission Control Lever *Black
- Replaced by: 23411184

Chevrolet Trim Cover Part Number: 19317835
$59.35 MSRP: $88.32You Save: $28.97 (33%)Ships in 1-3 Business DaysProduct Specifications- Other Name: Boot, Transmission Control Lever

Chevrolet Shift Boot Part Number: 20907616
$28.34 MSRP: $42.17You Save: $13.83 (33%)Ships in 1-3 Business DaysProduct Specifications- Other Name: Boot, Automatic Transmission Control; Boot, Transmission Control Lever

Chevrolet Lower Cover Part Number: 24274697
$20.31 MSRP: $30.23You Save: $9.92 (33%)Ships in 1-3 Business DaysProduct Specifications- Other Name: Boot-Manual Transmission Control Lever Lower; Boot, Transmission Control Lever
- Position: Lower

Chevrolet Trim Bezel Part Number: 92193282
$6.28 MSRP: $9.36You Save: $3.08 (33%)Ships in 1-3 Business DaysProduct Specifications- Other Name: Boot Assembly-Manual Transmission Control Lever Lower; Boot, Transmission Control Lever
- Position: Lower
Chevrolet Shift Boot Part Number: 23201113
$60.26 MSRP: $90.90You Save: $30.64 (34%)Ships in 1-2 Business DaysProduct Specifications- Other Name: Boot Assembly-Manual Transmission Control Lever *Black
- Replaced by: 23411181
Chevrolet Shift Boot Part Number: 20907625
$15.16 MSRP: $22.56You Save: $7.40 (33%)Ships in 1-3 Business DaysProduct Specifications- Other Name: Boot, Transmission Control Lever
Chevrolet Shift Boot, Titanium Part Number: 20907686
$6.38 MSRP: $9.50You Save: $3.12 (33%)Ships in 1-3 Business DaysProduct Specifications- Other Name: Boot, Transmission Control Lever

Chevrolet Shift Boot, Black; Red Part Number: 24263725
$48.72 MSRP: $72.50You Save: $23.78 (33%)Product Specifications- Other Name: Boot, Transmission Control Lever


Chevrolet Shift Boot, Black; Red Part Number: 24261464
$73.26 MSRP: $109.02You Save: $35.76 (33%)Product Specifications- Other Name: Boot, Transmission Control Lever

Chevrolet Boot Part Number: 92191386
$48.09 MSRP: $75.33You Save: $27.24 (37%)Product Specifications- Other Name: Boot, Transmission Control Lever; Shift Boot
- Position: Lower
Chevrolet Shift Boot, Blue Part Number: 24267675
$21.80 MSRP: $32.43You Save: $10.63 (33%)Product Specifications- Other Name: Boot, Transmission Control Lever
Chevrolet Shift Boot, Dark Gray, Steel Part Number: 24267676
$47.45 MSRP: $70.62You Save: $23.17 (33%)Product Specifications- Other Name: Boot, Transmission Control Lever
| Page 1 of 3 |Next >
1-20 of 57 Results
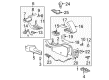
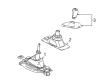
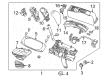
Chevrolet Shift Linkage Boot
Want to cut long-term maintenance and repair costs? Choose OEM Shift Linkage Boot. Those parts deliver top durability you can trust. On our site, you'll find a huge catalog of genuine Chevrolet parts. Prices are unbeatable, so you can keep more in your pocket. Every OEM Chevrolet Shift Linkage Boot includes a manufacturer's warranty. You can also get an easy return policy that keeps buying risk free. Fast delivery, get your car on the road quickly. It's simple to search, compare, and order. Stop guessing about quality or fit. Order today and save with parts that last.
Chevrolet Shift Linkage Boot Parts Questions & Experts Answers
- Q: How to Service and Repair the Shift Linkage Boot on Chevrolet Camaro?A:Begin replacement of the shift control boot by removing both the shift control closeout boot followed by the control lever boot retainer and control lever boot from the control. The replacement process starts with going under the control lever boot followed by installing the control lever boot retainer then continue with the installation of the shift control closeout boot.
- Q: How to Replace the Shift Linkage Boot on Chevrolet Colorado?A:The first step for control lever and boot replacement involves taking out both the shift lever assembly and console component if present. The next step includes screw removal from the control lever boot then tilting this boot away from the control lever to separate them. First set the transmission to neutral position before removing the control lever housing assembly bolts which detach the assembly together with its gasket. Users must apply masking over the control lever housing opening before inspecting it to block any transmission entry of foreign objects. Also separate the control lever housing for assembly work. The first step of installation requires reassembly of the control lever housing unless it was already disassembled. After removing the masking material from the control lever opening check that the sealing surface is both clean and dry. Install the transmission control lever gasket while positioning the control lever housing assembly into the opening with the bushing aligned to the internal shift control lever. Fasten the control lever housing assembly bolts by tightening them to 20 nm (15 ft. Lbs.). Pute the boot over the control lever while inspecting to make sure carpet material does not block the boot from touching the floor panel. Then drop the boot to create proper floor contact. The control lever boot requires installation followed by screw tightening to 2.5 nm (22 inch lbs.) before putting back the console and shift lever assembly.
- Q: How to Properly Service the Shift Linkage Boot on Chevrolet Silverado 1500?A:The replacement process for transmission control lever boot requires dismantling of the transmission control lever prior to commencement. The lower border of the control lever boot needs lift and pushing motions to access the retaining screws before removing them all. Separate the floor-mounted four plastic retainers before you remove the control lever boot retaining bezel and boot assembly with its retainers. Remove the 4 plastic retainers from the boot before pulling out both the control lever boot retaining bezel and boot independently. Lastly, detach the control lever insulator from the floor. The first step for installation consists of placing the control lever insulator onto the floor surface. After aligning the control lever boot retaining bezel with boot construction you can add its 4 plastic retainers. The installation process requires fitting the control lever boot retaining bezel and boot together with the floor retention of 4 plastic retainers by following fastener caution guidelines. Use a screwdriver to tighten the 4 retaining screws of the control lever boot to 1.6 Nm (14 lb in). After screw installation, the transmission control lever can be added.


Related Chevrolet Parts
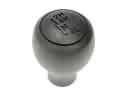 Chevrolet Shift Knob
 Chevrolet Tailgate Latch
 Chevrolet Window Regulator
 Chevrolet Cup Holder
 Chevrolet Door Latch Assembly
 Chevrolet Center Console Base
 Chevrolet Door Armrest
 Chevrolet Hood Cable
 Chevrolet Instrument Panel Light Bulb
 Chevrolet Lift Support
 Chevrolet Liftgate Hinge
 Chevrolet Seat Switch
Browse Chevrolet Shift Linkage Boot by Models
S10 Colorado Tahoe Malibu Camaro SS SSR Avalanche Silverado 1500 Silverado 2500 HD Caprice Suburban Blazer Tracker Cavalier Corvette Aveo Beretta City Express Corsica Express 1500 Express 2500 Express 3500 Metro Prizm Uplander Suburban 1500 Aveo5 Silverado 1500 LD Silverado 1500 LTD Silverado 3500 HD Suburban 2500