ChevyParts
My Garage
My Account
Cart
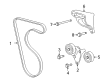
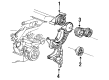
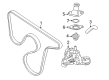
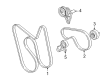
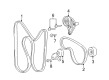
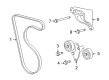
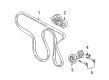
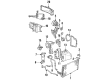
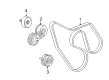
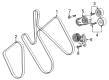
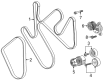
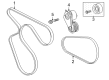
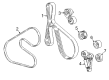
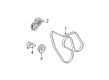
OEM GMC Drive Belt
Serpentine Belt- Select Vehicle by Model
- Select Vehicle by VIN
Select Vehicle by Model
orMake
Model
Year
Select Vehicle by VIN
For the most accurate results, select vehicle by your VIN (Vehicle Identification Number).
136 Drive Belts found


GMC Serpentine Belt Part Number: 12637200
$57.36 MSRP: $102.42You Save: $45.06 (44%)Ships in 1-3 Business DaysProduct Specifications- Other Name: Belt-Fan; Serpentine Belt Drive Kit; Accessory Drive Belt; Drive Belt; V-Belt; A/C Belt; Belt, Drive
- Replaces: 12576448


GMC Serpentine Belt Part Number: 22518599
$50.15 MSRP: $89.56You Save: $39.41 (44%)Ships in 1-3 Business DaysProduct Specifications- Other Name: Belt, Fan; Serpentine Belt Drive Kit; Drive Belt; V-Belt; Belt; Belt, Drive


GMC Serpentine Belt Part Number: 12576572
$47.42 MSRP: $84.68You Save: $37.26 (44%)Ships in 1-3 Business DaysProduct Specifications- Other Name: Belt, Fan, Water Pump, A/C Compressor, Generator, Power Steering Pump; Serpentine Drive Kit.; Belt, Drive
- Replaces: 12564762


GMC Serpentine Belt Part Number: 12576455
$48.82 MSRP: $87.19You Save: $38.37 (45%)Ships in 1-2 Business DaysProduct Specifications- Other Name: Belt, Drive; Serpentine Belt Drive Kit; Accessory Drive Belt; Drive Belt; V-Belt


GMC Serpentine Belt Part Number: 12637204
$44.85 MSRP: $97.10You Save: $52.25 (54%)Ships in 1-3 Business DaysProduct Specifications- Other Name: Belt-Fan & Water Pump & Generator & Power Steering Pump; Serpentine Drive Kit; Accessory Drive Belt; V-Belt; Belt; Belt, Drive
- Replaces: 12557501, 12569348, 12576451


GMC Serpentine Belt Part Number: 12637201
$38.31 MSRP: $71.94You Save: $33.63 (47%)Ships in 1-2 Business DaysProduct Specifications- Other Name: Belt, Drive; Serpentine Belt Drive Kit; Accessory Drive Belt; Drive Belt; V-Belt
- Replaces: 12590623


GMC Serpentine Belt Part Number: 12593774
$36.46 MSRP: $79.59You Save: $43.13 (55%)Ships in 1-3 Business DaysProduct Specifications- Other Name: Belt, Drive; Serpentine Belt Drive Kit; Accessory Drive Belt; Drive Belt; V-Belt
- Replaces: 12575216, 12569531


GMC Serpentine Belt Part Number: 19244944
$31.18 MSRP: $55.68You Save: $24.50 (44%)Ships in 1-3 Business DaysProduct Specifications- Other Name: Belt, Fan & Power Steering Pump; Serpentine Belt Drive Kit; Drive Belt; V-Belt; Belt; Belt, Drive
- Replaces: 10189265

GMC Serpentine Belt Part Number: 12569435
$20.53 MSRP: $71.75You Save: $51.22 (72%)Ships in 1-2 Business DaysProduct Specifications- Other Name: Belt-Fan & Water Pump & Generator & Power Steering Pump; Serpentine Drive Kit; Accessory Drive Belt; V-Belt; Belt, Drive

GMC Serpentine Belt Part Number: 12569436
$31.43 MSRP: $71.92You Save: $40.49 (57%)Product Specifications- Other Name: Belt-Fan & Water Pump & Generator & Power Steering Pump; Serpentine Drive Kit; Accessory Drive Belt; V-Belt; Fan Belt

GMC Serpentine Belt Part Number: 12732705
$43.27 MSRP: $88.43You Save: $45.16 (52%)Ships in 1-2 Business DaysProduct Specifications- Other Name: Belt-Accessory Drive Primary; Belt, Drive
- Replaces: 12675893

GMC Drive Belt Part Number: 12717890
$26.71 MSRP: $52.81You Save: $26.10 (50%)Ships in 1-3 Business DaysProduct Specifications- Other Name: Belt-Accessory Drive Auxiliary; Belt, Drive
- Replaced by: 12732424

GMC Serpentine Belt Part Number: 12662028
$37.95 MSRP: $67.77You Save: $29.82 (44%)Ships in 1-3 Business DaysProduct Specifications- Other Name: Belt-Fan; Serpentine Belt Drive Kit; Drive Belt; V-Belt; Belt, Drive
GMC Serpentine Belt Part Number: 19355375
$39.34 MSRP: $81.59You Save: $42.25 (52%)Ships in 1-2 Business DaysProduct Specifications- Other Name: Belt, Drive; Serpentine Belt Drive Kit; Drive Belt; V-Belt; Fan Belt
- Replaces: 24502138, 88986816, 24501203, 24502761, 12555073

GMC Serpentine Belt Part Number: 12642434
$46.38 MSRP: $82.82You Save: $36.44 (44%)Ships in 1-2 Business DaysProduct Specifications- Other Name: Belt-Fan; Serpentine Belt Drive Kit; Drive Belt; V-Belt; Belt, Drive
- Replaces: 98064080

GMC A/C Belt Part Number: 12669975
$47.64 MSRP: $85.10You Save: $37.46 (45%)Product Specifications- Other Name: Belt Kit, Drive; Serpentine Belt Drive Kit; Serpentine Belt; Drive Belt; V-Belt
GMC Serpentine Belt Part Number: 14102099
Product Specifications- Other Name: Belt, Drive; Serpentine Belt Drive Kit; Drive Belt; V-Belt
GMC Serpentine Belt Part Number: 12569438
Product Specifications- Other Name: Belt, Drive; Serpentine Belt Drive Kit; Accessory Drive Belt; Drive Belt; V-Belt; Fan Belt
GMC Serpentine Belt Part Number: 12569439
Product Specifications- Other Name: Belt, Drive; Serpentine Belt Drive Kit; Accessory Drive Belt; Drive Belt; V-Belt; Fan Belt
- Replaces: 12559619

GMC Serpentine Belt Part Number: 19355376
Product Specifications- Other Name: Belt, Drive; Serpentine Belt Drive Kit; Drive Belt; V-Belt
- Replaces: 88986820, 12568057, 12555074
| Page 1 of 7 |Next >
1-20 of 136 Results
GMC Drive Belt
Want to cut long-term maintenance and repair costs? Choose OEM Drive Belt. Those parts deliver top durability you can trust. On our site, you'll find a huge catalog of genuine GMC parts. Prices are unbeatable, so you can keep more in your pocket. Every OEM GMC Drive Belt includes a manufacturer's warranty. You can also get an easy return policy that keeps buying risk free. Fast delivery, get your car on the road quickly. It's simple to search, compare, and order. Stop guessing about quality or fit. Order today and save with parts that last.
GMC Drive Belt Parts Questions & Experts Answers
- Q: How to replace the drive belt without A/C on GMC Canyon?A:Before changing the Drive Belt without a/c you need to use a 3/8 inch breaker bar to turn the Drive Belt tensioner clockwise for Drive Belt tension relief. Relax the Drive Belt tensioner before the Drive Belt removal from the pulleys by first slipping the Drive Belt away from the Water Pump Pulley . The Drive Belt must be passed over every pulley except the Water Pump Pulley followed by tensioner rotation through clockwise movement using a breaker bar. To install the Drive Belt start by directing it over the Water Pump Pulley top before slowly letting the Drive Belt tensioner spring to relax. Verify that the belt is correctly aligned and situated where the drive pulleys have grooves before examining the belt's proper positioning on the pulleys.
- Q: How to replace the accessory drive belt on GMC Yukon?A:The first step for accessory Drive Belt replacement includes hood opening and duct removal from the air cleaner outlet. The Drive Belt tensioner bolt needs a hex-head socket connector to the breaker bar so users can turn the tensioner clockwise to ease belt tension. After detaching the Drive Belt from its position between the pulleys and tensioner step until you can slowly decrease the tension on the tensioner before using a breaker bar and socket to remove both items. Thoroughly clean the belt surfaces that exist on all pulleys. To tension the Drive Belt for installation you should run it past all pulleys except the idler pulley and connect a breaker bar equipped with a hex-head socket to the tensioner bolt for clockwise rotation. Install the Drive Belt under the idler pulley then slow down tension release before removing the breaker bar with hex-head socket. First inspect both the Drive Belt for correct position and alignment then reinstall the air cleaner outlet duct and start the vehicle; check the Drive Belt works correctly before completing hood closure.
- Q: How to replace the Drive Belt on a V8 engine on GMC Sierra 1500?A:The first step to replace the air conditioning compressor belt for v8 engines requires removal of the accessory Drive Belt together with the skid plate. Disconnect the old belt which links the air conditioning and crankshaft pulleys. Lay the new belt at the rear part of the balancer where it remains clear of the a/c pulley contact. Position the belt installation tool to the balancer before sliding it upwards to place the belt on the tool. You should move the tool downward to give the belt proper placement on the a/c pulley but maintain only minimal tension. The ribbed surface of the belt must be positioned facing forward at the bottom of its installation. Finger pressure alongside clockwise turning of the Crankshaft Pulley will help pull the belt forward until the ribbed section covers the a/c pulley correctly. Check the Drive Belt alignment when installed correctly. Proceed to turn the balancer another 360 degrees for correct positioning inspection. The final stage consists of reattaching both the skid plate along with the accessory Drive Belt.


Related GMC Parts
 GMC Radiator
 GMC Water Pump
 GMC A/C Condenser Fan
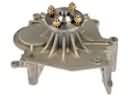 GMC Cooling Fan Bracket
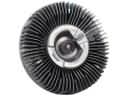 GMC Cooling Fan Clutch
 GMC Cooling Hose
 GMC Crossmember Bushing
 GMC Fan Blade
 GMC Oil Cooler Hose
 GMC Transmission Oil Cooler
 GMC Water Pump Gasket
 GMC Water Pump Pulley
Browse GMC Drive Belt by Models
Acadia Sierra 1500 Yukon Canyon Sierra 2500 HD Terrain Envoy Sonoma Typhoon Syclone Caballero C1500 Envoy XL Envoy XUV Jimmy K1500 S15 S15 Jimmy Safari Savana 2500 Savana 3500 Sierra 2500 Sierra 3500 Yukon XL Acadia Limited C2500 C3500 G2500 K2500 K3500 P3500 Savana 1500 Yukon XL 1500 C1500 Suburban C2500 Suburban G1500 G3500 K1500 Suburban K2500 Suburban P2500 R1500 R1500 Suburban R2500 R2500 Suburban R3500 Sierra 1500 Classic Sierra 1500 HD Sierra 1500 HD Classic Sierra 1500 Limited Sierra 2500 HD Classic Sierra 3500 Classic Sierra 3500 HD V1500 V1500 Suburban V2500 V2500 Suburban V3500 Yukon XL 2500