ChevyParts
My Garage
My Account
Cart
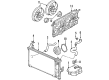
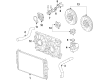
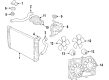
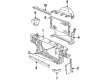
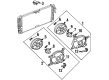
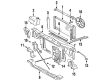
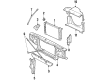
OEM Buick Fan Shroud
Radiator Fan Shroud- Select Vehicle by Model
- Select Vehicle by VIN
Select Vehicle by Model
orMake
Model
Year
Select Vehicle by VIN
For the most accurate results, select vehicle by your VIN (Vehicle Identification Number).
57 Fan Shrouds found

Buick Fan Shroud Part Number: 15816789
$250.59 MSRP: $380.91You Save: $130.32 (35%)Ships in 1-3 Business DaysProduct Specifications- Other Name: Shroud Assembly-Engine Coolant Fan; Radiator Fan Assembly; Fan Assembly
- Replaces: 15290116, 15112778

Buick Fan Shroud Part Number: 15290117
$184.53 MSRP: $280.59You Save: $96.06 (35%)Ships in 1-3 Business DaysProduct Specifications- Other Name: Shroud Assembly-Engine Coolant Fan; Dual Radiator and Condenser Fan Assembly
- Replaces: 15112779


Buick Fan Shroud Part Number: 13267631
$318.04 MSRP: $475.40You Save: $157.36 (34%)Ships in 1-3 Business DaysProduct Specifications- Other Name: Shroud, Radiator Fan Shroud

Buick Fan Shroud Part Number: 42806372
$99.09 MSRP: $147.45You Save: $48.36 (33%)Ships in 1-2 Business DaysProduct Specifications- Other Name: Shroud, Radiator Fan Shroud
- Replaces: 42441975, 94551425


Buick Fan Shroud Part Number: 25506412
Product Specifications- Other Name: Shroud, Radiator Fan Shroud; Shroud
- Position: Lower


Buick Fan Shroud Part Number: 89019107
Product Specifications- Other Name: Shroud Assembly, Engine Coolant Fan; Dual Radiator and Condenser Fan Assembly; Cooling Fan Assembly; Shroud; Shroud Kit, Radiator Fan Shroud
- Replaces: 88987274, 89018446


Buick Fan Shroud Part Number: 22915388
Product Specifications- Other Name: Shroud, Radiator Fan Shroud


Buick Fan Shroud Part Number: 21999691
Product Specifications- Other Name: Shroud Assembly-Engine Coolant Fan; Dual Radiator and Condenser Fan Assembly; Cooling Fan Assembly; Shroud, Engine Air Cooling(Electrical); Shroud, Radiator Fan Shroud

Buick Fan Shroud Part Number: 25506411
Product Specifications- Other Name: Shroud, Radiator Fan Shroud; Shroud
- Position: Upper

Buick Upper Shroud Part Number: 10281083
Product Specifications- Other Name: Shroud, Radiator Fan Shroud; Fan Shroud
- Position: Upper
Buick Fan Shroud Part Number: 15816787
$196.78 MSRP: $299.11You Save: $102.33 (35%)Product Specifications- Other Name: Shroud Assembly-Engine Coolant Fan; Dual Radiator and Condenser Fan.; Fan Assembly
- Replaces: 15112780, 15290118

Buick Fan Shroud, Passenger Side Part Number: 22137014
Product Specifications- Other Name: Shroud Kit; Shroud; Shroud Kit, Radiator Fan Shroud
- Position: Passenger Side

Buick Shroud Part Number: 25505059
Product Specifications- Other Name: Shroud, Radiator Fan Shroud; Shroud, Radiator Fan; Fan Shroud
- Position: Lower
Buick Shroud Part Number: 25505058
Product Specifications- Other Name: Shroud, Radiator Fan Shroud; Shroud, Radiator Fan; Fan Shroud
- Position: Upper

Buick Lower Shroud Part Number: 22502123
Product Specifications- Other Name: Shroud, Radiator Fan Shroud; Shroud; Fan Shroud
- Position: Lower

Buick Shroud Part Number: 22502272
Product Specifications- Other Name: Shroud, Radiator Fan Shroud; Fan Shroud
- Position: Upper
Buick Fan Shroud, Driver Side Part Number: 22137013
Product Specifications- Other Name: Shroud Kit, Radiator Fan Shroud; Shroud
- Position: Driver Side

Buick Shroud Part Number: 22054223
Product Specifications- Other Name: Shroud Kit, Radiator Fan Shroud; Fan Shroud

Buick Mount Bracket, Driver Side Part Number: 22075053
Product Specifications- Other Name: Shroud, Radiator Fan Shroud; Cooling Fan Bracket; Shroud Assembly; Shroud Housing; Shroud; Shroud Kit, Radiator Fan Shroud; Fan Shroud
- Position: Driver Side

Buick Upper Shroud Part Number: 10100812
Product Specifications- Other Name: Shroud, Radiator Fan Shroud; Shroud; Fan Shroud
- Position: Upper
| Page 1 of 3 |Next >
1-20 of 57 Results
Buick Fan Shroud
Choose OEM Fan Shroud, you're making the optimal decision for superior quality and perfect performance. You can feel confident because each component goes through stringent quality checks. Every part is carefully built to comply with Buick's factory specifications. You'll enjoy a smooth, worry-free installation that fits just right. At ChevyPartsGiant.com, you'll find it easy to get top-quality OEM Buick Fan Shroud. You can shop at highly competitive prices and protect your budget. All our genuine Buick parts include a dependable manufacturer's warranty. You'll also appreciate our straightforward return policy and swift delivery services for extra convenience.
Buick Fan Shroud Parts and Q&A
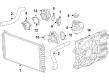
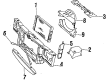
- Q: How to replace the engine coolant fan shroud (LGD, LZ9) (3.9L) on Buick Lucerne?A:The maintenance of the engine coolant Fan Shroud (LGD, LZ9) (3.9L) requires that workers disconnect the battery negative cable as the first step. The removal procedure starts with draining the cooling system while simultaneously taking away the condenser as well as the upper tie bar. Support the car while you remove the front air deflector after which you should lift the vehicle. You should use hose clamp plier (J 38185) to shift the Radiator outlet hose clamp position before cutting the Radiator outlet hose loose. The vehicle descent becomes necessary after transmission oil cooler pipe retaining bolt removal from the Fan Shroud. Apply hose clamp plier (J 38185) to shift the Radiator inlet hose clamp for hose removal purposes. Accomplish access to the lines by sliding rearward the caps on transmission oil cooler lines and then extract those lines from their placement on the Radiator. First disconnect the wiring harness electrical connectors from cooling fan motors followed by unclipping the harness to Fan Shroud then removing all Fan Shroud mounting bolts. You should carefully remove the Fan Shroud assembly through a sequence of moving it left before pulling up on the right side then extracting it from the vehicle. Position the Fan Shroud assembly behind the Radiator while centering it correctly before tightening the Fan Shroud mounting bolts to 6 nm. After attaching the wiring connectors to cooling fan motors the Fan Shroud retaining clips must be installed onto the shroud. Insert the transmission oil cooler pipe into the Radiator quick connect until a "click" sound occurs before placing the plastic cap over the joint. Insert the Radiator inlet hose into position before securing it with hose clamp plier (J 38185). The vehicle should be lifted again for the installation of transmission oil cooler pipe retaining bolts to the Fan Shroud while tightening them to 6 nm (53 lb in). Next install the Radiator outlet hose before repositioning the Radiator outlet hose clamp with hose clamp plier (J 38185). The front air deflector needs to be reinstalled after lowering the vehicle which requires installation of the upper tie bar and condenser. Complete cooling system fluid installation while reattaching the battery negative terminal cable but also check the transmission fluid level.
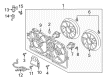
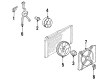
- Q: How to replace the fan shroud on Buick Regal?A:Starting the Fan Shroud replacement process requires removing both cooling fans then separating the cooling fan wiring harness from each cooling Fan Motor. Unfasten the cooling fan electrical harness from within the Fan Shroud before removing the cooling Fan Blade nuts and the cooling fan blades respectively. You should unfasten the bolts securing the fan motors then pull them out from the fan housing. Remember that the installation starts by placing cooling fan motors onto the Fan Shroud followed by bolt tightening at 6 nm (53 inch lbs.) but make sure to replace all bent or damaged fan blades to ensure safety and proper balance. Secure the cooling fan blades on the Fan Shroud by screwing the blade nuts with torque to 6 nm (53 inch lbs.). The cooling fan process concludes with reattaching the electrical harness to the Fan Shroud before linking the harness to each cooling Fan Motor and reinstalling the devices.


Related Buick Parts
 Buick Thermostat
 Buick A/C Condenser Fan
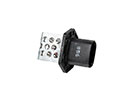 Buick Cooling Fan Resistors
 Buick Cooling Hose
 Buick Drain Plug
 Buick Fan Clutch
 Buick Fan Motor
 Buick Oil Cooler
 Buick Radiator Hose
 Buick Radiator fan
 Buick Thermostat Gasket
 Buick Thermostat Housing