ChevyParts
My Garage
My Account
Cart
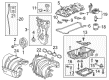
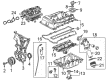
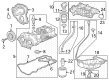
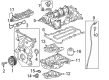
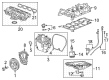
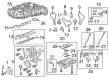
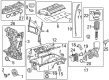
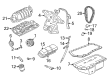
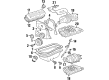
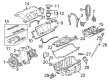
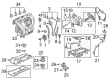
OEM Buick Intake Manifold
Engine Intake Manifold- Select Vehicle by Model
- Select Vehicle by VIN
Select Vehicle by Model
orMake
Model
Year
Select Vehicle by VIN
For the most accurate results, select vehicle by your VIN (Vehicle Identification Number).
67 Intake Manifolds found


Buick Intake Manifold Part Number: 12690468
$267.09 MSRP: $420.08You Save: $152.99 (37%)Product Specifications- Other Name: Manifold Assembly-Intake (W/Throttle Body); Manifold, Engine Fuel Intake Manifold
- Replaces: 12678245, 12668310

Buick Intake Manifold Part Number: 55504606
$342.45 MSRP: $464.64You Save: $122.19 (27%)Ships in 1-3 Business DaysProduct Specifications- Other Name: Manifold Assembly-Intake (W/Throttle Body); Manifold, Engine Fuel Intake Manifold
- Replaces: 55496265, 55491536


Buick Intake Manifold Part Number: 55515837
$78.86 MSRP: $123.50You Save: $44.64 (37%)Ships in 1-3 Business DaysProduct Specifications- Other Name: Manifold, Engine Fuel Intake Manifold
- Replaces: 55506044, 55506043

Buick Intake Manifold Part Number: 25204837
$22.72 MSRP: $35.59You Save: $12.87 (37%)Ships in 1-3 Business DaysProduct Specifications- Other Name: Manifold, Engine Fuel Intake Manifold
- Replaces: 55496066
Buick Intake Manifold Part Number: 25202607
$154.85 MSRP: $243.65You Save: $88.80 (37%)Ships in 1-3 Business DaysProduct Specifications- Other Name: Manifold Assembly-Intake (W/Throttle Body); Manifold, Engine Fuel Intake Manifold

Buick Intake Manifold Part Number: 12718923
$56.81 MSRP: $88.98You Save: $32.17 (37%)Ships in 1-3 Business DaysProduct Specifications- Other Name: Manifold, Engine Fuel Intake Manifold

Buick Intake Manifold Part Number: 12607282
$1266.98 MSRP: $2001.65You Save: $734.67 (37%)Ships in 1-3 Business DaysProduct Specifications- Other Name: Manifold, Engine Fuel Intake Manifold


Buick Intake Plenum Part Number: 89060538
$75.04 MSRP: $117.54You Save: $42.50 (37%)Ships in 1-3 Business DaysProduct Specifications- Other Name: Manifold Kit, Engine Fuel Intake Manifold
- Position: Upper

Buick Intake Manifold Part Number: 12690467
$197.20 MSRP: $310.28You Save: $113.08 (37%)Product Specifications- Other Name: Manifold Assembly-Intake (W/Throttle Body); Manifold, Engine Fuel Intake Manifold
- Replaces: 12665908, 12678244


Buick Intake Manifold Part Number: 89017272
Product Specifications- Other Name: Manifold Kit, Engine Fuel Intake Manifold; Intake Plenum
- Position: Upper


Buick Intake Manifold Part Number: 17113044
Product Specifications- Other Name: Manifold Kit, Engine Fuel Intake Manifold; Manifold
- Position: Upper


Buick Intake Manifold Part Number: 24507501
Product Specifications- Other Name: Manifold, Engine Fuel Intake Manifold; Intake Plenum; Manifold
- Position: Upper


Buick Intake Manifold Part Number: 24507499
Product Specifications- Other Name: Manifold, Engine Fuel Intake Manifold
- Position: Upper


Buick Intake Manifold Part Number: 89017588
Product Specifications- Other Name: Manifold, Engine Fuel Intake Manifold

Buick Intake Manifold Part Number: 89018222
$131.68 MSRP: $207.20You Save: $75.52 (37%)Product Specifications- Other Name: Manifold Kit, Engine Fuel Intake Manifold; Intake Plenum
- Position: Upper
- Replaces: 89017283, 89017732, 89017555

Buick Manifold Part Number: 24505669
Product Specifications- Other Name: Manifold, Engine Fuel Intake Manifold; Intake Manifold
- Position: Upper

Buick Intake Manifold, Lower Part Number: 12590281
Product Specifications- Other Name: Manifold Assembly-Lower Intake; Manifold, Engine Fuel Intake Manifold
- Position: Lower
Buick Intake Manifold, Lower Part Number: 12579767
Product Specifications- Other Name: Manifold Assembly-Lower Intake; Intake Plenum
- Position: Lower

Buick Intake Manifold Part Number: 12590280
Product Specifications- Other Name: Manifold, Engine Fuel Intake Manifold; Manifold
- Position: Lower
- Replaces: 12579681, 12582983, 24507497

Buick Intake Manifold, Upper Part Number: 12583312
Product Specifications- Other Name: Manifold, Upper Intake; Intake Plenum; Manifold, Engine Fuel Intake Manifold
- Position: Upper
| Page 1 of 4 |Next >
1-20 of 67 Results
Buick Intake Manifold
Want to cut long-term maintenance and repair costs? Choose OEM Intake Manifold. Those parts deliver top durability you can trust. On our site, you'll find a huge catalog of genuine Buick parts. Prices are unbeatable, so you can keep more in your pocket. Every OEM Buick Intake Manifold includes a manufacturer's warranty. You can also get an easy return policy that keeps buying risk free. Fast delivery, get your car on the road quickly. It's simple to search, compare, and order. Stop guessing about quality or fit. Order today and save with parts that last.
Buick Intake Manifold Parts Questions & Experts Answers
- Q: How to replace the lower intake manifold on Buick LaCrosse?A:The lower intake replacement process begins by shutting off the ignition then removing the air inlet duct. The metal collar quick connect fitting service (Fitting Service) and plastic collar quick connect fitting service (Fitting Service) must be used for engine hose detachment of fuel pressure and evaporative emission (EVAP). The process begins with disconnecting the baro sensor electrical connector yet keeping the Engine Control Module (ECM) electrical connectors undisturbed. First remove the ecm bracket with the ecm from its place and set it aside before disconnecting the purge solenoid electrical connector. The removal process starts by disconnecting the right-side wiring harness from the Intake Manifold and then proceeds with the disconnection of both the Fuel Injector electrical connector and the Throttle Body electrical connector. First disconnect the Brake Booster Vacuum Hose and check valve combination then remove the positive crankcase ventilation (PCV) hose from the Intake Manifold. To remove the Intake Manifold the technician must first remove its mounting bolts (1-6) and then detach the Intake Manifold. The Intake Manifold needs to be broken down for cleaning while examining all surfaces used for sealing. After assembling the required parts of the Intake Manifold let's install it followed by connecting the pcv hose to the Intake Manifold then connecting the Brake Booster Vacuum Hose with check valve to the brake booster. After connecting the Throttle Body electricity and Fuel Injector electricity, tighten wiring harness bracket bolts to 10 n.m (89 lb in) while installing the harness to the Intake Manifold right side. Rejoin the electrical connector for the purge solenoid while also reinstalling the ecm bracket that contains the ecm and connecting the baro sensor electrical connector. Complete the installation by connecting the engine's fuel pressure and evap hoses with metal collar quick connect fitting service (Fitting Service) and plastic collar quick connect fitting service (Fitting Service) before reinstalling the air inlet duct.
- Q: How to replace the intake manifold on Buick Enclave?A:To replace the Intake Manifold, follow the procedure of turning off the ignition and remove the fuel injector sight shield. Next, remove air cleaner outlet duct and disconnect the brake booster from the Intake Manifold vacuum hose. Unplug the purge solenoid valve electrical connector, and the purge line from the purge hose. Then remove the rear positive crankcase ventilation hose. Unplug the throttle body electrical connector and pry off the electrical connector retainer. Take off the fuel pipe shield, remove the engine wiring harness retaining clip from the side of the Intake Manifold, then the wire harness retaining bolt and clips. Lift the engine wiring harness off the location, pull off the Intake Manifold insulator and bolts, followed by disassembling the Intake Manifold off with the throttle body. In the case of replacing the Intake Manifold, disassemble and clean. For installation, mesh the new Intake Manifold if required and install a fresh Intake Manifold Gasket, afterward the Intake Manifold itself to 23 nm (17 lb ft) while tightening while starting at the center (long bolts) and moving it outwards followed by a new Intake Manifold Gasket, thereafter, the Intake Manifold itself. Put back the engine wiring harness, install the retaining clips to the Intake Manifold and the clip to the side. Replace the fuel pipe shield and check the engagement of the wiring harness connector. Connect the electrical connector to the throttle body and install the electrical connector retainer, as well as connect the purge line to the purge solenoid valve putting the purge solenoid valve electrical connector. After that, reinstall rear positive crankcase ventilation hose and join Brake Booster Vacuum Hose to the Intake Manifold, so as to install the air cleaner outlet duct and fuel injector sight shield.
- Q: How to replace the lower intake manifold (L36) on Buick Regal?A:The procedure starts by taking out the upper Intake Manifold then continuing with the generator brace followed by drive belt tensioner with mounting bracket and heater water bypass inlet pipe. Detach the exhaust gas recirculation (EGR) outlet pipe from the lower Intake Manifold before removing the radiator inlet hose from the water outlet housing and disconnecting the engine coolant temperature (ECT) sensor electrical connector. Start by removing the generator brace bracket bolts then the bracket before moving onto the evaporative emissions canister purge solenoid valve. Using this sequence remove each bolt holding the lower Intake Manifold in place followed by its complete removal along with teardown of seals and gaskets. The water outlet housing bolt and stud needs removal along with the water outlet housing and gasket when replacing the manifold. The ect sensor must also be removed during this process. Check the width alignment of inlet surfaces on the lower Intake Manifold and clean both mating surfaces together with all bolt holes and bolts before any adhesive application. Reinstall the ect sensor only if removed during the process then secure it tightly to 25 nm (18 ft. Lbs.). Next install the Thermostat followed by the gasket and water outlet housing while torqueing bolts and stud to 27 nm (20 ft. Lbs.). Follow up with lower Intake Manifold gasket installation after applying gm p/n 12346286 sealer or equivalent material to the Intake Manifold seal ends. Position the seals for installation. Before bolting down the lower Intake Manifold install gm p/n 12345382 or equivalent thread locking compound to both hidden bolts then follow a bolt-specific torque sequence up to 15 nm (11 ft. Lbs.). Reinstall the evaporative emissions canister purge solenoid valve followed by the generator brace bracket and its bolts. Torque the bolts to 50 nm (37 ft. Lbs.). The procedure includes hooking up the ect sensor electrical connector while you attach the radiator inlet hose to the water outlet housing and then install the egr outlet pipe onto the lower Intake Manifold with a bolt torque of 29 nm (21 ft. Lbs.). Reinstall the drive belt tensioner followed by the generator brace then finish with the upper Intake Manifold.


Related Buick Parts
 Buick Air Filter
 Buick Fuel Filter
 Buick Fuel Pump
 Buick Gas Cap
 Buick Intake Manifold Gasket
 Buick Air Intake Coupling
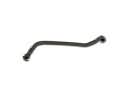 Buick Crankcase Breather Hose
 Buick Fuel Pressure Sensor
 Buick Fuel Pump Gasket
 Buick Fuel Pump Wiring Harness
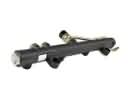 Buick Fuel Rail
 Buick Fuel Tank