ChevyParts
My Garage
My Account
Cart
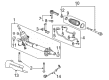
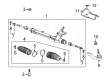
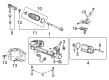
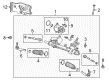
OEM Buick Rack And Pinion
Steering Rack And Pinion- Select Vehicle by Model
- Select Vehicle by VIN
Select Vehicle by Model
orMake
Model
Year
Select Vehicle by VIN
For the most accurate results, select vehicle by your VIN (Vehicle Identification Number).
102 Rack And Pinions found


Buick Steering Gear Part Number: 19330581
$1684.99 MSRP: $3266.16You Save: $1581.17 (49%)Product Specifications- Other Name: Gear, Steering; Gear Assembly; Rack
- Replaces: 22856135, 13271000, 22774358, 23139003

Buick Gear Assembly Part Number: 42796291
$175.20 MSRP: $275.67You Save: $100.47 (37%)Ships in 1-2 Business DaysProduct Specifications- Other Name: Gear Assembly-Rack & Pinion Steering; Gear, Steering


Buick Steering Gear Part Number: 42745904
$191.52 MSRP: $326.07You Save: $134.55 (42%)Ships in 1-3 Business DaysProduct Specifications- Other Name: Gear Assembly-Rack & Pinion Steering; Gear Assembly; Rack; Gear, Steering

Buick Steering Gear Part Number: 84271183
$3782.55 MSRP: $4886.07You Save: $1103.52 (23%)Ships in 1-2 Business DaysProduct Specifications- Other Name: Gear, Steering; Gear Assembly; Motor
- Replaced by: 84216769

Buick Gear Assembly Part Number: 86784000
$1280.73 MSRP: $1648.30You Save: $367.57 (23%)Product Specifications- Other Name: Gear Assembly-Electrical Dual Pinion Rack & Pinion S; Rack; Gear, Steering
- Replaces: 84960593

Buick Steering Gear Part Number: 39107560
$3748.60 MSRP: $4820.38You Save: $1071.78 (23%)Ships in 1-2 Business DaysProduct Specifications- Other Name: Gear Assembly, Electric Dual Pinion Rack & Pinion Steering; Gear Assembly; Gear, Steering
- Replaces: 13372109, 13335002, 13423005, 39032955
Buick Steering Gear Part Number: 39107561
$1876.54 MSRP: $2411.06You Save: $534.52 (23%)Ships in 1-3 Business DaysProduct Specifications- Other Name: Gear Assembly, Electric Dual Pinion Rack & Pinion Steering; Gear Assembly; Gear, Steering
- Replaces: 13423007, 39035652, 13372110

Buick Steering Gear Part Number: 84710258
$2089.32 MSRP: $2684.91You Save: $595.59 (23%)Ships in 1-3 Business DaysProduct Specifications- Other Name: Gear Assembly-Electrical Dual Pinion Rack & Pinion S; Gear Assembly; Gear, Steering
- Replaces: 23227473, 84187574
Buick Steering Gear Part Number: 84298300
$1386.64 MSRP: $1780.56You Save: $393.92 (23%)Ships in 1-3 Business DaysProduct Specifications- Other Name: Gear, Steering; Gear Assembly
- Replaces: 23412369, 84125997
Buick Steering Gear Part Number: 84544302
$2275.72 MSRP: $2924.81You Save: $649.09 (23%)Product Specifications- Other Name: Gear Assembly-Electrical Dual Pinion Rack & Pinion S; Gear Assembly; Gear, Steering
- Replaced by: 85621688
- Replaces: 84352219
Buick Steering Gear Part Number: 84216770
$2144.18 MSRP: $2755.51You Save: $611.33 (23%)Ships in 1-3 Business DaysProduct Specifications- Other Name: Gear Assembly, Electric Dual Pinion Rack & Pinion Steering; Gear Assembly; Gear, Steering
- Replaces: 13366874, 13376584, 22943370, 23338635
Buick Steering Gear Part Number: 84710254
$1973.46 MSRP: $2535.79You Save: $562.33 (23%)Ships in 1-3 Business DaysProduct Specifications- Other Name: Gear Assembly-Electrical Dual Pinion Rack & Pinion S; Gear Assembly; Gear, Steering
- Replaces: 23227474, 84187575
Buick Steering Gear Part Number: 84383161
$1556.45 MSRP: $2083.57You Save: $527.12 (26%)Ships in 1-2 Business DaysProduct Specifications- Other Name: Gear Assembly-Electrical Dual Pinion Rack & Pinion S; Gear Assembly
- Replaced by: 84992264
Buick Gear Assembly Part Number: 84450389
$991.59 MSRP: $1700.99You Save: $709.40 (42%)Ships in 1-2 Business DaysProduct Specifications- Other Name: Gear Assembly-Electrical Dual Pinion Rack & Pinion S; Gear, Steering
- Replaces: 84544304, 84462328

Buick Steering Gear Part Number: 26024900
$164.23 MSRP: $210.41You Save: $46.18 (22%)Ships in 1-3 Business DaysProduct Specifications- Other Name: Steering Gear Assembly


Buick Worm Gear Part Number: 7817528
Product Specifications- Other Name: Rack Kit-Piston & Nut Assembly; Steering Rack; Rack & Pinion; Input Shaft; Worm & Ball; Rack Assembly; Steering Gear Kit.


Buick Steering Gear Part Number: 19330578
Product Specifications- Other Name: Gear, Steering; Gear Assembly
- Replaces: 22886742, 23139001, 22840287


Buick Steering Gear Part Number: 26046146
Product Specifications- Other Name: Gear Kit, Steering; Gear Assembly
- Replaces: 26024886

Buick Steering Gear Part Number: 26046144
Product Specifications- Other Name: Gear Kit, Steering; Gear Assembly
Buick Steering Gear Part Number: 26044830
Product Specifications- Other Name: Gear Kit, Steering (Remanufacture); Gear Assembly; Gear Kit, Steering
- Replaces: 26035402, 26024892, 26046142
| Page 1 of 6 |Next >
1-20 of 102 Results
Buick Rack And Pinion
Want to cut long-term maintenance and repair costs? Choose OEM Rack And Pinion. Those parts deliver top durability you can trust. On our site, you'll find a huge catalog of genuine Buick parts. Prices are unbeatable, so you can keep more in your pocket. Every OEM Buick Rack And Pinion includes a manufacturer's warranty. You can also get an easy return policy that keeps buying risk free. Fast delivery, get your car on the road quickly. It's simple to search, compare, and order. Stop guessing about quality or fit. Order today and save with parts that last.
Buick Rack And Pinion Parts Questions & Experts Answers
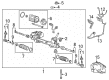
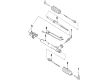
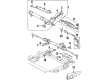
- Q: How to Replace the Front Rack and Pinion Steering Gear on Buick Lucerne?A:Begin steering gear replacement by inserting the Steering Column anti-rotation pin (J 42640) through the column's underside to lock the Steering Column. Position the vehicle on supports before you take out the tires and wheels. Afterwards detach the Rack And Pinion's heatshield. The steering wheel should face forward and the Steering Column must be secured in toggle position before disconnecting any steering components to stop coil assembly damage. First remove the lower pinch bolt from the intermediate shaft then disconnect the shaft from the Rack And Pinion before removing the outer tie rods retaining nuts. Begin outer tie rod separation process from steering knuckles by using universal steering linkage puller (J 24319-B) before removing power steering pressure and return hoses from Rack And Pinion. For equipment with variable effort steering disconnect the electrical connector while also removing the left stabilizer shaft insulator and separating the tie rod ends from the knuckles. First disconnect Rack And Pinion mounting bolts and pull out the Rack And Pinion from the left-wheel opening. After placing the Rack And Pinion through the left wheel opening properly install the Rack And Pinion mounting bolts and torque them to 95 n.m (70 lb ft). The left stabilizer shaft insulator goes back into position while the power steering pressure and return hoses connect with 30 n.m (22 lb ft) torque. After hooking up any available variable effort steering electrical connector, install the outer tie rod to its respective steering knuckle while securing retaining nuts at 30 n.m (22 lb ft) torque with an additional 180 degrees of rotation. After connecting the intermediate shaft to the Rack And Pinion you should install and torque the lower intermediate shaft pinch bolt to 47 n.m (37 lb ft). After fitting new tires and wheels and the Rack And Pinion heatshield the vehicle should be lowered completely. You must first remove the Steering Column anti-rotation pin (J 42640) from the Steering Column before you perform the power steering system bleed and leak check and adjust the front toe.
- Q: How to Replace the Front Rack and Pinion Steering Gear on Buick LeSabre?A:It is necessary to begin Rack And Pinion replacement by locking the steering column using the steering column anti-rotation pin (J42640). After vehicle support the technician must remove the tires and wheels and afterward remove the Rack And Pinion heatshield. Keep the wheels facing forward by locking the steering column at position lock to avoid damaging the coil assembly. Three steps follow to replace the Rack And Pinion: initial removal of the intermediate shaft lower pinch bolt coupling precedes intermediate shaft Rack And Pinion disconnection. With the universal steering linkage puller (J24319-B) disconnect the steering knuckles from the outer tie rods by removing their retaining nuts. Customers must remove both the Rack And Pinion pressure and return hoses (1 & 2) from the Rack And Pinion while disconnecting variable effort steering electrical connectors when present. The first step is to take off the left stabilizer shaft insulator and disconnect tie rod ends from the knuckles and remove the Rack And Pinion mounting bolts. When changing the Rack And Pinion extract it through the left wheel opening after moving the outer tie rods to the new Rack And Pinion. You should first guide the new Rack And Pinion through the left wheel opening before mounting it with bolts which require torquing to 95 nm (70 ft. Lbs.). Install the left stabilizer shaft insulator while tightening Rack And Pinion pressure and return hoses (1 & 2) to 30 nm (22 ft. Lbs.). The variable effort steering system requires an electrical connection before installing the outer tie rod to the steering knuckles by using retaining nuts which should be torqued to 70 nm (52 ft. Lbs.). Fasten the intermediate shaft to the Rack And Pinion and deploy the intermediate shaft lower pinch bolt until torque reaches 45 nm (33 ft. Lbs.). After reinstalling the tires and wheels and lowering the vehicle to normal height perform the following steps: remove the j42640 from the steering column then bleed the Rack And Pinion system while checking for leaks and adjusting front toe.
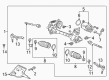
- Q: How to Replace the Front Rack and Pinion Steering Gear on Buick Terraza?A:To change the Rack And Pinion, make sure that the front wheels are straight and Steering Column is locked before disconnecting any of the parts in order to prevent misalignments and damage to the sir coil assembly. Start with the rotation of the Steering Wheel to the forward position, locking it, and removing the ignition key. Raise and support the vehicle, and remove the front tire and wheel assemblies, as well as the stabilizer shaft. Loosen the outer tie rod castle nuts without using a pickle fork or wedge tool to avoid the destruction of the seal or bushing. Separate through (J 24319-B) the tie rod ends from the steering knuckles to move the intermediate shaft seal to access the Rack And Pinion pinch bolt. To remove the pinch bolt and separate the intermediate shaft from the Rack And Pinion, you need to carefully ensure that you do not lower the rear end of the frame too much due to damage to engine components. Lay down a jack stand on the rear of cradle support, unbolt the two rear cradle support bolts, and drop the rear of the cradle support for clearance. Unfasten the two Rack And Pinion heat shield bolts and remove the shield, disconnect the Rack And Pinion inlet pipe/hose and the Rack And Pinion cooler pipe/hose, and remove the o-ring seals, discarding them. Remove the Rack And Pinion mounting nuts and bolts and extract the Rack And Pinion through the left side entry wheel. For installation, insert the new Rack And Pinion through the left side wheel opening, make sure that mounting nuts and bolts are kept clean and free from rust, and have produced 2 n.m (18 lb in) of torque to the autres, before seating; otherwise, replace them. Tighten the Rack And Pinion nuts and bolts to 60 n.m (44 lb ft) with an additional 60 degrees. You have to join the Rack And Pinion inlet pipe/hose and Rack And Pinion cooler pipe/hose with new o-ring seals with the fitting tightened to 27 n.m (20 lb ft). Install back the Rack And Pinion heat shield and tighten the bolts to 14 n.m (124 lb in). Raising the rear of the cradle support with the jack stand, install the two rear cradle support bolts at 165 n.m (122 lb ft) before releasing the jack stand. Align the intermediate shaft to the Rack And Pinion, and tighten the pinch bolt to 48 n.m (35 lb ft). Install the outer tie rod ends into the steering knuckles and install outer tie rod ends castle nuts so that 2.5-4.5 Tie Rod End threads extend beyond the tie rod nut nylon, then tighten the castle nuts to 30 n.m (22 lb ft) + 120 degrees flats (2). Replace the shock absorber, the front tire and wheel assemblies, lower the vehicle, recharge and bleed the system of air and inspect and adjust the front toe as necessary.


Related Buick Parts
 Buick Steering Wheel
 Buick Power Steering Pump
 Buick Steering Column
 Buick Drag Link
 Buick Ignition Lock Assembly
 Buick Ignition Lock Cylinder
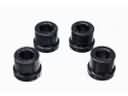 Buick Rack & Pinion Bushing
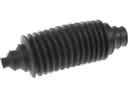 Buick Rack and Pinion Boot
 Buick Radius Heat Shield
 Buick Steering Angle Sensor
 Buick Steering Column Cover
 Buick Tie Rod