ChevyParts
My Garage
My Account
Cart
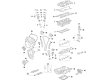
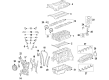
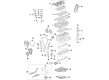
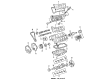
OEM Cadillac Camshaft
Cam- Select Vehicle by Model
- Select Vehicle by VIN
Select Vehicle by Model
orMake
Model
Year
Select Vehicle by VIN
For the most accurate results, select vehicle by your VIN (Vehicle Identification Number).
112 Camshafts found


Cadillac Camshaft Part Number: 12625988
$258.67 MSRP: $406.90You Save: $148.23 (37%)Product Specifications- Other Name: Camshaft, Engine
- Replaced by: 19431714


Cadillac Camshaft Part Number: 12574519
$294.17 MSRP: $462.69You Save: $168.52 (37%)Product Specifications- Other Name: Camshaft, Engine

Cadillac Camshaft Part Number: 12632200
$202.31 MSRP: $283.94You Save: $81.63 (29%)Ships in 1-2 Business DaysProduct Specifications- Other Name: Camshaft, Engine

Cadillac Camshaft Part Number: 24456976
$63.09 MSRP: $825.54You Save: $762.45 (93%)Ships in 1-2 Business DaysProduct Specifications- Other Name: Camshaft, Engine


Cadillac Exhaust Camshaft Part Number: 12565171
$105.88 MSRP: $175.24You Save: $69.36 (40%)Ships in 1-2 Business DaysProduct Specifications- Other Name: Camshaft, Engine; Camshaft


Cadillac Camshaft Part Number: 12666065
$228.79 MSRP: $359.91You Save: $131.12 (37%)Ships in 1-3 Business DaysProduct Specifications- Other Name: Camshaft Assembly-Intake; Camshaft, Engine
Cadillac Camshaft Part Number: 55511463
$320.79 MSRP: $504.53You Save: $183.74 (37%)Ships in 1-3 Business DaysProduct Specifications- Other Name: Camshaft Assembly-Intake; Camshaft, Engine
- Replaces: 55504558

Cadillac Camshaft Part Number: 55570269
$123.25 MSRP: $193.93You Save: $70.68 (37%)Ships in 1-3 Business DaysProduct Specifications- Other Name: Camshaft, Engine

Cadillac Camshaft Part Number: 55508606
$92.67 MSRP: $145.12You Save: $52.45 (37%)Ships in 1-3 Business DaysProduct Specifications- Other Name: Camshaft Assembly-Intake; Camshaft, Engine


Cadillac Camshaft Part Number: 12666072
$91.07 MSRP: $142.65You Save: $51.58 (37%)Ships in 1-3 Business DaysProduct Specifications- Other Name: Camshaft, Engine

Cadillac Camshaft Part Number: 12652769
$72.76 MSRP: $113.97You Save: $41.21 (37%)Ships in 1-3 Business DaysProduct Specifications- Other Name: Camshaft, Engine
Cadillac Intake Camshaft Part Number: 12565168
$214.82 MSRP: $338.00You Save: $123.18 (37%)Ships in 1-3 Business DaysProduct Specifications- Other Name: Camshaft, Engine; Camshaft
Cadillac Camshaft Part Number: 12669978
$118.44 MSRP: $186.34You Save: $67.90 (37%)Ships in 1-3 Business DaysProduct Specifications- Other Name: Camshaft, Engine
- Replaces: 12641987
Cadillac Exhaust Camshaft Part Number: 12565172
$97.33 MSRP: $184.09You Save: $86.76 (48%)Ships in 1-2 Business DaysProduct Specifications- Other Name: Camshaft, Engine; Camshaft


Cadillac Camshaft Part Number: 12677832
$70.88 MSRP: $111.05You Save: $40.17 (37%)Ships in 1-3 Business DaysProduct Specifications- Other Name: Camshaft, Engine
- Replaces: 12647871

Cadillac Exhaust Camshaft Part Number: 12581635
$30.80 MSRP: $48.25You Save: $17.45 (37%)Ships in 1-3 Business DaysProduct Specifications- Other Name: Camshaft, Engine; Camshaft
Cadillac Camshaft Part Number: 12676416
$217.10 MSRP: $341.52You Save: $124.42 (37%)Ships in 1-3 Business DaysProduct Specifications- Other Name: Camshaft Assembly-Exhaust (W/Actuator); Camshaft, Engine

Cadillac Camshaft Part Number: 12632272
$80.37 MSRP: $125.85You Save: $45.48 (37%)Ships in 1-3 Business DaysProduct Specifications- Other Name: Camshaft, Engine

Cadillac Camshaft Part Number: 12570332
Product Specifications- Other Name: Camshaft, Engine
Cadillac Intake Camshaft Part Number: 3522433
Product Specifications- Other Name: Camshaft; Camshaft, Engine
| Page 1 of 6 |Next >
1-20 of 112 Results
Cadillac Camshaft
Choose OEM Camshaft, you're making the optimal decision for superior quality and perfect performance. You can feel confident because each component goes through stringent quality checks. Every part is carefully built to comply with Cadillac's factory specifications. You'll enjoy a smooth, worry-free installation that fits just right. At ChevyPartsGiant.com, you'll find it easy to get top-quality OEM Cadillac Camshaft. You can shop at highly competitive prices and protect your budget. All our genuine Cadillac parts include a dependable manufacturer's warranty. You'll also appreciate our straightforward return policy and swift delivery services for extra convenience.
Cadillac Camshaft Parts and Q&A
- Q: How to replace the left camshaft on Cadillac CTS?A:The left Camshaft replacement starts with stripping away the upper Intake Manifold and lower Intake Manifold before proceeding to remove the left bank Camshaft cover and both Camshaft sensors along with the Camshaft position actuator solenoid. Apply the Crankshaft rotation socket (EN 46111) to rotate the Crankshaft until the camshafts achieve their neutral (low tension) position where the Camshaft flats run parallel with the rail of the Camshaft cover. Prevent engine Camshaft rotation by using an open-end wrench on the Camshaft hex bolt while unscrewing the Camshaft position actuator bolt without complete removal. Complete your installation of the Timing Chain retention tool (EN 46108) within the Timing Chain so it stays in position and apply firm torque to its en 46108 nuts. Note down both the Camshaft position actuator locations and Timing Chain position before unbolt the Camshaft position actuator bolt and removing the camshafts. When installing the Camshaft position actuator maintain alignment of its marks with the Timing Chain marks but avoid tightening the bolt yet. The camshafts should be positioned on the cylinder head before mounting the Camshaft actuators to the camshafts and installing both components with their respective bearing caps. Reinstall the Camshaft position actuators while using the open-end wrench to block rotation then tighten them fully. The process ends by installing the intake Camshaft position actuator solenoid together with Camshaft sensors and Crankshaft balancer followed by the Camshaft cover and the reassembly of upper and lower Intake Manifold.
- Q: How to replace the camshaft (except RPOs LC9, LMG, LY2, LY5) on Cadillac Escalade?A:To replace the Camshaft (except RPOs LC9, LMG, LY2, LY5) one must begin by removing the radiator support followed by the valve lifters before removing the engine front cover and Starter motor. Install the j 42386-a (Flywheel Holding Tool) so its teeth interlock with the engine Flywheel teeth before using one m10-1.5 x 120 mm and one m10-1.5 x 45 mm bolt to bolt the j 42386-a and secure both bolts at 50 nm (37 lb ft). Use the crankshaft sprocket to rotate until both alignment marks between the cmp actuator and the crankshaft sprocket become perfectly lined up. Disconnect and remove the cmp actuator solenoid valve (234) before removing the cmp actuator (235) as well as the Timing Chain (208). Unscrew the bolts (204) along with the retainer (203) of the Camshaft while watching out for Camshaft bearing damage. Unscrew the Camshaft sprocket bolt through the front bolt hole of the Camshaft and employ the bolt as a tool for cautious Camshaft extraction from the engine. Clean engine oil serves to lubricate the Camshaft journals and bearings before you should use the bolt to handle the Camshaft duringinstallation into the engine block. First tidy the gasket surface of the engine block before installing the Camshaft retainer (203) together with bolts (204). Tighten hex head bolts of the first design to 25 nm (18 lb ft) and torx® head bolts of the second design to 15 nm (11 lb ft). Install en 46330 (Timing Belt Tensioner Retaining Pin) by compressing the Timing Chain tensioner guide while keeping cmp actuator and Timing Chain in proper alignment. The installation of cmp actuator solenoid valve (234) requires light hand tightening before assessing sprocket alignment. The cmp actuator solenoid valve needs first tightening to 65 nm (48 lb ft) then a single pass to a 90-degree angle by using the j 45059 (Angle Meter). During this procedure, remove the en 46330. First remove the j 42386-a and bolts before restating the Starter motor and engine front cover with valve lifters before finishing with the radiator support.