ChevyParts
My Garage
My Account
Cart
OEM Cadillac Radiator
Cooling Radiator- Select Vehicle by Model
- Select Vehicle by VIN
Select Vehicle by Model
orMake
Model
Year
Select Vehicle by VIN
For the most accurate results, select vehicle by your VIN (Vehicle Identification Number).
137 Radiators found


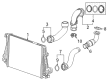
Cadillac Intercooler Part Number: 22799480
$297.71 MSRP: $511.30You Save: $213.59 (42%)Ships in 1-2 Business DaysProduct Specifications- Other Name: Radiator Assembly-Charging Air Cooler
- Replaced by: 84356897


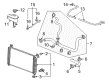
Cadillac Radiator Part Number: 84207656
$396.82 MSRP: $593.14You Save: $196.32 (34%)Ships in 1-2 Business DaysProduct Specifications- Other Name: Radiator, Radiator
- Replaces: 23378654, 23126402, 84062174


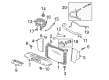
Cadillac Radiator Part Number: 15841574
$314.07 MSRP: $469.47You Save: $155.40 (34%)Ships in 1-2 Business DaysProduct Specifications- Other Name: Radiator, Radiator
- Replaces: 15252624, 15193114


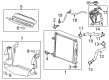
Cadillac Radiator Part Number: 84352738
$181.85 MSRP: $271.81You Save: $89.96 (34%)Ships in 1-2 Business DaysProduct Specifications- Other Name: Radiator, Radiator
- Replaced by: 86551903
- Replaces: 23452330

Cadillac Radiator Part Number: 23194682
$145.40 MSRP: $228.79You Save: $83.39 (37%)Ships in 1-3 Business DaysProduct Specifications- Other Name: Radiator Assembly-Charging Air Cooler; Intercooler; Radiator, Turbocharger/Supercharger Cooling


Cadillac Radiator Part Number: 52486866
$397.81 MSRP: $625.92You Save: $228.11 (37%)Ships in 1-3 Business Days
Cadillac Intercooler Part Number: 84551761
$231.23 MSRP: $363.74You Save: $132.51 (37%)Ships in 1-3 Business DaysProduct Specifications- Other Name: Radiator Assembly-Charging Air Cooler; Radiator, Turbocharger/Supercharger Cooling

Cadillac Intercooler Part Number: 23477181
$155.39 MSRP: $244.49You Save: $89.10 (37%)Ships in 1-3 Business DaysProduct Specifications- Other Name: Radiator Assembly-Charging Air Cooler; Radiator, Turbocharger/Supercharger Cooling

Cadillac Intercooler Part Number: 23385892
$240.36 MSRP: $378.21You Save: $137.85 (37%)Ships in 1-2 Business DaysProduct Specifications- Other Name: Radiator Assembly-Charging Air Cooler; Radiator, Turbocharger/Supercharger Cooling

Cadillac Intercooler Part Number: 20982750
$220.71 MSRP: $532.14You Save: $311.43 (59%)Ships in 1-3 Business DaysProduct Specifications- Other Name: Radiator Assembly-Charging Air Cooler; Radiator, Turbocharger/Supercharger Cooling

Cadillac Radiator Part Number: 86785339
$283.52 MSRP: $423.81You Save: $140.29 (34%)Product Specifications- Other Name: Radiator, Radiator
- Replaces: 84501976, 84555772, 84943136

Cadillac Radiator Part Number: 22747160
$258.87 MSRP: $386.94You Save: $128.07 (34%)Ships in 1-2 Business DaysProduct Specifications- Other Name: Radiator Assembly; Radiator, Radiator

Cadillac Radiator Part Number: 85535176
$217.76 MSRP: $325.51You Save: $107.75 (34%)Ships in 1-3 Business DaysProduct Specifications- Other Name: Radiator, Radiator

Cadillac Radiator Part Number: 22966123
$392.05 MSRP: $586.02You Save: $193.97 (34%)Ships in 1-2 Business DaysProduct Specifications- Other Name: Radiator Assembly; Radiator, Radiator
- Replaces: 22897770

Cadillac Radiator Part Number: 15932854
$180.60 MSRP: $269.95You Save: $89.35 (34%)Ships in 1-2 Business DaysProduct Specifications- Other Name: Radiator Assembly; Radiator, Radiator

Cadillac Auxiliary Cooler Part Number: 23385893
$150.58 MSRP: $225.09You Save: $74.51 (34%)Ships in 1-3 Business DaysProduct Specifications- Other Name: Radiator, Radiator; Radiator

Cadillac Radiator Part Number: 23428314
$313.64 MSRP: $471.52You Save: $157.88 (34%)Ships in 1-2 Business DaysProduct Specifications- Other Name: Radiator Assembly; Radiator, Radiator
- Replaces: 20926497

Cadillac Radiator Part Number: 19258628
$197.20 MSRP: $294.76You Save: $97.56 (34%)Product Specifications- Other Name: Radiator Assembly; Radiator, Radiator
- Replaces: 89022478, 19129984
Cadillac Radiator Part Number: 25957496
Product Specifications- Other Name: Radiator Assembly; Radiator, Radiator
- Replaces: 25789912

Cadillac Intercooler Part Number: 25876663
$601.07 MSRP: $950.01You Save: $348.94 (37%)Product Specifications- Other Name: Radiator Assembly-Charging Air Cooler; Radiator, Turbocharger/Supercharger Cooling
| Page 1 of 7 |Next >
1-20 of 137 Results
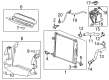
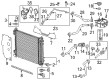
Cadillac Radiator
Choose OEM Radiator, you're making the optimal decision for superior quality and perfect performance. You can feel confident because each component goes through stringent quality checks. Every part is carefully built to comply with Cadillac's factory specifications. You'll enjoy a smooth, worry-free installation that fits just right. At ChevyPartsGiant.com, you'll find it easy to get top-quality OEM Cadillac Radiator. You can shop at highly competitive prices and protect your budget. All our genuine Cadillac parts include a dependable manufacturer's warranty. You'll also appreciate our straightforward return policy and swift delivery services for extra convenience.
Cadillac Radiator Parts and Q&A
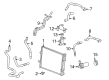
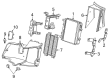
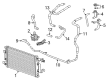
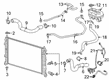
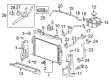
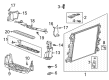
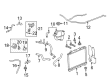
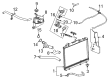
- Q: How to replace the radiator (LP1, LY7) on Cadillac CTS?A:Starting with Radiator (LP1, LY7) replacement requires draining coolant before uninstalling the Radiator support brackets with their cooling fans. Rise the vehicle after you detach the two upper bolts that mount the condenser. The j 38185 hose clamp pliers should be used to disconnect the lower Radiator Hose from the Radiator. Disconnect the lower transaxle oil cooler line from the Radiator by using j 44827 transmission cooler quick disconnect while avoiding any damage to the Radiator and transmission. Next remove the front air deflector. The Radiator procedure begins by removing lower condenser mounting bolts along with push pins from Radiator side seals before finally separating side seals from the Radiator. The operator may then lower the vehicle to remove the Radiator. Install the new Radiator by placing it into the insulator frame and tighten the upper condenser mounting bolts to 6.5 nm (58 inch lbs. Raising the vehicle a second time enables easy installation of lower condenser mounting bolts before tightening them to match original specifications. Verify the lower transaxle oil cooler lines seating position within the Radiator after pushing them into place. Proceed with attaching the lower Radiator Hose to the Radiator by sliding the clamp into position using j 38185. The side seal pushpin must be fitted into the Radiator and then all seals must be checked for proper placement followed by vehicle lowering and finally completion with cooling fans and Radiator supports before coolant addition.
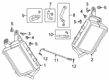
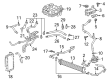
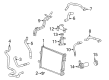
- Q: How to Properly Handle the Radiator Replacement Process on Cadillac XLR?A:The first step for radiator replacement involves draining the charge air cooler cooling system. Rise the vehicle and use appropriate support tools. Apply GE-47622 Hose Clamp Pliers to move the charge air cooler coolant outlet hose before removing it from the charge air cooler radiator. The next step involves installing the GE-47622 pliers to reposition the charge air cooler coolant inlet hose before removing it. Remove the charge air cooler radiator retaining nuts from the vehicle before you disconnect the radiator itself. Install the new charge air cooler radiator into your vehicle and fasten the retaining nuts to 8 Nm (71 lb in). Follow up with a GE-47622 and reposition the inlet hose clamp before reattaching the charge air cooler coolant inlet hose. Next install the charge air cooler coolant outlet hose followed by clamping and positioning the outlet tube using GE-47622. Soak up the vehicle and complete the fill operation for the charge air cooler cooling system.


Related Cadillac Parts
 Cadillac Thermostat
 Cadillac Radiator Hose
 Cadillac Water Pump Pulley
 Cadillac A/C Condenser Fan
 Cadillac Automatic Transmission Oil Cooler Line
 Cadillac Belt Tensioner Bolt
 Cadillac Coolant Reservoir
 Cadillac Engine Oil Cooler
 Cadillac Fan Shroud
 Cadillac Oil Cooler
 Cadillac Oil Cooler Hose
 Cadillac Transmission Oil Cooler