ChevyParts
My Garage
My Account
Cart
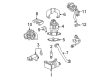
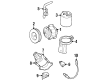
OEM Chevrolet Air Inject Check Valve
Air Injection Reaction Check Valve- Select Vehicle by Model
- Select Vehicle by VIN
Select Vehicle by Model
orMake
Model
Year
Select Vehicle by VIN
For the most accurate results, select vehicle by your VIN (Vehicle Identification Number).
43 Air Inject Check Valves found


Chevrolet Check Valve Part Number: 12659290
$304.32 MSRP: $584.64You Save: $280.32 (48%)Ships in 1-2 Business DaysProduct Specifications- Other Name: Valve, Emission Control System; Diverter Valve; Shut-Off Valve
- Replaces: 12619123, 12609876

Chevrolet Check Valve, Driver Side Part Number: 12621124
$232.48 MSRP: $420.77You Save: $188.29 (45%)Ships in 1-2 Business DaysProduct Specifications- Other Name: Valve, Emission Control System; Diverter Valve
- Position: Driver Side

Chevrolet Check Valve, Driver Side Part Number: 12652894
$173.32 MSRP: $325.48You Save: $152.16 (47%)Ships in 1-2 Business DaysProduct Specifications- Other Name: Valve, Emission Control System; Secondary Air Injection Check Valve; Diverter Valve; Shut-Off Solenoid
- Position: Driver Side


Chevrolet Pulse Air Valve Part Number: 22048208
$74.17 MSRP: $150.65You Save: $76.48 (51%)Ships in 1-2 Business DaysProduct Specifications- Other Name: Valve Assembly, Secondary Air Injection Check; Valve, Emission Control System
Chevrolet Check Valve, Passenger Side Part Number: 12621123
$241.34 MSRP: $436.81You Save: $195.47 (45%)Ships in 1-2 Business DaysProduct Specifications- Other Name: Valve, Emission Control System; Diverter Valve
- Position: Passenger Side

Chevrolet Check Valve, Passenger Side Part Number: 12652895
$172.89 MSRP: $324.68You Save: $151.79 (47%)Ships in 1-2 Business DaysProduct Specifications- Other Name: Valve, Emission Control System; Secondary Air Injection Check Valve; Diverter Valve; Shut-Off Solenoid
- Position: Passenger Side

Chevrolet Boost Sensor Part Number: 12702113
$31.26 MSRP: $48.97You Save: $17.71 (37%)Ships in 1-3 Business DaysProduct Specifications- Other Name: Solenoid, Turbocharger Boost Control Valves; Wastegate Solenoid; Intake Manifold Runner Control; MAP Sensor; By-Pass Valve; By-Pass Control Valve; Solenoid; Valve, Turbocharger/Supercharger Cooling
- Replaces: 55496241

Chevrolet Check Valve Part Number: 55581479
$145.76 MSRP: $229.33You Save: $83.57 (37%)Ships in 1-3 Business DaysProduct Specifications- Other Name: Valve Assembly-Secondary Air Injection Check; Diverter Valve; Valve, Emission Control System


Chevrolet A.I.R. Pump Valve Part Number: 12550930
Product Specifications- Other Name: Valve, Emission Control System


Chevrolet Check Valve Part Number: 12565503
$113.21 MSRP: $203.06You Save: $89.85 (45%)Product Specifications- Other Name: Valve Assembly-Secondary Air Injection Check; Secondary Air Injection Check Valve; Diverter Valve; Air Valve; A.I.R. Pipe; Emission Control System Valves (Air Injector Reactor, ECM Components, EGR Control)
- Replaces: 22040805, 22048212


Chevrolet Check Valve Part Number: 12556070
Product Specifications- Other Name: Valve Assembly-Secondary Air Injection Check; Valve, Emission Control System


Chevrolet Check Valve Part Number: 12562568
Product Specifications- Other Name: Valve Assembly-Secondary Air Injection Check; Secondary Air Injection Check Valve; Solenoid; Valve, Emission Control System
- Replaces: 22040897


Chevrolet Diverter Valve Part Number: 17072997
Product Specifications- Other Name: Valve Air, Emission Control System; Secondary Air Injection Check Valve; Valve, Emission Control System


Chevrolet Diverter Valve Part Number: 17087137
Product Specifications- Other Name: Valve, Emission Control System (ECM Components); Secondary Air Injection Check Valve; By-Pass Valve; Emission Control System (ECM & EGR Components)


Chevrolet Diverter Valve Part Number: 17075122
Product Specifications- Other Name: Valve, Emission Control System; Secondary Air Injection Check Valve

Chevrolet Diverter Valve Part Number: 17087182
Product Specifications- Other Name: Valve, Emission Control System (ECM Components); Secondary Air Injection Check Valve; Valve, Emission Control System

Chevrolet Diverter Valve Part Number: 17075123
Product Specifications- Other Name: Valve Air, Emission Control System; Secondary Air Injection Check Valve; Valve, Emission Control System

Chevrolet Check Valve Part Number: 22048579
Product Specifications- Other Name: Valve Assembly, Secondary Air Injection Check; Secondary Air Injection Check Valve; Diverter Valve; Valve, Emission Control System

Chevrolet Check Valve Part Number: 22050642
Product Specifications- Other Name: Valve, Emission Control System; Secondary Air Injection Check Valve; Diverter Valve; Valve, Emission Control System (ECM, EGR Components, Valves)
- Replaces: 22099019

Chevrolet Diverter Valve Part Number: 17087223
Product Specifications- Other Name: Valve, Emission Control System; Secondary Air Injection Check Valve
| Page 1 of 3 |Next >
1-20 of 43 Results
Chevrolet Air Inject Check Valve
Want to cut long-term maintenance and repair costs? Choose OEM Air Inject Check Valve. Those parts deliver top durability you can trust. On our site, you'll find a huge catalog of genuine Chevrolet parts. Prices are unbeatable, so you can keep more in your pocket. Every OEM Chevrolet Air Inject Check Valve includes a manufacturer's warranty. You can also get an easy return policy that keeps buying risk free. Fast delivery, get your car on the road quickly. It's simple to search, compare, and order. Stop guessing about quality or fit. Order today and save with parts that last.
Chevrolet Air Inject Check Valve Parts Questions & Experts Answers
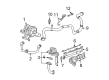
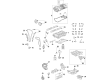
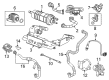
- Q: How to Perform an Air Inject Check Valve Replacement on a Chevrolet Impala?A:The first step to replace the secondary air injection shutoff and check valve requires removing the exhaust crossover pipe. Detach the secondary air injection (AIR) feed tube quick connect fitting from its connection with the AIR shutoff/check valve while also removing the AIR feed tube bolt from the heater inlet/outlet pipe bracket. You should disconnect the engine wiring harness electrical connector that connects to the AIR shutoff/check valve. After supporting the vehicle properly you should take off the AIR shutoff/check valve nuts then lower the vehicle first to access and remove the AIR shutoff/check valve bolts . Remove the AIR check valve after discarding its gasket. Place a NEW gasket on the AIR pipe studs before installing the AIR check valve through positioning it correctly with subsequent tightening of the AIR shutoff/check valve bolts to 50 Nm (37 lb ft). You must raise the car while it remains supported to tighten the AIR shutoff/check valve nuts to 10 Nm (89 lb in). The engine wiring harness should be reconnected to the AIR shutoff/check valve while the vehicle remains on its lower position. Also install the AIR feed tube quick connect fitting to the AIR shutoff/check valve. Place the exhaust crossover pipe back before reattaching the heater inlet/outlet pipe bracket with the AIR feed tube bolt at 10 Nm (89 lb in).
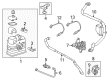
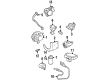
- Q: How to service the Air Inject Check Valve for Bank 1 on Chevrolet Corvette?A:Service the bank 1 air injection check valve by removing its clamp while practicing engine safety. Dismantle the check valve from both the air pipe through removal of the Air Hose. The left air pipe must be detached from its position on the manifold. Technicians should test the check valve before replacing it by connecting a Vacuum Pump to the air pump side nipple and pumping the system up to 10 in hg vacuum pressure to monitor the gauge reading. Check valve replacement is necessary if pressure drops to zero within five seconds. To perform installation attach the check valve to the air pipe and fasten it until torque reaches 23 n.m (17 lb ft). Employ a torque of 20 n.m (15 lb ft) when you install the air pipe to the Exhaust Manifold. The final step comprises attaching the Air Hose to the check valve before tightening it with a check valve clamp.
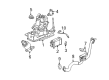
- Q: How to service the Air Inject Check Valve for Bank 2 on Chevrolet Lumina?A:Service of Air Inject Check Valve for bank 2 requires engine temperature to be low to avoid burns. The service starts with removing the clamp linked to the Air Hose from the check valve before proceeding to separate the vacuum line from the check valve. The right air pipe assembly must be removed from the manifold after disconnecting it from the Exhaust Manifold adaptors and removing the air pipe bracket nut. The check valve should be separated from the air pipe by removing its two bottom bolts. Upgrade the check valve by threading two bolts through the pipe before fitting the check valve with its associated pipe to the bracket stud and manifold adaptors while securely tightening the pipe connections to the manifold adaptors. Install the bracket stud nut followed by tightening of the locknut to 10 nm (88 lb in). The vacuum line installation should be performed by connecting it to the check valve while you reinstall the clamp and attach the Air Hose to its designated valve location.


Related Chevrolet Parts
 Chevrolet Catalytic Converter
 Chevrolet EGR Valve
 Chevrolet Exhaust Manifold Gasket
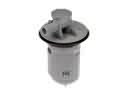 Chevrolet Fuel Tank Vent Valve
 Chevrolet Muffler
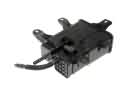 Chevrolet Vapor Canister
 Chevrolet Canister Purge Valves
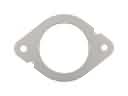 Chevrolet Catalytic Converter Gasket
 Chevrolet EGR Vacuum Solenoid
 Chevrolet Exhaust Hanger
 Chevrolet Exhaust Pipe
 Chevrolet Secondary Air Injection Pump
Browse Chevrolet Air Inject Check Valve by Models
S10 Colorado Tahoe Cruze Malibu Camaro Equinox Impala Silverado 1500 Silverado 2500 HD Caprice Cobalt Blazer Sonic Volt Trailblazer Astro Cavalier Corvette C20 C1500 C2500 C30 C3500 Celebrity Express 3500 G10 G20 G30 K1500 K20 K2500 K30 K3500 Lumina Monte Carlo P30 S10 Blazer Silverado 2500 Venture Silverado 3500 Suburban 1500 Trailblazer EXT C1500 Suburban C2500 Suburban Citation II Cruze Limited K1500 Suburban K2500 Suburban R10 R10 Suburban R1500 Suburban R20 R20 Suburban R2500 R2500 Suburban R30 R3500 Suburban 2500 V10 V10 Suburban V1500 Suburban V20 V20 Suburban V2500 Suburban V30 V3500