ChevyParts
My Garage
My Account
Cart
OEM Chevrolet Equinox Rack And Pinion
Steering Rack And Pinion- Select Vehicle by Model
- Select Vehicle by VIN
Select Vehicle by Model
orMake
Model
Year
Select Vehicle by VIN
For the most accurate results, select vehicle by your VIN (Vehicle Identification Number).
10 Rack And Pinions found


Chevrolet Equinox Steering Gear Part Number: 84157552
$387.78 MSRP: $759.23You Save: $371.45 (49%)Ships in 1-2 Business Days
Chevrolet Equinox Gear Assembly Part Number: 84295087
$752.11 MSRP: $1004.64You Save: $252.53 (26%)Ships in 1-2 Business Days
Chevrolet Equinox Steering Gear Part Number: 15896770
$453.37 MSRP: $838.80You Save: $385.43 (46%)
Chevrolet Equinox Steering Gear Part Number: 85169183
$920.04 MSRP: $1180.05You Save: $260.01 (23%)
Chevrolet Equinox Steering Gear Part Number: 84037522
$3209.63 MSRP: $4145.40You Save: $935.77 (23%)Ships in 1-2 Business DaysChevrolet Equinox Steering Gear Part Number: 20857570
$995.88 MSRP: $1283.43You Save: $287.55 (23%)Ships in 1-2 Business DaysChevrolet Equinox Steering Gear Part Number: 84157553
$414.57 MSRP: $705.79You Save: $291.22 (42%)Ships in 1-2 Business Days


Chevrolet Equinox Steering Gear Part Number: 19133700

Chevrolet Equinox Steering Gear Part Number: 19180760
Chevrolet Equinox Steering Gear Part Number: 84992271
$783.76 MSRP: $1004.64You Save: $220.88 (22%)
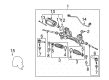
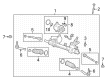
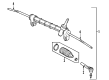
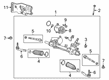
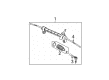
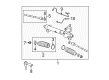
Chevrolet Equinox Rack And Pinion
Want to cut long-term maintenance and repair costs? Choose OEM Rack And Pinion. Those parts deliver top durability you can trust. On our site, you'll find a huge catalog of genuine Chevrolet Equinox parts. Prices are unbeatable, so you can keep more in your pocket. Every OEM Chevrolet Equinox Rack And Pinion includes a manufacturer's warranty. You can also get an easy return policy that keeps buying risk free. Fast delivery, get your car on the road quickly. It's simple to search, compare, and order. Stop guessing about quality or fit. Order today and save with parts that last.
The Rack And Pinion in Chevrolet Equinox cars are one of those elements which, by its means, turn the movement of the steering wheel into a side movement of the front wheels. This one is called rack and pinion; it features a pinion that is connected to the steering column; a rack is housed in a metal tube which it is connected to the tie-rods and steering knuckles of the vehicle. Current generation Chevrolet Equinox models employ a power-assisted, rack and pinion steering, which is further aided by a hydraulic pump driven off the engine. Manual racks were previously used, but have been more or less phased out in favor of power assisted models for easy operation. The application is mostly utilitarian with straight gears being preferred for a number of reasons including their ability to run cooler as compared to helical gears that though used due to their advantages are known to worn out faster. Most problems with the Rack And Pinion arise from leakage of fluid from the seals, worn gears and other related components causes stiffness of the steering or play of the wheel. This means timely servicing to avoid being call upon to spend a lot of money in the process of repairing when you could have been preventive the same from happening.
Chevrolet Equinox Rack And Pinion Parts Questions & Experts Answers
- Q: How to replace the Rack and Pinion in those equipped with Electronic Power Steering on Chevrolet Equinox?A:The first step to replace a Rack And Pinion on vehicles with electronic power steering requires wheel immobilization by using an anti-rotation pin to maintain a straight-ahead position. This step protects the sir from damaging incidents. Start by lifting the vehicle and placing it on a support system then remove the front tires. Start by removing both outer Tie Rod to Steering Knuckle nuts and discarding them before avoiding the use of pickle forks or wedge-type tools to protect wheel seal and bushing integrity. The j 24319-b (Steering Linkage and Tie Rod Puller) helps separate tie rods from steering knuckles before you rotate the intermediate Steering Shaft for accessing its pinch bolt. Separate the intermediate to Rack And Pinion pinch bolt before you disconnect the intermediate shaft from the Rack And Pinion. A technician should disconnect the stabilizer links from the stabilizer bar followed by removing the Rack And Pinion to cradle mounting bolts before extracting the Rack And Pinion through the vehicle's right side. Rack And Pinion owners should remove and preserve heat shields for future reinstallations. During installation check that the stabilizer rests at its highest position to achieve proper gear clearance and install the heat shield if necessary. Steer the Rack And Pinion through the right side opening before you insert it. After positioning the bushings in the supports, manually begin bolt installation and tighten them to 110 nm (81 lb ft). Mount the intermediate shaft to the Rack And Pinion through a new pinch bolt which requires a torque of 34 nm (25 lb ft). During stabilizer bar nut installation keep a firm grip on the ball stud to avoid turning while tightening the nuts. Secure the Tie Rod to the knuckle with a new nut which must reach 25 nm (18 lb ft) along with 90 degrees torque. After reinstalling the front wheels and tires check the front wheel alignment then perform adjustments as needed before performing the vehicle lowering.

Related Chevrolet Equinox Parts
 Chevrolet Equinox Steering Wheel
 Chevrolet Equinox Power Steering Pump
 Chevrolet Equinox Power Steering Reservoir
 Chevrolet Equinox Tie Rod
 Chevrolet Equinox Power Steering Hose
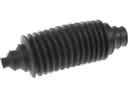 Chevrolet Equinox Rack and Pinion Boot
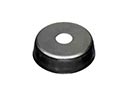 Chevrolet Equinox Radius Heat Shield
 Chevrolet Equinox Steering Column
 Chevrolet Equinox Steering Column Cover
 Chevrolet Equinox Steering Column Seal
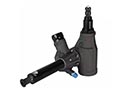 Chevrolet Equinox Steering Gearbox
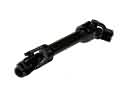 Chevrolet Equinox Steering Shaft