ChevyParts
My Garage
My Account
Cart
OEM GMC Idle Control Valve
IACV- Select Vehicle by Model
- Select Vehicle by VIN
Select Vehicle by Model
orMake
Model
Year
Select Vehicle by VIN
For the most accurate results, select vehicle by your VIN (Vehicle Identification Number).
12 Idle Control Valves found


GMC Idle Speed Control Part Number: 17113598
$136.73 MSRP: $243.06You Save: $106.33 (44%)Ships in 1-2 Business DaysProduct Specifications- Other Name: Valve Kit, Throttle Body/Carburetor; Idle Air Control Valve


GMC Idle Speed Control Part Number: 19333271
$78.63 MSRP: $221.36You Save: $142.73 (65%)Ships in 1-2 Business DaysProduct Specifications- Other Name: Valve Assembly, Idle Air Control; Fuel Injection Idle Air Control Valve; Idle Air Control Valve; Valve Kit, Throttle Body/Carburetor
- Replaces: 17112898


GMC Idle Air Control Valve Part Number: 19333268
$119.09 MSRP: $215.54You Save: $96.45 (45%)Ships in 1-2 Business DaysProduct Specifications- Other Name: Valve Assembly, Idle Air Control; Idle Speed Control Kit; Multi Portion Fuel Injection Idle Air Valve; Throttle Body/Carburetor.
- Replaces: 17111826

GMC Idle Speed Control Part Number: 19333272
$118.29 MSRP: $210.28You Save: $91.99 (44%)Ships in 1-2 Business DaysProduct Specifications- Other Name: Valve Assembly, Idle Air Control; Fuel Injection Idle Air Control Valve; Idle Air Control Valve; Valve Kit, Throttle Body/Carburetor
- Replaces: 17111788, 17113099

GMC Idle Speed Control Part Number: 19333270
$109.84 MSRP: $198.79You Save: $88.95 (45%)Ships in 1-2 Business DaysProduct Specifications- Other Name: Valve Assembly, Idle Air Control; Fuel Injection Idle Air Control Valve; Idle Air Control Valve; Valve, Throttle Body/Carburetor
- Replaces: 17112648


GMC Idle Speed Control Part Number: 17113209
Product Specifications- Other Name: Valve Kit, Throttle Body/Carburetor; Idle Air Control Valve

GMC Idle Air Control Valve Part Number: 12482707
Product Specifications- Other Name: Valve Kit, Throttle Body/Carburetor; Idle Speed Control
- Replaces: 17113200, 17113297


GMC Idle Speed Control Part Number: 17112193
$106.03 MSRP: $189.35You Save: $83.32 (44%)Product Specifications- Other Name: Valve Kit, Multi Portion Fuel Injection Idle Air; Idle Air Control Valve


GMC Idle Air Control Valve Part Number: 25527077
Product Specifications- Other Name: Valve Kit, Throttle Body/Carburetor; Idle Speed Control; Motor; Multi Portion Fuel Injection Air; Throttle Body/Carburetor; Body Injection Valve Kit
- Replaces: 17111460, 17111288
GMC Idle Air Control Valve Part Number: 17111460
Product Specifications- Other Name: Idle Speed Control
- Replaced by: 25527077
GMC Idle Speed Control Part Number: 17112712
Product Specifications- Other Name: Valve Assembly, Idle Air Control; Idle Air Control Valve; Valve, Throttle Body/Carburetor
GMC Idle Air Control Valve Part Number: 17112966
$112.34 MSRP: $201.51You Save: $89.17 (45%)Product Specifications- Other Name: Valve Kit, Throttle Body/Carburetor; Idle Speed Control; Valve Assembly; Valve, Throttle Body/Carburetor
GMC Idle Control Valve
Want to cut long-term maintenance and repair costs? Choose OEM Idle Control Valve. Those parts deliver top durability you can trust. On our site, you'll find a huge catalog of genuine GMC parts. Prices are unbeatable, so you can keep more in your pocket. Every OEM GMC Idle Control Valve includes a manufacturer's warranty. You can also get an easy return policy that keeps buying risk free. Fast delivery, get your car on the road quickly. It's simple to search, compare, and order. Stop guessing about quality or fit. Order today and save with parts that last.
GMC Idle Control Valve Parts Questions & Experts Answers
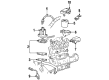
- Q: How to replace the Idle Control Valve on GMC Jimmy?A:Before starting Idle Control Valve replacement start by removing the negative Battery Cable and iat sensor harness connector. Next, detach the breather tube from the air cleaner outlet duct keeping in mind the wing nut securing the duct. Finally, loosen the maf sensor outlet clamp to remove the Throttle Body until the Idle Control Valve and o-ring seal. First disconnect the Idle Control Valve harness connector while undoing the maf sensor outlet clamp then lift the air cleaner outlet duct from the Throttle Body. Start by unhooking the Idle Control Valve mounting screws from the Throttle Body assembly to extract the Idle Control Valve along with its o-ring. Apply carburetor cleaner from a parts cleaning brush to the Idle Control Valve o-ring sealing surface and the pintle valve seat along with the air passage. Be careful not to submerge the Idle Control Valve in liquid cleaning solutions or solvents. Apply replacement Idle Control Valve o-ring before checking the pintle distance to its housing end, which should measure under 28 mm (1-1/8 in). Compress the pintle manually if distance from the valve motor housing to the end of the pintle exceeds 1-1/8 inch. After applying clean engine oil to the new Idle Control Valve o-ring you should insert the valve through the o-ring until all flange holes match the Throttle Body assembly. The Idle Control Valve mounting screws need clean screw threads before receiving application of thread locking compound gm p/n 1052624 or equivalent followed by screw torquing to 3 n.m (27 lb in). After attaching the Idle Control Valve harness you should reinstall the air cleaner outlet duct while tightening its wing nut and duct clamp to 4 n.m (35 lb in). Connect all components including the breather tube and the iat sensor connector as well as the negative Battery Cable before resetting the Idle Control Valve pintle position.

Related GMC Parts
 GMC Fuel Pump
 GMC Throttle Body
 GMC Carburetor
 GMC Fuel Injector
 GMC Fuel Pressure Regulator
 GMC Fuel Injection Pump
 GMC Fuel Injector O-Ring
 GMC Fuel Pressure Sensor
 GMC Fuel Pump Driver Module
 GMC Fuel Pump Seal
 GMC Fuel Pump Strainer
 GMC Fuel Rail
Browse GMC Idle Control Valve by Models
Sierra 1500 Yukon Sierra 2500 HD Sonoma Typhoon Syclone Caballero C1500 Jimmy K1500 S15 S15 Jimmy Safari Savana 2500 Savana 3500 Sierra 2500 Sierra 3500 C2500 C3500 G2500 K2500 K3500 Savana 1500 Yukon XL 1500 C1500 Suburban C2500 Suburban G1500 G3500 K1500 Suburban K2500 Suburban P2500 R1500 R1500 Suburban R2500 R2500 Suburban R3500 Sierra 1500 Classic Sierra 1500 HD V1500 V1500 Suburban V2500 V2500 Suburban V3500 Yukon XL 2500