ChevyParts
My Garage
My Account
Cart
OEM GMC Savana 1500 Engine Mount
Engine Motor Mount- Select Vehicle by Model
- Select Vehicle by VIN
Select Vehicle by Model
orMake
Model
Year
Select Vehicle by VIN
For the most accurate results, select vehicle by your VIN (Vehicle Identification Number).
16 Engine Mounts found


GMC Savana 1500 Mount Bracket Part Number: 15027096
$11.69 MSRP: $15.43You Save: $3.74 (25%)Ships in 1-2 Business Days


GMC Savana 1500 Motor Mount Part Number: 21998157
$102.69 MSRP: $176.37You Save: $73.68 (42%)
GMC Savana 1500 Motor Mount Part Number: 25863822
$113.33 MSRP: $192.95You Save: $79.62 (42%)
GMC Savana 1500 Adapter, Passenger Side Part Number: 25758852
$28.04 MSRP: $43.93You Save: $15.89 (37%)Ships in 1-3 Business Days
GMC Savana 1500 Mount Bracket, Driver Side Part Number: 20886359
$115.59 MSRP: $181.86You Save: $66.27 (37%)Ships in 1-3 Business DaysGMC Savana 1500 Mount Bracket, Passenger Side Part Number: 20886358
$119.13 MSRP: $187.46You Save: $68.33 (37%)Ships in 1-3 Business Days


GMC Savana 1500 Motor Mount, Driver Side Part Number: 21998156


GMC Savana 1500 Mount Bracket, Driver Side Part Number: 15969184


GMC Savana 1500 Mount Bracket Part Number: 15719194
GMC Savana 1500 Adapter, Driver Side Part Number: 25758853

GMC Savana 1500 Front Mount Part Number: 22188659
GMC Savana 1500 Mount Bracket Part Number: 15969183

GMC Savana 1500 Mount Bracket, Passenger Side Part Number: 15969182
GMC Savana 1500 Mount Bracket, Driver Side Part Number: 15969181
GMC Savana 1500 Mount Bracket, Driver Side Part Number: 15969179
GMC Savana 1500 Mount Bracket, Passenger Side Part Number: 15054180
GMC Savana 1500 Engine Mount
Want to cut long-term maintenance and repair costs? Choose OEM Engine Mount. Those parts deliver top durability you can trust. On our site, you'll find a huge catalog of genuine GMC Savana 1500 parts. Prices are unbeatable, so you can keep more in your pocket. Every OEM GMC Savana 1500 Engine Mount includes a manufacturer's warranty. You can also get an easy return policy that keeps buying risk free. Fast delivery, get your car on the road quickly. It's simple to search, compare, and order. Stop guessing about quality or fit. Order today and save with parts that last.
GMC Savana 1500 Engine Mount Parts and Q&A
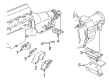
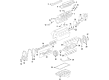
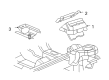
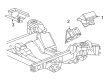
- Q: How to replace the left engine mount on GMC Savana 1500?A:The replacement of a left Engine Mount begins with taking off the upper Fan Shroud followed by vehicle elevation. To begin the replacement of the Engine Mount start by taking out the through-bolt along with its nut from the engine mounting on the side which needs to be changed. The vehicle demands removal of the Starter when handling right side engine mounts. Have caution when supporting the engine by using any jack equipment since placing it beneath the Oil Pan or any sheet metal or crankshaft balancer may cause damage. Use a jack on the square tab at the engine block rear to lift the motor just enough for removing the mount while checking for dash panel clearance. Remove the bolts linking the Engine Mount to the Engine Mount frame bracket followed by separating the Engine Mount from its proper position. The procedure to remove the Engine Mount engine bracket begins with unbolted bolts from the Engine Mount engine bracket followed by extracting the bracket while potentially needing to remove the heat shield. The first installation step requires attaching the heat shield followed by bolt tightening to 6 nm (53 inch lbs.) before proceeding to install the Engine Mount engine bracket along with its bolts and tightening them to 54 nm (40 ft. Lbs.). The procedure for installing the Engine Mount consists of attaching the mount itself along with the Engine Mount to Engine Mount frame bracket bolts which should be tightened to 58 nm (43 ft. Lbs.). Lower the engine to insert the Engine Mount through-bolt and install both the mount through-bolt along with its nut while torquing it to 68 nm (50 ft. Lbs.). Begin by reinstalling the Starter and then proceed with lowering the vehicle and concluding with the upper Fan Shroud installation.
- Q: How to replace the right engine mount on GMC Savana 1500?A:Start the right Engine Mount replacement by removing the upper Fan Shroud followed by vehicle lifting. First remove the through-bolt and nut which maintains the engine mounting position of the side involved in replacement together with the Starter when addressing right-side mounts. Supporting or raising the engine requires you to avoid placing the jack under the Oil Pan sheet metal or crankshaft balancer since this could cause damage. A square-jack placed on the rear engine block tab will lift the engine slightly to let the Engine Mount be taken out. Examine whether the engine rear part intersects with dash panel components before removing all Engine Mount to frame bracket bolts and the Engine Mount assembly. The process of removing the Engine Mount engine bracket includes unbolting it from the Engine Mount engine bracket while also shedding the heat shield if required. Begin by installing and tightening the heat shield bolts to 6 nm (53 inch lbs.) before adding the Engine Mount engine bracket and its bolts and fastening them to 54 nm (40 ft. Lbs.). You must now install both the Engine Mount together with the Engine Mount to Engine Mount frame bracket bolts with a torque of 58 nm (43 ft. Lbs.). Placing the engine at the desired height lets you insert the engine mounting through-bolt before installing both bolt and nut with a torque of 68 nm (50 ft. Lbs.). The Starter can be installed while proceeding to lift the vehicle before putting back the upper Fan Shroud.


Related GMC Savana 1500 Parts
 GMC Savana 1500 Balance Shaft Gear
 GMC Savana 1500 Crankshaft Thrust Washer Set
 GMC Savana 1500 Cylinder Head
 GMC Savana 1500 Dipstick
 GMC Savana 1500 Dipstick Tube
 GMC Savana 1500 Engine Mount Bracket
 GMC Savana 1500 Front Cross-Member
 GMC Savana 1500 Motor And Transmission Mount
 GMC Savana 1500 Pushrod
 GMC Savana 1500 Rocker Arm
 GMC Savana 1500 Timing Cover
 GMC Savana 1500 Variable Timing Adjuster Magnet