ChevyParts
My Garage
My Account
Cart
OEM GMC Seat Cushion Pad
Seat Pad Cushion- Select Vehicle by Model
- Select Vehicle by VIN
Select Vehicle by Model
orMake
Model
Year
Select Vehicle by VIN
For the most accurate results, select vehicle by your VIN (Vehicle Identification Number).
353 Seat Cushion Pads found

GMC Seat Cushion Pad, Rear Part Number: 84454565
$96.72 MSRP: $143.93You Save: $47.21 (33%)Ships in 1-3 Business DaysProduct Specifications- Other Name: Pad, Rear Seat Cushion; Seat Cushion
- Position: Rear
- Replaces: 84099797, 84180430

GMC Seat Back Pad, Front Part Number: 23360166
$36.02 MSRP: $53.58You Save: $17.56 (33%)Ships in 1-3 Business DaysProduct Specifications- Other Name: Pad, Front Seat Back
- Position: Front

GMC Seat Back Pad, Front Part Number: 84611527
$24.27 MSRP: $36.12You Save: $11.85 (33%)Ships in 1-3 Business DaysProduct Specifications- Other Name: Pad, Front Seat Back
- Position: Front
- Replaces: 23417620


GMC Seat Cushion Pad, Rear Part Number: 85112729
$28.20 MSRP: $41.97You Save: $13.77 (33%)Ships in 1-3 Business DaysProduct Specifications- Other Name: Pad, Rear Seat Cushion; Pad, Seat Cushion
- Position: Rear
- Replaces: 84776648

GMC Seat Cushion Pad, Front Center Part Number: 84553679
$21.40 MSRP: $31.84You Save: $10.44 (33%)Ships in 1-3 Business DaysProduct Specifications- Other Name: Pad-Front Seat Cushion Center; Pad, Seat Cushion; Seat Cushion
- Position: Front Center

GMC Cushion Cover, Black, Rear Part Number: 84664221
$22.16 MSRP: $32.99You Save: $10.83 (33%)Product Specifications- Other Name: Pad, Rear Seat Cushion; Seat Cushion Pad; Seat Cushion
- Position: Rear
- Replaces: 23303751

GMC Seat Back Pad, Rear Part Number: 23120425
$20.08 MSRP: $29.89You Save: $9.81 (33%)Ships in 1-3 Business DaysProduct Specifications- Other Name: Pad, Rear Seat Back
- Position: Rear

GMC Seat Back Pad, Rear Part Number: 84489895
$31.35 MSRP: $46.66You Save: $15.31 (33%)Ships in 1-3 Business DaysProduct Specifications- Other Name: Pad, Rear Seat Back
- Position: Rear
- Replaces: 23268124


GMC Seat Cushion Pad Part Number: 84716924
$27.98 MSRP: $41.64You Save: $13.66 (33%)Ships in 1-3 Business DaysProduct Specifications- Other Name: Pad, Seat Cushion; Pad, Front Seat Cushion; Seat Cushion

GMC Seat Cushion Pad Part Number: 89026510
$45.52 MSRP: $67.74You Save: $22.22 (33%)Ships in 1-3 Business DaysProduct Specifications- Other Name: Pad, Seat Cushion; Seat Cushion
- Position: Rear Driver Side
GMC Seat Back Pad, Front Part Number: 84736471
$21.94 MSRP: $32.65You Save: $10.71 (33%)Ships in 1-3 Business DaysProduct Specifications- Other Name: Pad, Front Seat Back
- Position: Front

GMC Seat Cushion Pad Part Number: 89039558
$52.28 MSRP: $77.80You Save: $25.52 (33%)Ships in 1-3 Business DaysProduct Specifications- Other Name: Pad, Rear Seat Cushion; Pad, Seat Cushion; Seat Cushion
- Position: Rear

GMC Seat Cushion Pad Part Number: 84823332
$70.24 MSRP: $104.51You Save: $34.27 (33%)Ships in 1-3 Business DaysProduct Specifications- Other Name: Pad, Seat Cushion; Pad, Front Seat Cushion; Seat Cushion
- Replaces: 84513562

GMC Seat Back Pad, Rear Part Number: 84180426
$29.78 MSRP: $44.32You Save: $14.54 (33%)Ships in 1-3 Business DaysProduct Specifications- Other Name: Pad, Rear Seat Back
- Position: Rear

GMC Seat Cushion Pad, Rear Part Number: 22888653
$121.99 MSRP: $182.34You Save: $60.35 (34%)Ships in 1-3 Business DaysProduct Specifications- Other Name: Pad, Rear Seat Cushion; Pad, Seat Cushion; Seat Cushion
- Position: Rear

GMC Seat Cushion, Rear Part Number: 84664222
$32.17 MSRP: $47.87You Save: $15.70 (33%)Ships in 1-3 Business DaysProduct Specifications- Other Name: Pad, Rear Seat Cushion
- Position: Rear
- Replaces: 23303752

GMC Seat Back Pad, Rear Part Number: 23470761
$102.19 MSRP: $152.07You Save: $49.88 (33%)Ships in 1-3 Business DaysProduct Specifications- Other Name: Pad-Rear Seat Back; Pad, Seat Back Cushion
- Position: Rear
GMC Seat Cushion Pad Part Number: 84572338
$27.63 MSRP: $41.10You Save: $13.47 (33%)Ships in 1-3 Business DaysProduct Specifications- Other Name: Pad, Seat Cushion; Pad, Front Seat Cushion; Seat Cushion
- Replaces: 84093793, 84136743

GMC Seat Back Pad, Rear Part Number: 84411506
$37.33 MSRP: $55.55You Save: $18.22 (33%)Ships in 1-3 Business DaysProduct Specifications- Other Name: Pad, Rear Seat Back
- Position: Rear
- Replaces: 84180427, 84099801
GMC Seat Cushion Pad Part Number: 84572336
$62.68 MSRP: $93.27You Save: $30.59 (33%)Product Specifications- Other Name: Pad, Seat Cushion; Pad, Front Seat Cushion; Seat Cushion
- Replaces: 84093792, 84136741
| Page 1 of 18 |Next >
1-20 of 353 Results
GMC Seat Cushion Pad
Want to cut long-term maintenance and repair costs? Choose OEM Seat Cushion Pad. Those parts deliver top durability you can trust. On our site, you'll find a huge catalog of genuine GMC parts. Prices are unbeatable, so you can keep more in your pocket. Every OEM GMC Seat Cushion Pad includes a manufacturer's warranty. You can also get an easy return policy that keeps buying risk free. Fast delivery, get your car on the road quickly. It's simple to search, compare, and order. Stop guessing about quality or fit. Order today and save with parts that last.
GMC Seat Cushion Pad Parts Questions & Experts Answers
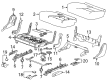
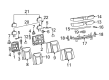
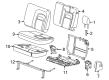
- Q: How to Replace a Rear Seat Cushion Pad and Cover on GMC Envoy?A:First remove the vehicle seat cushion before removing the seat cushion bracket to change the rear seat cushion pad and cover. Before proceeding move on to remove the seat latch bezels while using the Clip Removal Tool (J 36796) to disconnect push pins beneath the seat bottom and begin the seat cushion extraction. You must expose the J-strips on the carpeted section to unfasten the seat cover from its seat pan position. The foam can be compressed beginning from any forward corner to partially disengage the seat cover assembly from the seat pan but you should avoid pulling adhesive-backed strip from the seat pad when separating seat cover retaining strips. You should separate the retaining strips to remove the cover followed by extracting the cushion and cover assembly off the seat pan. Once the reinforcement bar has been released from its hog-ring position you can detach the cover from both the cushion and the bar itself. Security begins by connecting the cover to the cushion before refitting the reinforcement bar to its place on the hog-rings and lastly applying the retaining strips which secure the cover to the cushion. Install the seat cushion to the seat pan by setting the seat pan over the cushion and cover assembly while slightly compressing the foam until you attach and position the seat cover and cushion on the seat pan. Plug in the J-strips which attach the cover to the seat pan and reinstall the push pins located underneath the seat bottom before installing the latch bezels. Reattach the seat cushion bracket before returning the upholstery to its appropriate position in the vehicle.
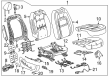
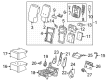
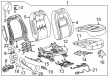
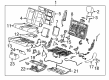
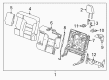
- Q: How to replace the front seat cushion pad and cover on GMC Canyon?A:The replacement process for front seat cushion cover and pad requires the vehicle seat removal followed by cup holder bracket detachment through straight pulling. You need to remove first the trim panel from the front seat cushion exterior before detaching the 3 bolts securing the cup holder bracket from the seat frame except in cases with no cup holder. Unclip the front, rear and side j-strips (1, 2) which are located under the seat before pulling the lumbar knob directly off while accounting for an equipped seat. First remove both the seat switch bezel (if present) while simultaneously taking off the recliner handle. Unlock the seat recliner from its seat adjuster mounting with two bolts and then separate the seat back unit from the seat cushion unit. After disconnecting the seat belt buckle electrical connector the technician should detach any clips or straps that hold the electrical harness to the seat cushion frame base. Disassemble the seat by removing the bolt that fastens the seat belt buckle assembly to the seat adjuster then unfasten the seat cushion cover and cushion foam. Before pad replacement you need to peel off the heating element from the pad when the pad contains this component. Installation requires an adhesive-backed heating element which should be applied onto the pad when replacing (if equipped) after which the cover needs to be installed onto the pad through hog ring attachment. Install the seat belt buckle assembly through the Seat Cushion Pad while attaching the frame to the seat cushion foam pad along with its cover. Attaching the seat belt buckle assembly to the seat adjuster requires fastening it with the bolt until it reaches 55 n.m (41 lb ft) torque. The seat belt buckle electrical connector should be connected and all electrical harness clips or straps need to be restated. Fasten the seat back assembly to the seat cushion assembly using the 2 seat recliner bolts while torquing them to 24 n.m (18 lb ft). If the seat has a switch bezel you should reinstall it before pushing a lumbar knob directly onto the shaft when present. After installing the recliner handle you must attach the front and rear and side j-strips (1, 2) under the seat platform. Use three bolts to fasten the cup holder bracket onto the seat frame while tightening them at 9.1 n.m (80 lb in). Then install the front seat cushion outer trim panel. The seat installation procedure finishes with the cup holder direct installation on its bracket along with the seat reinstallation into the vehicle.
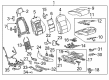
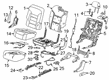
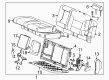
- Q: How to replace the front seat back cover and Seat Cushion Pad on GMC Sierra 1500?A:The process of replacing the front seat back cover and pad requires the removal of the head restraint and seat trim panel followed by the lower Seat Belt anchor nut before disengaging the j-strip retainer at the bottom of the seat back cover and disconnecting the heater seat element connector if present. The armrest should be removed before lifting the seat cover over the air bag cover until you reach the top seating position. The bottom end of your seat back cover has a j-strip retainer which needs uninstallation followed by disconnecting all heater seats elements connectors if they exist. You should lift the seat back cover half off its foam pad to access the armrest clip along with the armrest (if equipped). Push a flat-bladed tool beneath the seat cover to slide it over the air bag cover before carrying out the seat cover removal up to the seat top. Remove the rear cardboard panel by disengaging its panel fasteners and release the head restraint retainers by unclipping them. You should remove the bolts that secure the Seat Belt tower cover before removing the cover from its position. Feed the Seat Belt along with the Seat Belt bezel through the seat cover opening before lifting the rest of the cover from the foam pad until the pad can be removed from the frame. Install the Seat Belt tower by affixing the foam pad on the frame first and then tighten the Seat Belt tower cover bolts to 1.9 n.m (17 lb in). After placing the rear cardboard panel and hooking its fasteners the seat back cover needs to be partially installed onto the frame top. After routing the Seat Belt and its bezel through the tower opening users must mount the armrest clip then gently pull the remaining cover portion using alternating side-to-side movements of the hand. Install the armrests and head restraint retainers before fitting the seat cover around the air bag cover and inserting the nut onto the lower Seat Belt anchor while tightening it to 53 n.m (39 lb ft). You need to put the seat trim panel in position and install the head restraints before pushing the seat cover down to check it has secure retention from the velcro in the seat cushion and to join the j-strip at seat bottom.


Related GMC Parts
 GMC Center Console
 GMC Shift Knob
 GMC Window Motor
 GMC Body Mount Hole Plug
 GMC Center Console Base
 GMC Door Seal
 GMC Hood Cable
 GMC Mirror Cover
 GMC Seat Heater Pad
 GMC Seat Switch Panel
 GMC Side View Mirrors
 GMC Weather Strip
Browse GMC Seat Cushion Pad by Models
Acadia Sierra 1500 Yukon Canyon Sierra 2500 HD Terrain Envoy Sonoma C1500 Envoy XL Envoy XUV K1500 Savana 2500 Savana 3500 Sierra 2500 Sierra 3500 Yukon XL Acadia Limited C2500 C3500 K2500 K3500 Savana 1500 Yukon XL 1500 Hummer EV Pickup Sierra 1500 Classic Sierra 1500 HD Sierra 1500 HD Classic Sierra 2500 HD Classic Sierra 3500 Classic Sierra 3500 HD Yukon XL 2500