ChevyParts
My Garage
My Account
Cart
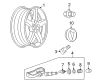
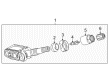
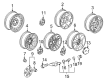
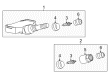
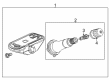
OEM GMC TPMS Sensor
Tire Pressure Monitoring System Sensor- Select Vehicle by Model
- Select Vehicle by VIN
Select Vehicle by Model
orMake
Model
Year
Select Vehicle by VIN
For the most accurate results, select vehicle by your VIN (Vehicle Identification Number).
29 TPMS Sensors found


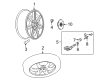
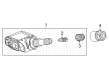
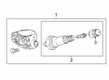
GMC TPMS Sensor Part Number: 15921013
$79.54 MSRP: $154.38You Save: $74.84 (49%)Ships in 1-2 Business DaysProduct Specifications- Other Name: Sensor Assembly-Tire Pressure Indicator; Tire Pressure Monitoring System (TPMS) Sensor; TPMS Capteur; Tire Pressure Sensor; Tire Sensor; Pressure Sensor; Sensor; Sensor, Tire Pressure
- Replaced by: 20925924


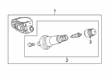
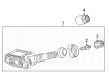
GMC TPMS Sensor Valve Part Number: 13581557
$4.86 MSRP: $9.12You Save: $4.26 (47%)Ships in 1-2 Business DaysProduct Specifications- Other Name: Nut, Tire Pressure; TPMS Sensor Service Kit; TPMS Sensor Nut; Valve Assembly Nut; Nut, Wheel & Spare Tire; Nut, Wheel


GMC Wheel Nut Part Number: 15234846
$7.26 MSRP: $13.64You Save: $6.38 (47%)Ships in 1-3 Business DaysProduct Specifications- Other Name: Nut, Tire Pressure; TPMS Sensor Service Kit; Valve Stem Nut; TPMS Sensor Valve; TPMS Sensor Nut; Pressure Sensor Nut; Tire Sensor Nut; Transmitter Nut; Nut, Wheel
- Replaces: 10268439, 15825474, 15125473, 25708165


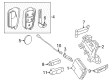
GMC Valve Stem Part Number: 13507403
$14.70 MSRP: $26.60You Save: $11.90 (45%)Ships in 1-3 Business DaysProduct Specifications- Other Name: Sensor Kit, Tire Pressure; TPMS Sensor Service Kit; TPMS Sensor; TPMS Sensor Valve Assembly; Sensor Kit, Vehicle Security & Safety


GMC TPMS Sensor Part Number: 15114379
$65.59 MSRP: $127.30You Save: $61.71 (49%)Ships in 1-2 Business DaysProduct Specifications- Other Name: Sensor, Tire Pressure Indicator; Tire Pressure Monitoring System (TPMS) Sensor; TPMS Capteur; Tire Pressure Sensor; Sensor, Tire Pressure


GMC TPMS Sensor Part Number: 25774007
$57.98 MSRP: $113.50You Save: $55.52 (49%)Ships in 1-2 Business DaysProduct Specifications- Other Name: Sensor, Tire Pressure Indicator; TPMS Sensor Valve Assembly; Valve Repair Set; Tyre Pressure Repair Kit.; Tire Pressure Sensor; Transmitter; Sensor, Tire Pressure


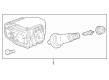
GMC TPMS Sensor, Gray; Silver Part Number: 20925924
$79.54 MSRP: $154.38You Save: $74.84 (49%)Ships in 1-3 Business DaysProduct Specifications- Other Name: Sensor, Tire Pressure Indicator; Tire Pressure Monitoring System (TPMS) Sensor; TPMS Capteur; Tire Pressure Sensor; Tire Sensor; Sensor; Sensor, Vehicle Security & Safety; Sensor, Tire Pressure
- Replaces: 10394110, 15268606, 15921013


GMC TPMS Sensor Part Number: 20927604
$70.63 MSRP: $138.28You Save: $67.65 (49%)Ships in 1-2 Business DaysProduct Specifications- Other Name: Sensor Assembly-Tire Pressure Indicator; Tire Pressure Monitoring System (TPMS) Sensor; Sensor; Sensor, Vehicle Security & Safety; Sensor, Tire Pressure
- Replaces: 15122618


GMC TPMS Sensor Part Number: 13540606
$27.10 MSRP: $50.90You Save: $23.80 (47%)Ships in 1-2 Business DaysProduct Specifications- Other Name: Sensor Assembly-Tire Pressure Indicator; Tire Pressure Sensor; Sensor, Vehicle Security & Safety; Sensor, Tire Pressure
- Replaces: 13512347

GMC TPMS Sensor Part Number: 13538761
$38.51 MSRP: $68.76You Save: $30.25 (44%)Ships in 1-2 Business DaysProduct Specifications- Other Name: Sensor Assembly-Tire Pressure Indicator; Tire Pressure Sensor; Sensor; Sensor, Vehicle Security & Safety; Sensor, Tire Pressure
- Replaced by: 13556202

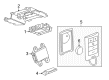
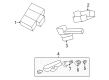
GMC Receiver Part Number: 20803737
$91.17 MSRP: $162.80You Save: $71.63 (44%)Ships in 1-3 Business DaysProduct Specifications- Other Name: Receiver Assembly-Remote Control Door Lock; Receiver, Door Lock Remote Control Inside; Receiver, Door Electric And Vacuum Locks; Module, Tire Pressure
- Replaces: 25856316, 25938218

GMC TPMS Sensor Part Number: 13556202
$38.51 MSRP: $68.76You Save: $30.25 (44%)Ships in 1-2 Business DaysProduct Specifications- Other Name: Sensor Assembly-Tire Pressure Indicator; Sensor, Vehicle Security & Safety; Sensor, Tire Pressure
- Replaces: 13530661, 13593960, 13538761

GMC TPMS Sensor Nut Part Number: 25976357
$3.15 MSRP: $5.62You Save: $2.47 (44%)Ships in 1-3 Business DaysProduct Specifications- Other Name: Nut, Tire Pressure; TPMS Sensor Service Kit; Pressure Sensor Nut; Valve Assembly Nut; Tire Sensor Nut
- Replaces: 15242789


GMC TPMS Sensor Part Number: 13540607
$27.15 MSRP: $50.98You Save: $23.83 (47%)Ships in 1-2 Business DaysProduct Specifications- Other Name: Sensor Assembly-Tire Pressure Indicator; Tire Pressure Sensor; Sensor, Vehicle Security & Safety; Sensor, Tire Pressure
- Replaces: 13512346
GMC TPMS Sensor Part Number: 13538760
$26.86 MSRP: $50.44You Save: $23.58 (47%)Product Specifications- Other Name: Sensor Assembly-Tire Pressure Indicator; Tire Pressure Sensor; Sensor
- Replaced by: 13554170

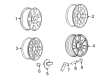
GMC Tire Pressure Sensor Part Number: 84991144
$26.21 MSRP: $40.00You Save: $13.79 (35%)Product Specifications- Other Name: Tire Pressure Monitor (Xl8-433Mhz); Sensor Package, Tire Pressure
- Replaced by: 86530815

GMC TPMS Sensor Part Number: 13542523
$26.01 MSRP: $48.84You Save: $22.83 (47%)Product Specifications- Other Name: Sensor Assembly-Tire Pressure Indicator; Tire Pressure Sensor; Stem, Tire Valve And Cover Lock; Sensor, Tire Pressure
- Replaces: 13533166

GMC Control Module Part Number: 20803736
$70.29 MSRP: $193.25You Save: $122.96 (64%)Ships in 1-3 Business DaysProduct Specifications- Other Name: Receiver, Door Lock Remote Control Inside; Receiver; Receiver, Door Electric And Vacuum Locks; Module, Tire Pressure; Harness, Dome Lamp
- Replaces: 15807815, 15857830, 25896540, 15946937, 25857326, 25856131, 25808836

GMC TPMS Sensor Part Number: 13540605
$39.15 MSRP: $76.64You Save: $37.49 (49%)Ships in 1-2 Business DaysProduct Specifications- Other Name: Sensor Assembly-Tire Pressure Indicator; Tire Pressure Sensor; Sensor, Tire Pressure
- Replaces: 13598463


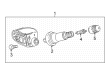
GMC Tire Pressure Sensor Part Number: 84338125
$125.44 MSRP: $150.00You Save: $24.56 (17%)Product Specifications- Other Name: Tire Pressure Monitor (Xl8-433Mhz); TPMS Sensor; Sensor Package, Tire Pressure
- Replaced by: 86803857
| Page 1 of 2 |Next >
1-20 of 29 Results
GMC TPMS Sensor
Want to cut long-term maintenance and repair costs? Choose OEM TPMS Sensor. Those parts deliver top durability you can trust. On our site, you'll find a huge catalog of genuine GMC parts. Prices are unbeatable, so you can keep more in your pocket. Every OEM GMC TPMS Sensor includes a manufacturer's warranty. You can also get an easy return policy that keeps buying risk free. Fast delivery, get your car on the road quickly. It's simple to search, compare, and order. Stop guessing about quality or fit. Order today and save with parts that last.
GMC TPMS Sensor Parts Questions & Experts Answers
- Q: How to replace the TPMS Sensor (Snap In Style) on GMC Sierra 3500 Classic?A:To replace the Tire Pressure Indicator Sensor (Snap In Style) lift the vehicle on an applicable support and remove the tire-wheel assembly. Remove the tire from the rim, with the use of a new Schrader(R) tire pressure monitor (TPM) and new TORX screw (in the case of fixing it). Erase the TORX screw from the tire pressure sensor and create plain off the tire pressure valve stem, careful not to scope or break the clean coat packaging on the wheels which are of aluminum. Pull off the tire pressure check valve stem, through the rim. During installation, make sure the flat of the valve is aligned with the flats of the snap in the enclosure and keep a note that TPM valves and TORX screws are one-time-use only. Mount the tire pressure sensor to the valve stem and slide the new TORX screw down locking it in with 1.3 N.m (11.5 lb in). Consult an approved tire mounting lubricant, and do not use the silicon or the corrosive base. Soap up the rubber portion that extends out from the valve stem, and use the tire valve stem mounting tool to "pull" the valve right through again parallel to the VALVE hole on the rim. Note that Snap Fit TPM sensors are designed to arrive in the OFF state but will go from this stage when the tire is deflated and the technician will be able to program the vehicle normally. Mount the tire on the rim, tire-wheel assembly is then installed on the vehicle, lower the vehicle, learn the tire pressure sensors.
- Q: How to replace the TPMS Sensor (Clamp In Style) on GMC Sierra 1500?A:In order to change the Tire Pressure Indicator Sensor (Clamp In Style), raise the vehicle on an adequate support and detach the tire/wheel assembly. Before you take off the tire, put the cap of the sensor and valve on clean surface ensuring that the cap of the sensor is made of aluminum and the valve of nickel plated to avoid corrosion. When removing the bead from the tire, place the bead breaker fixture 90 degrees from the valve stem and insert the tire iron or pry bar at an angle to the sensor body on the clockwise end as you pry the tire bead. Use the tire machine to rotate the tyre/wheel assembly labelled as clockwise in the transfer of tyre bead to the outside of the wheel rim followed by both the inner and outer beads. Once the tire is removed, clean the inner surfaces to ensure there is no tire sealant. Then, get rid of the tire pressure sensor nut and the sensor itself. The sensor must be installed with the air passage aimed into the wheel, cleaning the sealing area of the grommet, installing the sensor nut so that the sensor body is parallel to the internal surface of the wheel tightness of 7 N.m (62 lb in). Before mounting the tire, place the mounting/dismounting head 180 degrees from the valve stem and the bead transition area 45 degrees to the counterclockwise of the valve stem and mount it clockwise turning tire/wheel assembly for the bead transfer to the inside of the wheel rim and repeat for the outer bead). Mount the tire on the wheel, a service replacement tire pressure sensor shipped from the factory is OFF and interested needs to be spun at speeds over 32 km/h (20 mph) for a minimum of 10 seconds to enable. Last, place the tire/wheel assembly on the vehicle, lower the vehicle, while learning about the tire pressure sensors.


Related GMC Parts
 GMC Fuse
 GMC ABS Control Module
 GMC Body Control Module
 GMC Engine Control Module
 GMC Fuel Pump Relay
 GMC Fuse Box
 GMC ABS Relay
 GMC Antenna Base
 GMC Antenna Cable
 GMC Battery Vent Tube
 GMC Headlight Relay
 GMC Relay
Browse GMC TPMS Sensor by Models
Acadia Sierra 1500 Yukon Canyon Sierra 2500 HD Terrain Envoy Envoy XL Savana 2500 Savana 3500 Sierra 2500 Sierra 3500 Yukon XL Acadia Limited Savana 1500 Yukon XL 1500 Hummer EV Pickup Sierra 1500 Classic Sierra 1500 HD Sierra 1500 HD Classic Sierra 1500 Limited Sierra 2500 HD Classic Sierra 3500 Classic Sierra 3500 HD Yukon XL 2500