ChevyParts
My Garage
My Account
Cart
OEM GMC Washer Reservoir
Windshield Washer Reservoir- Select Vehicle by Model
- Select Vehicle by VIN
Select Vehicle by Model
orMake
Model
Year
Select Vehicle by VIN
For the most accurate results, select vehicle by your VIN (Vehicle Identification Number).
66 Washer Reservoirs found


GMC Washer Reservoir Part Number: 12365363
$22.14 MSRP: $40.10You Save: $17.96 (45%)Ships in 1-2 Business DaysProduct Specifications- Other Name: Container, Windshield Washer Solvent
- Replaced by: 12494846


GMC Washer Reservoir Part Number: 84454003
$36.39 MSRP: $64.99You Save: $28.60 (45%)Ships in 1-3 Business DaysProduct Specifications- Other Name: Container Kit, Windshield Washer; Container, Windshield Washer
- Replaces: 52027826, 84168359


GMC Washer Reservoir Part Number: 88958134
$88.02 MSRP: $157.20You Save: $69.18 (45%)Ships in 1-2 Business DaysProduct Specifications- Other Name: Container, Windshield Washer Solvent; Reservoir; Container, Windshield Washer


GMC Reservoir Part Number: 1256620
$119.88 MSRP: $213.12You Save: $93.24 (44%)Ships in 1-2 Business DaysProduct Specifications- Other Name: Jar-Windshield Washer; Windshield Washer Reservoir; Container; Container, Windshield Washer


GMC Washer Reservoir Part Number: 23283669
$36.17 MSRP: $72.64You Save: $36.47 (51%)Ships in 1-2 Business DaysProduct Specifications- Other Name: Container, Windshield Washer; Reservoir
- Replaces: 22954986


GMC Washer Reservoir Part Number: 22144000
$59.27 MSRP: $92.84You Save: $33.57 (37%)Ships in 1-3 Business DaysProduct Specifications- Other Name: Container, Windshield Washer Solvent; Container, Windshield Washer
GMC Washer Reservoir Part Number: 84454002
$36.89 MSRP: $65.87You Save: $28.98 (44%)Ships in 1-3 Business DaysProduct Specifications- Other Name: Container Kit, Windshield Washer; Reservoir; Container, Windshield Washer
- Replaces: 84176472

GMC Washer Reservoir Part Number: 84968436
$96.13 MSRP: $171.66You Save: $75.53 (44%)Ships in 1-2 Business DaysProduct Specifications- Other Name: Container, Windshield Washer; Reservoir
- Replaced by: 85684399
GMC Washer Reservoir Part Number: 85592477
$90.76 MSRP: $162.08You Save: $71.32 (44%)Ships in 1-2 Business DaysProduct Specifications- Other Name: Container, Windshield Washer
- Replaced by: 85684400


GMC Washer Reservoir Part Number: 85594063
$47.53 MSRP: $84.88You Save: $37.35 (44%)Ships in 1-2 Business DaysProduct Specifications- Other Name: Container, Windshield Washer
- Replaced by: 86538837

GMC Reservoir Assembly Part Number: 15076408
$96.96 MSRP: $173.13You Save: $76.17 (44%)Ships in 1-3 Business DaysGMC Washer Reservoir Part Number: 85594064
$49.62 MSRP: $88.60You Save: $38.98 (44%)Ships in 1-2 Business DaysProduct Specifications- Other Name: Container, Windshield Washer
- Replaced by: 86518445

GMC Reservoir Part Number: 84955775
$73.76 MSRP: $131.72You Save: $57.96 (44%)Ships in 1-2 Business DaysProduct Specifications- Other Name: Container, Windshield Washer
GMC Reservoir Assembly Part Number: 15076401
$77.56 MSRP: $138.51You Save: $60.95 (44%)Ships in 1-3 Business Days
GMC Washer Reservoir Part Number: 84176929
$49.62 MSRP: $88.60You Save: $38.98 (44%)Ships in 1-3 Business DaysProduct Specifications- Other Name: Container, Windshield Washer; Reservoir
- Replaced by: 86518445

GMC Washer Reservoir Part Number: 15942521
$50.00 MSRP: $89.28You Save: $39.28 (44%)Ships in 1-2 Business DaysProduct Specifications- Other Name: Reservoir Assembly; Reservoir
- Replaced by: 20999339

GMC Reservoir Tank Part Number: 25796345
$38.70 MSRP: $69.10You Save: $30.40 (44%)Ships in 1-3 Business DaysProduct Specifications- Other Name: Container Kit, Windshield Washer; Washer Reservoir; Container, Windshield Washer
- Replaces: 15046470
GMC Reservoir Assembly Part Number: 15076395
$83.37 MSRP: $130.60You Save: $47.23 (37%)Ships in 1-3 Business Days
GMC Reservoir Part Number: 20999333
$19.86 MSRP: $32.72You Save: $12.86 (40%)Ships in 1-2 Business DaysProduct Specifications- Other Name: Container Kit, Windshield Washer
GMC Reservoir Part Number: 22880825
$29.71 MSRP: $48.95You Save: $19.24 (40%)Ships in 1-2 Business DaysProduct Specifications- Other Name: Container Kit-Windshield Washer Solvent
- Replaces: 22777344, 22743901, 25993607
| Page 1 of 4 |Next >
1-20 of 66 Results
GMC Washer Reservoir
Choose OEM Washer Reservoir, you're making the optimal decision for superior quality and perfect performance. You can feel confident because each component goes through stringent quality checks. Every part is carefully built to comply with GMC's factory specifications. You'll enjoy a smooth, worry-free installation that fits just right. At ChevyPartsGiant.com, you'll find it easy to get top-quality OEM GMC Washer Reservoir. You can shop at highly competitive prices and protect your budget. All our genuine GMC parts include a dependable manufacturer's warranty. You'll also appreciate our straightforward return policy and swift delivery services for extra convenience.
GMC Washer Reservoir Parts and Q&A
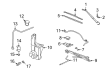
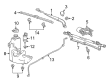
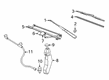
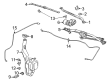
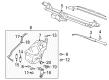
- Q: How to replace the windshield washer reservoir on GMC Sierra 1500?A:Before you can replace the windshield washer solvent container you must raise and stabilize the vehicle. Disconnect and remove the left front wheel assembly plus its liner. At first remove the lower outer bolt from the washer container when lowering the vehicle. Take the Washer Pump hoses (1, 2) off their connections to the fender flange and collect windshield washer solvent into a safe receptacle. Disconnect the electric wires followed by lowering the vehicle until you can reach its Hood Latch and open the hood. Disconnect the windshield washer solvent cap and the auxiliary battery tray if present then pull the washer container bolt out from under the auxiliary battery tray. Take out the washer container from below the vehicle through the wheelhouse opening. Disconnect the upper windshield washer solvent container bolts first before taking out the washer solvent container unit. Move washer pumps and level indicator hardware to the fresh windshield washer container and connect the whole washer solvent assembly. Install the bolt that connects the upper windshield washer container to the auxiliary battery tray when present and torque the windshield washer container bolts to 80 lb in (9 N.m). Install the auxiliary battery tray back into place when necessary and secure the windshield washer solvent cap. Secure Washer Pump connections and hoses (1, 2) before installing the bolt on the lower outer container. Reattach the left wheelhouse and wheel parts before filling the solvent container with windshield cleaner.
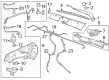
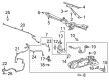
- Q: How to replace the windshield washer reservoir on GMC Yukon?A:Before working on the windshield washer solvent container step one is to lift and suspend the vehicle. Take off both the left front wheel and wheelhouse liner parts from their position. Take off the Washer Pump hoses (1, 2) from their left side fender flange connections to collect windshield washer solvent in a proper container. Lower the vehicle and access the Hood Latch by disconnecting all electrical parts. Take off the washer solvent bottle cap as well as the extra battery box if it exists. Unfasten the bolt beneath the auxiliary battery tray to access the top windshield washer container bolt and disconnect it. Install the whole windshield washer solvent container assembly. Place washer pumps and level indicator parts on the new washer solvent container before installing the whole windshield washer system. Secure the upper windshield washer container bolt to the auxiliary battery tray when equipped and tighten the upper windshield washer solvent container bolts to 9 nm (80 lb in). Attach the auxiliary battery tray as needed before putting the washer solvent cap back in place while adding Washer Pump hose connections (1, 2). You must put back on the left front wheelhouse liner and left front wheel assembly before placing windshield solvent into the washer container.


Related GMC Parts
 GMC Door Handle
 GMC Door Lock
 GMC Door Lock Actuator
 GMC Tailgate Latch
 GMC Window Motor
 GMC Door Lock Cylinder
 GMC Door Moldings
 GMC Door Striker
 GMC Tailgate Lift Support
 GMC Windshield Wiper
 GMC Wiper Arm
 GMC Wiper Blade
Browse GMC Washer Reservoir by Models
Acadia Sierra 1500 Yukon Canyon Sierra 2500 HD Terrain Envoy Sonoma Typhoon Caballero C1500 Envoy XL Envoy XUV Jimmy K1500 S15 S15 Jimmy Safari Savana 2500 Savana 3500 Sierra 2500 Sierra 3500 Yukon XL Acadia Limited C2500 C3500 G2500 K2500 K3500 P3500 Savana 1500 Yukon XL 1500 C1500 Suburban C2500 Suburban G1500 G3500 Hummer EV Pickup K1500 Suburban K2500 Suburban P2500 R1500 R1500 Suburban R2500 R2500 Suburban R3500 Sierra 1500 Classic Sierra 1500 HD Sierra 1500 HD Classic Sierra 1500 Limited Sierra 2500 HD Classic Sierra 3500 Classic Sierra 3500 HD V1500 V1500 Suburban V2500 V2500 Suburban V3500 Yukon XL 2500