ChevyParts
My Garage
My Account
Cart
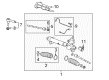
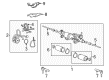
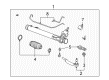
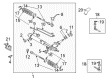
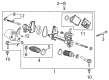
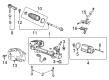
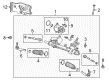
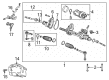
OEM Cadillac Tie Rod
Steering Tie Rod- Select Vehicle by Model
- Select Vehicle by VIN
Select Vehicle by Model
orMake
Model
Year
Select Vehicle by VIN
For the most accurate results, select vehicle by your VIN (Vehicle Identification Number).
106 Tie Rods found


Cadillac Inner Tie Rod Part Number: 25901292
$129.02 MSRP: $211.19You Save: $82.17 (39%)Ships in 1-2 Business DaysProduct Specifications- Other Name: Rod Kit, Steering Tie Rod Inner; Steering Tie Rod End; Tie Rod End
- Position: Inner


Cadillac Outer Tie Rod Part Number: 15895646
$61.10 MSRP: $149.08You Save: $87.98 (60%)Ships in 1-2 Business DaysProduct Specifications- Other Name: Rod Kit, Steering Tie Rod Outer; Steering Tie Rod End; Outer Tie Rod End; Tie Rod End
- Position: Outer


Cadillac Outer Tie Rod, Passenger Side Part Number: 19177445
$112.46 MSRP: $178.54You Save: $66.08 (38%)Ships in 1-2 Business DaysProduct Specifications- Other Name: Rod Kit, Steering Linkage Outer Tie; Steering Tie Rod End; Outer Tie Rod End; Tie Rod End; Rod Kit, Steering Tie Rod Outer
- Position: Outer Passenger Side


Cadillac Inner Tie Rod Part Number: 15221006
$71.84 MSRP: $175.34You Save: $103.50 (60%)Product Specifications- Other Name: Rod Kit, Steering Linkage Inner Tie; Steering Tie Rod End; Tie Rod End; Rod Kit, Steering Tie Rod Inner; Rod Kit, Steering Tie Rod Outer
- Position: Inner
- Replaces: 21011026, 26075038, 26034348


Cadillac Outer Tie Rod, Passenger Side Part Number: 23214216
$44.05 MSRP: $75.63You Save: $31.58 (42%)Ships in 1-2 Business DaysProduct Specifications- Other Name: Rod Assembly-Steering Linkage Outer Tie; Steering Tie Rod End; Outer Tie Rod End; Tie Rod End
- Position: Passenger Side
- Replaced by: 87853957


Cadillac Outer Tie Rod Part Number: 88957172
$86.33 MSRP: $137.07You Save: $50.74 (38%)Ships in 1-2 Business DaysProduct Specifications- Other Name: Rod Kit, Steering Linkage Outer Tie; Steering Tie Rod End; Outer Tie Rod End; Tie Rod End; Rod Kit, Steering Tie Rod Outer
- Position: Outer


Cadillac Outer Tie Rod, Driver Side Part Number: 13354538
$104.87 MSRP: $172.75You Save: $67.88 (40%)Ships in 1-2 Business DaysProduct Specifications- Other Name: Rod Kit, Steering Linkage Outer Tie; Rod Kit, Steering Tie Rod Outer
- Position: Outer Driver Side


Cadillac Inner Tie Rod Part Number: 84674099
$40.56 MSRP: $69.66You Save: $29.10 (42%)Ships in 1-3 Business DaysProduct Specifications- Other Name: Rod Kit, Steering Tie Rod Inner; Steering Tie Rod End; Tie Rod End
- Position: Inner
- Replaces: 84179759
Cadillac Outer Tie Rod, Driver Side Part Number: 19177444
$112.46 MSRP: $178.54You Save: $66.08 (38%)Ships in 1-2 Business DaysProduct Specifications- Other Name: Rod Kit, Steering Linkage Outer Tie; Steering Tie Rod End; Outer Tie Rod End; Tie Rod End; Rod Kit, Steering Tie Rod Outer
- Position: Outer Driver Side

Cadillac Outer Tie Rod, Passenger Side Part Number: 22961958
$90.12 MSRP: $154.77You Save: $64.65 (42%)Ships in 1-2 Business DaysProduct Specifications- Other Name: Rod Assembly-Steering Linkage Outer Tie
- Position: Passenger Side
- Replaced by: 87827847

Cadillac Inner Tie Rod Part Number: 84768922
$31.19 MSRP: $51.40You Save: $20.21 (40%)Ships in 1-3 Business DaysProduct Specifications- Other Name: Rod Kit, Steering Tie Rod Inner; Steering Tie Rod End; Tie Rod End
- Position: Inner
- Replaced by: 87853961
Cadillac Outer Tie Rod Part Number: 88957176
$56.18 MSRP: $137.07You Save: $80.89 (60%)Ships in 1-2 Business DaysProduct Specifications- Other Name: Rod Kit, Steering Linkage Outer Tie; Steering Tie Rod End; Outer Tie Rod End; Tie Rod End; Rod Kit, Steering Tie Rod Outer
- Position: Outer

Cadillac Inner Tie Rod Part Number: 13271998
$126.94 MSRP: $201.53You Save: $74.59 (38%)Ships in 1-2 Business DaysProduct Specifications- Other Name: Rod Kit, Steering Tie Rod Inner; Steering Tie Rod End; Tie Rod End
- Position: Inner

Cadillac Outer Tie Rod, Passenger Side Part Number: 84721394
$69.94 MSRP: $109.56You Save: $39.62 (37%)Ships in 1-3 Business DaysProduct Specifications- Other Name: Rod Assembly-Steering Linkage Outer Tie; Rod, Steering Tie Rod Outer
- Position: Passenger Side
- Replaces: 84321069

Cadillac Inner Tie Rod Part Number: 22776531
$49.12 MSRP: $80.91You Save: $31.79 (40%)Ships in 1-2 Business DaysProduct Specifications- Other Name: Rod Kit, Steering Tie Rod Inner; Steering Tie Rod End; Tie Rod End
- Position: Inner
Cadillac Outer Tie Rod, Driver Side Part Number: 22961957
$90.12 MSRP: $154.77You Save: $64.65 (42%)Ships in 1-2 Business DaysProduct Specifications- Other Name: Rod Assembly-Steering Linkage Outer Tie
- Position: Driver Side
- Replaced by: 87827846

Cadillac Inner Tie Rod Part Number: 84768928
$44.24 MSRP: $69.27You Save: $25.03 (37%)Ships in 1-3 Business DaysProduct Specifications- Other Name: Rod Kit, Steering Tie Rod Inner; Steering Tie Rod End; Tie Rod End
- Position: Inner
- Replaced by: 87853962
Cadillac Outer Tie Rod Part Number: 89060262
$65.43 MSRP: $102.04You Save: $36.61 (36%)Ships in 1-2 Business DaysProduct Specifications- Other Name: Rod Kit, Steering Linkage Outer Tie; Steering Tie Rod End; Outer Tie Rod End; Tie Rod End; Rod Kit, Steering Tie Rod Outer
- Position: Outer

Cadillac Inner Tie Rod Part Number: 26059036
Product Specifications- Other Name: Rod Kit, Steering Linkage Inner Tie; Steering Tie Rod End; Outer Tie Rod End; Tie Rod End; Rod Kit, Steering Tie Rod Inner
- Position: Inner
- Replaces: 26057015, 26000154

Cadillac Center Link Part Number: 26050592
Product Specifications- Other Name: Rod Assembly, Steering Linkage Relay; Drag Link Repair Kit; Drag Link; Center Link Assembly; Rod, Steering Connecting
| Page 1 of 6 |Next >
1-20 of 106 Results
Cadillac Tie Rod
Want to cut long-term maintenance and repair costs? Choose OEM Tie Rod. Those parts deliver top durability you can trust. On our site, you'll find a huge catalog of genuine Cadillac parts. Prices are unbeatable, so you can keep more in your pocket. Every OEM Cadillac Tie Rod includes a manufacturer's warranty. You can also get an easy return policy that keeps buying risk free. Fast delivery, get your car on the road quickly. It's simple to search, compare, and order. Stop guessing about quality or fit. Order today and save with parts that last.
Cadillac Tie Rod Parts Questions & Experts Answers
- Q: How to replace the steering linkage outer tie rod on an all-wheel-drive on Cadillac CTS?A:The first step to replace the steering linkage outer Tie Rod on all-wheel-drive vehicles is to take off the tire assembly together with its wheel. Then you should detach the steering linkage outer Tie Rod nut before throwing it away. The j-24319-b - steering linkage and Tie Rod puller should be used to separate the outer Tie Rod from the Steering Knuckle. Record the necessary number of whole turns required to take off the outer Tie Rod when you loosen its steering linkage inner Tie Rod nut. You should first separate the outer Tie Rod from the inner Tie Rod before discarding the inner Tie Rod nut. To install the new inner Tie Rod nut attach it to the outer Tie Rod with the same number of turns recorded when the outer Tie Rod was removed. Connect both parts of the linkage before attaching them to the Steering Knuckle by observing proper fastener procedures. Fasten a fresh outer Tie Rod nut at 35 nm (26 lb ft) pressure while afterwards adding an additional 110-degree twist. Put back the tire-wheel assembly to measure and adjust the front toe settings. Complete the procedure by torquing the steering linkage inner Tie Rod nut to 65 nm (48 lb ft).
- Q: How to replace the steering linkage inner tie rod on Cadillac Escalade?A:Start the procedure to replace the steering linkage inner tie rod by removing any engine shield present on the vehicle. The first task requires detachment of the steering linkage outer tie rod. Wrench (J 34028) should be used to take out the steering linkage inner tie rod from its position on the relay rod. The steering linkage inner tie rod should be cleaned with denatured alcohol or equal solution to remove oil, grease and contaminants. After drying, apply red LOCTITE(TM) threadlocker GM P/N 12345493. The threads of the steering linkage inner tie rod need an application of red LOCTITE(TM) threadlocker which uses GM P/N 12345493 (Canadian P/N 10953488) according to instructions. Tighten the steering linkage inner tie rod to the relay rod using tool J 34028 to 100 Nm (74 lb ft). Attach both the steering linkage outer tie rod and engine shield when present before the next step. Finally, adjust the front toe.
- Q: How to replace the Rack and Pinion Inner Tie Rod on Cadillac XLR?A:Begin the Rack And Pinion inner Tie Rod replacement process by hoisting your vehicle securely with correct safety stands. Remove the tire and wheel assembly from the vehicle's frame. Before proceeding check the inner Tie Rod for any sign of corrosion or debris under the boot. You can start the repair process if no damage is visible. First remove the rack boot by making sure that adjustments must not be made to the rack bearing preload because inner Tie Rod removal will cause damage. Move the shock dampener from the inner Tie Rod then replace it onto the rack. To remove the inner Tie Rod from the rack assembly use a wrench to install on the flats of the inner Tie Rod housing and rotate it counterclockwise until the parts separate. The threads of both rack and inner Tie Rod require thorough loctite(R) removal before further installation. The shock dampener must be positioned properly on the rack alongside free threads for subsequent loctite(R) application. Use loctite(R) 262 (or equivalent) on inner Tie Rod threads before installing the inner Tie Rod to the Rack And Pinion . To properly install the inner Tie Rod use the j 34028 inner Tie Rod wrench (J34028) along with a torque wrench that will tighten the rod to 100 n.m (74 lb ft) while maintaining contact with the rack. Next position the shock dampener so it reaches the inner Tie Rod housing until it fully extends after which you must set the Rack And Pinion boot into place. Lower the vehicle and remove safety stands before reinstalling the tire-wheel assembly then checking wheel alignment.


Related Cadillac Parts
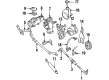
 Cadillac Power Steering Pump
 Cadillac Idler Arm
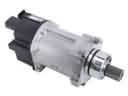 Cadillac Power Steering Assist Motor
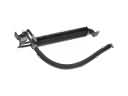 Cadillac Power Steering Cooler
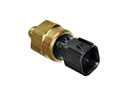 Cadillac Power Steering Pressure Switch
 Cadillac Rack & Pinion Bushing
 Cadillac Rack and Pinion Boot
 Cadillac Steering Angle Sensor
 Cadillac Steering Column Cover
 Cadillac Steering Column Seal
 Cadillac Steering Shaft
 Cadillac Tie Rod Adjusting Sleeve