ChevyParts
My Garage
My Account
Cart
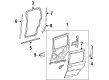
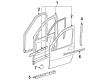
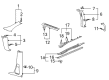
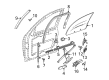
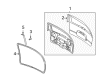
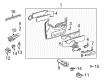
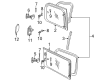
OEM Chevrolet Uplander Weather Strip
Door Weatherstripping- Select Vehicle by Model
- Select Vehicle by VIN
Select Vehicle by Model
orMake
Model
Year
Select Vehicle by VIN
For the most accurate results, select vehicle by your VIN (Vehicle Identification Number).
19 Weather Strips found


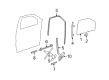
Chevrolet Uplander Door Weatherstrip, Passenger Side Part Number: 10449199
$106.06 MSRP: $151.76You Save: $45.70 (31%)

Chevrolet Uplander Door Weatherstrip, Front Part Number: 10449198
$105.04 MSRP: $154.08You Save: $49.04 (32%)Ships in 1-2 Business Days

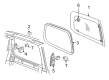
Chevrolet Uplander Lower Weatherstrip Part Number: 10383150
$13.11 MSRP: $18.75You Save: $5.64 (31%)

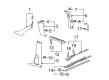
Chevrolet Uplander Run Weatherstrip, Front Driver Side Part Number: 10294036
$13.72 MSRP: $20.42You Save: $6.70 (33%)Ships in 1-3 Business Days

Chevrolet Uplander Outer Seal Part Number: 25887140
$13.11
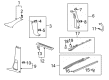
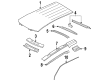
Chevrolet Uplander Lift Gate Weatherstrip, Rear Part Number: 15294464
$22.05 MSRP: $31.56You Save: $9.51 (31%)
Chevrolet Uplander Seal Strip, Front Part Number: 15238491
$72.43 MSRP: $90.55You Save: $18.12 (21%)Ships in 1-2 Business DaysChevrolet Uplander Door Weatherstrip, Driver Side Part Number: 10449200
$13.31 MSRP: $18.25You Save: $4.94 (28%)Ships in 1-2 Business DaysChevrolet Uplander Run Weatherstrip, Front Passenger Side Part Number: 10294035
$57.43 MSRP: $85.48You Save: $28.05 (33%)Ships in 1-2 Business Days


Chevrolet Uplander Lower Weatherstrip Part Number: 10383149


Chevrolet Uplander Rear Weatherstrip Part Number: 10330793

Chevrolet Uplander Rear Weatherstrip Part Number: 89044623


Chevrolet Uplander Weatherstrip, Driver Side Part Number: 15829669
Chevrolet Uplander Weatherstrip, Passenger Side Part Number: 15829668

Chevrolet Uplander Rear Weatherstrip Part Number: 15263851

Chevrolet Uplander Weatherstrip, Rear Part Number: 10353838

Chevrolet Uplander Rear Weatherstrip Part Number: 10353836

Chevrolet Uplander Lower Weatherstrip Part Number: 10232754
$5.79 MSRP: $8.62You Save: $2.83 (33%)
Chevrolet Uplander Weather Strip
Want to cut long-term maintenance and repair costs? Choose OEM Weather Strip. Those parts deliver top durability you can trust. On our site, you'll find a huge catalog of genuine Chevrolet Uplander parts. Prices are unbeatable, so you can keep more in your pocket. Every OEM Chevrolet Uplander Weather Strip includes a manufacturer's warranty. You can also get an easy return policy that keeps buying risk free. Fast delivery, get your car on the road quickly. It's simple to search, compare, and order. Stop guessing about quality or fit. Order today and save with parts that last.
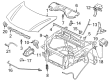
The Chevrolet Uplander Weather Strip is one of the spare parts which, when used, boosts the efficiency and durability of the Chevrolet Uplander Minivan that was manufactured between 2005 and 2009. This Weather Strip performs an important role as far as closing all the cracks at the door and windows, as well as any other opening through which water together with other materials can penetrate into the cabin. This Weather Strip serves the purpose of preventing metal surfaces that make up the Chevrolet uplander from scratching each other, therefore part of the overall improved ride quality. Using such materials as rubber or silicone, this Weather Strip is reproduced to perform efficiently even at extreme temperatures and automotive fluids. It is suitable for different Uplander models; thus, suitability for owners who want to protect the looks and performance of the vehicle. Although it is enclosed in a casing and hence protected from direct contact with the weather, the strain degrades it in the long run and as a result, the Weather Strip requires periodic check up and replacement to provide comfort and safety. The damages appearing on the car's exterior and interior- scratches, visible gaps in various spots, decrease the performance of the Uplander and lead to water leakage and vibration noise. Chevrolet Uplander Weather Strip appears to be highly popular in the automotive market thanks to its sturdiness and great importance for the efficiency and safety of automobiles. The main function of this Weather Strip, besides offering the interior a shield from various elements, is to decrease noise while driving; this solidifies the Chevrolet Uplander's reliability and performance aspect.
Chevrolet Uplander Weather Strip Parts Questions & Experts Answers
- Q: How to replace the sliding door Weather Strip on Chevrolet Uplander?A:The procedure for replacing the sliding door weather strip begins with PSD 15A fuse removal from the instrument panel fuse block followed by disabling the power sliding door system. Open the sliding rear door. First you need to remove the sliding door weather strip from its pinch-weld flange position while cleaning the adhesive residue from the entire flange. Note that the new sliding door opening weather strip includes a mastic/sealer/glue which means users should not apply weather strip adhesive; otherwise they can use the old weather strip with adhesive. Usage of the locator dot requires users to match it against the upper front and rear corners of the pinch-weld flange while pink signifies long wheel base and yellow indicates short wheel base. Begin the procedure by rolling the weather strip along its specified directional markings from the joint place until both corners rest without pulling too much on the weather strip. Dab the loose end of the weather strip to its seated counterpart before pulling the tear strip from the joint till the entire length is checked for wrinkles or creases. Complete the power sliding door system restoration through PSD 15A fuse installation into the instrument panel fuse block while both power sliding door modules must learn full open and full closed positions.

Related Chevrolet Uplander Parts
 Chevrolet Uplander Door Handle
 Chevrolet Uplander Door Hinge
 Chevrolet Uplander Door Latch Assembly
 Chevrolet Uplander Door Lock
 Chevrolet Uplander Door Lock Actuator
 Chevrolet Uplander Door Lock Cylinder
 Chevrolet Uplander Door Seal
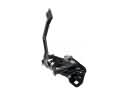 Chevrolet Uplander Hood Latch
 Chevrolet Uplander Lift Support
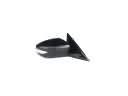 Chevrolet Uplander Side View Mirrors
 Chevrolet Uplander Window Channel
 Chevrolet Uplander Window Motor