ChevyParts
My Garage
My Account
Cart
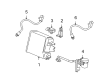
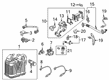
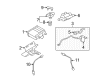
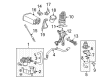
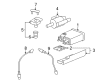
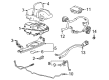
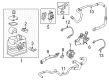
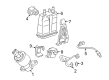
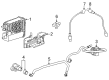
OEM GMC Canister Purge Valves
Fuel Tank Evaporator Purge Control Valve- Select Vehicle by Model
- Select Vehicle by VIN
Select Vehicle by Model
orMake
Model
Year
Select Vehicle by VIN
For the most accurate results, select vehicle by your VIN (Vehicle Identification Number).
48 Canister Purge Valves found


GMC Solenoid Valve Part Number: 84148825
$19.76 MSRP: $37.13You Save: $17.37 (47%)Ships in 1 Business DayProduct Specifications- Other Name: Solenoid Assembly-Evaporator Emission Canister, Intake Manifold Runner Control, Vapor Canister Purge, Vent.; Purge Control Valve; Vent Control Solenoid; Evaporation Emission System Valve; Fuel Tank Evaporator Solenoid
- Replaces: 13575704


GMC Control Valve Part Number: 12559015
$23.61 MSRP: $44.34You Save: $20.73 (47%)Ships in 1 Business DayProduct Specifications- Other Name: Valve, Fuel Tank Evaporator/Purge Control; Vapor Canister Purge and Vent Solenoids.; Purge Solenoid
- Replaces: 12554534


GMC Purge Valve Part Number: 12632174
$34.10 MSRP: $64.04You Save: $29.94 (47%)Ships in 1-2 Business DaysProduct Specifications- Other Name: Valve, Fuel Tank Evaporator/Purge Control; Vapor Canister Purge and Vent Solenoids.; Purge Solenoid; Purge Control Valve


GMC Solenoid Valve Part Number: 25932571
$28.12 MSRP: $50.22You Save: $22.10 (45%)Ships in 1-2 Business DaysProduct Specifications- Other Name: Solenoid Assembly, Evaporator Emission Canister; Intake Manifold Control; Canister Purge Valve; Purge Valve; Control Valve; Purge Solenoid; Fuel Tank Evaporator Valve
- Replaces: 10382105, 15750484, 22728634


GMC PCV Valve Part Number: 12608378
$31.84 MSRP: $59.80You Save: $27.96 (47%)Ships in 1-2 Business DaysProduct Specifications- Other Name: Valve, Evaporator Emission Canister Purge Solenoid; Purge Valve; Purge Solenoid; Purge Control Valve
- Replaced by: 12735400


GMC Purge Valve Part Number: 12630282
$36.16 MSRP: $74.36You Save: $38.20 (52%)Ships in 1 Business DayProduct Specifications- Other Name: Valve, Fuel Tank Evaporator/Purge Control; Vapor Canister Purge and Vent Solenoids.; Purge Solenoid; Purge Control Valve


GMC Purge Valve Part Number: 12690512
$27.65 MSRP: $51.92You Save: $24.27 (47%)Product Specifications- Other Name: Valve, Fuel Tank Evaporator/Purge Control; Vapor Canister Purge and Vent Solenoids.; Purge Solenoid; Purge Control Valve
- Replaced by: 12737252

GMC Vapor Canister Purge Solenoid Valve Part Number: 12666845
$17.24 MSRP: $32.38You Save: $15.14 (47%)Ships in 1-3 Business DaysProduct Specifications- Other Name: Valve Assembly Evap Emis Cnstr Purge Sol; Purge Solenoid; Purge Control Valve; Regulator Valve; Valve

GMC Vent Control Solenoid Part Number: 84613139
$47.07 MSRP: $84.06You Save: $36.99 (44%)Ships in 1-3 Business DaysProduct Specifications- Other Name: Solenoid Assembly-Evaporator Emission Canister; Solenoid, Fuel Tank Evaporator/Purge Control


GMC Solenoid Valve Part Number: 84613096
$61.57 MSRP: $109.94You Save: $48.37 (44%)Ships in 1-3 Business DaysProduct Specifications- Other Name: Solenoid Assembly-Evaporator Emission Canister; Vapor Canister Vent Solenoid; Vent Control Solenoid; Solenoid, Fuel Tank Evaporator/Purge Control

GMC Emission Filter Part Number: 85133242
$66.48 MSRP: $118.72You Save: $52.24 (44%)Ships in 1-3 Business DaysProduct Specifications- Other Name: Solenoid Assembly-Evaporator Emission Canister; Vent Control Solenoid; Solenoid, Fuel Tank Evaporator/Purge Control
- Replaces: 84843037, 84972608
GMC Purge Solenoid Part Number: 25811774
$65.44 MSRP: $116.86You Save: $51.42 (44%)Ships in 1-3 Business DaysProduct Specifications- Other Name: Solenoid Assembly for Evaporator Emission Canister; includes Purge and Vent Solenoids.

GMC Solenoid Valve Part Number: 84524035
$21.74 MSRP: $40.82You Save: $19.08 (47%)Ships in 1-2 Business DaysProduct Specifications- Other Name: Solenoid, Fuel Tank Evaporator/Purge Control; Vapor Canister Purge and Vent Solenoids; Canister Purge Valve; Purge Solenoid; Vent Valve; Vent Control Solenoid; Release Solenoid; Solenoid; Valve, Fuel Tank Evaporator/Purge Control
- Replaced by: 42933353
- Replaces: 22865590, 15788844, 17114055, 21993142, 20924750, 25321964, 25932573
GMC Purge Solenoid Part Number: 15921549
$65.44 MSRP: $116.86You Save: $51.42 (44%)Ships in 1-3 Business DaysProduct Specifications- Other Name: Solenoid Assembly for Evaporator Emission Canister; includes Purge and Vent Solenoids.
GMC Vent Control Solenoid Part Number: 84818283
$35.50 MSRP: $63.40You Save: $27.90 (45%)Ships in 1-3 Business DaysProduct Specifications- Other Name: Solenoid Assembly-Evaporator Emission Canister; Solenoid, Fuel Tank Evaporator/Purge Control
- Replaced by: 86772954

GMC Purge Valve Part Number: 12638819
$30.27 MSRP: $56.84You Save: $26.57 (47%)Ships in 1-2 Business DaysProduct Specifications- Other Name: Valve, Fuel Tank Evaporator/Purge Control; Canister Purge Valve; Purge Control Valve; Valve Assembly
- Replaced by: 12735404
- Replaces: 12617376
GMC Solenoid Valve Part Number: 84957998
$37.77 MSRP: $67.44You Save: $29.67 (44%)Ships in 1-3 Business DaysProduct Specifications- Other Name: Solenoid Assembly-Evaporator Emission Canister; Vapor Canister Purge Solenoid; Solenoid, Fuel Tank Evaporator/Purge Control
GMC Purge Solenoid Part Number: 15921551
$49.75 MSRP: $93.41You Save: $43.66 (47%)Ships in 1-2 Business DaysProduct Specifications- Other Name: Solenoid Assembly for Evaporator Emission Canister; includes Purge and Vent Solenoids.

GMC Solenoid Valve Part Number: 84833401
$50.33 MSRP: $89.88You Save: $39.55 (44%)Ships in 1-2 Business DaysProduct Specifications- Other Name: Solenoid Assembly-Evaporator Emission Canister; Solenoid, Fuel Tank Evaporator/Purge Control
GMC Purge Solenoid Part Number: 25811775
Product Specifications- Other Name: Solenoid Assembly for Evaporator Emission Canister; includes Purge and Vent Solenoids.; Solenoid
- Replaces: 15813531
| Page 1 of 3 |Next >
1-20 of 48 Results
GMC Canister Purge Valves
Want to cut long-term maintenance and repair costs? Choose OEM Canister Purge Valves. Those parts deliver top durability you can trust. On our site, you'll find a huge catalog of genuine GMC parts. Prices are unbeatable, so you can keep more in your pocket. Every OEM GMC Canister Purge Valves includes a manufacturer's warranty. You can also get an easy return policy that keeps buying risk free. Fast delivery, get your car on the road quickly. It's simple to search, compare, and order. Stop guessing about quality or fit. Order today and save with parts that last.
GMC Canister Purge Valves Parts Questions & Experts Answers
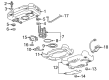
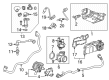
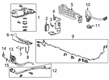
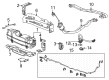
- Q: How to Service and Repair Canister Purge Valves on GMC Canyon?A:To replace the evaporative emission canister purge solenoid valve, first, lift and support the vehicle at an appropriate level to access the valve using the wheelhouse. Remove the left wheelhouse liner. Remove the EVAP purge hose/pipe and the EVAP purge hose from the EVAP canister purge solenoid valve using the Plastic Collar Quick Connect Fitting Service. Next, remove the electrical connector from the solenoid valve and then remove the bolt that secures the valve to the engine and then pull out the solenoid valve. Installation can be done by aligning the new EVAP canister purge solenoid valve into the engine and you should stick to fastener caution during this process. Tighten the bolt to 10Nm (89 lb in) while Hooking it in place. Connect the electrical connector, as well as, the EVAP Purge hose/PIpe and the EVAP Purge hose to the solenoid valve with the Plastic Collar Quick Connect Fitting Service. Finally, put back the left wheelhouse liner, and lower the vehicle.
- Q: How to Replace Canister Purge Valves on GMC Envoy?A:The first step to replace the EVAP canister purge valves starts by raising the vehicle. The valve operation requires dismantling two connectors: disconnect the harness connector from the evaporative emission (EVAP) canister purge valves and remove both the EVAP purge pipe and engine vacuum pipe. The purge valves get removed from their bracket as well as an optional bolt removal to detach the bracket from the valves. The replacement process requires you to install the purge bracket together with its attaching bolt before torquing it to 10 N.m (89 lb in). To install the purge valves proceed by first mounting them on their bracket and then reattaching the EVAP purge pipe and engine vacuum pipe to their correct positions followed by plugging in the harness connector to the EVAP canister purge valves before putting the vehicle back on the ground.
- Q: How to replace the canister purge valves on GMC Sierra 1500?A:The first step to replace the evaporative emission canister purge solenoid valve requires a cleaning process of all evap line connectors and surrounding surfaces to avoid contamination. Start by taking off the air cleaner outlet duct. Start by disconnecting the evap line quick connect fitting from the evap canister purge solenoid and then disconnect the engine wiring harness electrical connector from the solenoid. Tear away the solenoid from its holder at the Fuel Rail after first disconnecting the chassis evap line quick connect fitting from the solenoid and removing the retainer securing the solenoid to the Fuel Rail. Install the new evap canister purge solenoid by placing it on the Fuel Rail after attaching it with a retainer. Attach the engine wiring harness electrical connector to the solenoid and reconnect the chassis evap line quick connect fitting and finally connect the evap line quick connect fitting. To finish up this repair task you should reinstall the air cleaner outlet duct.


Related GMC Parts
 GMC Fuel Tank Vent Valve
 GMC Air Inject Check Valve
 GMC Diverter Valve
 GMC EGR Tube
 GMC EGR Vacuum Solenoid
 GMC EGR Valve Gasket
 GMC Exhaust Flange Gasket
 GMC Exhaust Heat Shield
 GMC Muffler Hanger Straps
 GMC PCV Valve Elbow
 GMC Secondary Air Injection Check Valve
 GMC Secondary Air Injection Pump
Browse GMC Canister Purge Valves by Models
Acadia Sierra 1500 Yukon Canyon Sierra 2500 HD Terrain Envoy Sonoma Typhoon Syclone C1500 Envoy XL Envoy XUV Jimmy K1500 S15 S15 Jimmy Safari Savana 2500 Savana 3500 Sierra 2500 Sierra 3500 Yukon XL Acadia Limited C2500 C3500 K2500 K3500 Savana 1500 Yukon XL 1500 C1500 Suburban C2500 Suburban K1500 Suburban K2500 Suburban Sierra 1500 Classic Sierra 1500 HD Sierra 1500 HD Classic Sierra 1500 Limited Sierra 2500 HD Classic Sierra 3500 Classic Sierra 3500 HD Yukon XL 2500