ChevyParts
My Garage
My Account
Cart
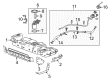
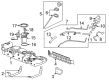
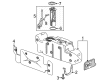
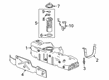
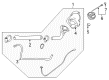
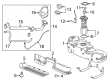
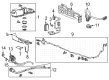
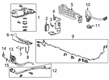
OEM GMC Fuel Filler Hose
- Select Vehicle by Model
- Select Vehicle by VIN
Select Vehicle by Model
orMake
Model
Year
Select Vehicle by VIN
For the most accurate results, select vehicle by your VIN (Vehicle Identification Number).
264 Fuel Filler Hoses found


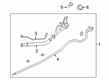
GMC Filler Neck Part Number: 84696025
$202.60 MSRP: $302.83You Save: $100.23 (34%)Ships in 1-3 Business DaysProduct Specifications- Other Name: Pipe Assembly-Fuel Tank Filler (W/Filler Hose); Fuel Tank Filler Neck; Fuel Filler Hose; Filler Pipe; Pipe, Fuel Tank Filler
- Replaces: 84315254, 84392894, 84090500, 84224654

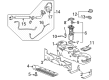
GMC Vent Hose Part Number: 23113673
$21.14 MSRP: $38.26You Save: $17.12 (45%)Ships in 1-2 Business DaysProduct Specifications- Other Name: Hose, Evaporation Emission System (Fuel Tank End); Hose, Evaporation Emission System(Fuel Tank End)

GMC Filler Neck Part Number: 22951217
$296.94 MSRP: $443.85You Save: $146.91 (34%)Product Specifications- Other Name: Pipe Assembly-Fuel Tank Filler; Fuel Tank Filler Neck; Fuel Filler Hose; Filler Pipe; Pipe, Fuel Tank Filler
- Replaces: 20964888, 25852920, 20878553, 15850897, 25836088
GMC Filler Neck Part Number: 84695998
$202.60 MSRP: $302.83You Save: $100.23 (34%)Product Specifications- Other Name: Pipe Assembly-Fuel Tank Filler (W/Filler Hose); Fuel Tank Filler Neck; Fuel Filler Hose; Filler Pipe; Pipe, Fuel Tank Filler
- Replaces: 84315252, 84392892, 84090498, 84224656

GMC Filler Neck Part Number: 84861900
$202.60 MSRP: $302.83You Save: $100.23 (34%)Ships in 1-3 Business DaysProduct Specifications- Other Name: Pipe Assembly-Fuel Tank Filler (W/Filler Hose); Fuel Tank Filler Neck; Fuel Filler Hose; Filler Pipe; Pipe, Fuel Tank Filler
- Replaced by: 85585193
- Replaces: 84566467

GMC Filler Neck Part Number: 84707997
$47.35 MSRP: $70.46You Save: $23.11 (33%)Ships in 1-3 Business DaysProduct Specifications- Other Name: Pipe Assembly-Fuel Tank Filler (W/Filler Hose); Fuel Tank Filler Neck; Fuel Filler Hose; Filler Pipe; Pipe, Fuel Tank Filler
- Replaces: 84626776

GMC Vent Hose Part Number: 84138743
$23.72 MSRP: $35.31You Save: $11.59 (33%)Ships in 1-3 Business DaysProduct Specifications- Other Name: Hose Assembly-Fuel Tank Filler Vent; Hose, Evaporation Emission System(Fuel Tank End)

GMC Vent Hose Part Number: 84224141
$34.13 MSRP: $50.79You Save: $16.66 (33%)Ships in 1-3 Business DaysProduct Specifications- Other Name: Hose Assembly-Fuel Tank Filler Vent; Hose, Evaporation Emission System(Fuel Tank End)
- Replaces: 23375749
GMC Filler Neck Part Number: 84868023
$51.15 MSRP: $76.11You Save: $24.96 (33%)Ships in 1-3 Business DaysProduct Specifications- Other Name: Pipe Assembly-Fuel Tank Filler (W/Filler Hose); Fuel Tank Filler Neck; Fuel Filler Hose; Filler Pipe; Pipe, Fuel Tank Filler

GMC Filler Neck Part Number: 87844676
$108.26 MSRP: $161.10You Save: $52.84 (33%)Ships in 1-2 Business DaysProduct Specifications- Other Name: Pipe Assembly-Fuel Tank Filler (W/Filler Hose); Pipe, Fuel Tank Filler
- Replaced by: 85773933
- Replaces: 84838586, 84694036, 84766597
GMC Filler Neck Part Number: 85552849
$113.69 MSRP: $169.92You Save: $56.23 (34%)Ships in 1-3 Business DaysProduct Specifications- Other Name: Pipe Assembly-Fuel Tank Filler (W/Filler Hose); Filler Pipe
- Replaced by: 85065149
GMC Filler Neck Part Number: 85552852
$123.60 MSRP: $184.75You Save: $61.15 (34%)Ships in 1-3 Business DaysProduct Specifications- Other Name: Pipe Assembly-Fuel Tank Filler (W/Filler Hose); Filler Pipe
- Replaced by: 85065151

GMC Filler Hose Part Number: 84542616
$59.05 MSRP: $96.35You Save: $37.30 (39%)Ships in 1-2 Business DaysProduct Specifications- Other Name: Hose, Fuel Tank Filler; Fuel Filler Hose
- Replaces: 84091692
GMC Vent Hose Part Number: 23375751
$15.00 MSRP: $22.31You Save: $7.31 (33%)Ships in 1-3 Business DaysProduct Specifications- Other Name: Hose Assembly-Fuel Tank Filler Vent; Hose, Evaporation Emission System(Fuel Tank End)
GMC Filler Neck Part Number: 84871958
$103.16 MSRP: $153.52You Save: $50.36 (33%)Ships in 1-3 Business DaysProduct Specifications- Other Name: Pipe Assembly-Fuel Tank Filler (W/Filler Hose); Fuel Tank Filler Neck; Fuel Filler Hose; Filler Pipe; Pipe, Fuel Tank Filler
- Replaced by: 85552850
GMC Vent Hose Part Number: 84224140
$44.27 MSRP: $65.88You Save: $21.61 (33%)Ships in 1-3 Business DaysProduct Specifications- Other Name: Hose Assembly-Fuel Tank Filler Vent; Hose, Evaporation Emission System(Fuel Tank End)
- Replaces: 84133745

GMC Vent Hose Part Number: 84100072
$20.63 MSRP: $30.70You Save: $10.07 (33%)Ships in 1-3 Business DaysProduct Specifications- Other Name: Hose Assembly-Fuel Tank Filler Vent; Hose, Evaporation Emission System(Fuel Tank End)
- Replaces: 22802073

GMC Filler Hose Part Number: 22951226
$53.64 MSRP: $86.76You Save: $33.12 (39%)Ships in 1-2 Business DaysProduct Specifications- Other Name: Hose, Fuel Tank Filler; Fuel Filler Hose
- Replaces: 15944405

GMC Filler Hose Part Number: 84533161
$43.93 MSRP: $68.32You Save: $24.39 (36%)Product Specifications- Other Name: Hose, Fuel Tank Filler; Fuel Filler Hose
- Replaces: 23375742, 84240990
GMC Filler Neck Part Number: 22827849
$172.42 MSRP: $257.73You Save: $85.31 (34%)Product Specifications- Other Name: Pipe Assembly-Fuel Tank Filler; Fuel Tank Filler Neck; Fuel Filler Hose; Filler Pipe; Pipe, Fuel Tank Filler
| Page 1 of 14 |Next >
1-20 of 264 Results
GMC Fuel Filler Hose
Choose OEM Fuel Filler Hose, you're making the optimal decision for superior quality and perfect performance. You can feel confident because each component goes through stringent quality checks. Every part is carefully built to comply with GMC's factory specifications. You'll enjoy a smooth, worry-free installation that fits just right. At ChevyPartsGiant.com, you'll find it easy to get top-quality OEM GMC Fuel Filler Hose. You can shop at highly competitive prices and protect your budget. All our genuine GMC parts include a dependable manufacturer's warranty. You'll also appreciate our straightforward return policy and swift delivery services for extra convenience.
GMC Fuel Filler Hose Parts and Q&A
- Q: How to replace the fuel filler hose on GMC Acadia?A:A safe procedure to replace the Fuel Filler Hose requires checking for smoking conditions first before disconnecting the negative Battery Cable unless battery voltage is required. First remove the fuel fill cap followed by taking out the Fuel Tank fill pipe housing from its bolts to drain the Fuel Tank. Begin by removing the left rear wheel followed by its tire before continuing with removing the left rear wheelhouse liner panel. The first step requires you to remove the Fuel Tank fill pipe bracket bolt then extract the Fuel Tank fill pipe assembly out of the vehicle. The maintenance technician should loosen the Fuel Tank fill hose clamp for hose removal. To install the Fuel Tank fill hose place it properly and tighten the Fuel Tank fill hose clamp to 3.3 n.m (29 lb in). Position the fill hose with the notch facing the Fuel Tank tab before installing the Fuel Tank fill hose to its proper position on the tank. The evaporative emission (EVAP) canister vent rear pipe quick connect fitting should be attached to the recirculation line on the Fuel Tank fill pipe while the Fuel Tank fill hose clamp should be tightened to 3.3 n.m (29 lb in). Finalize the installation of the Fuel Tank fill pipe bracket bolt by tightening it to 12 n.m (106 lb in). Lower the automobile while putting back the left rear wheelhouse liner panel followed by the left wheel and tire. As the last step install the Fuel Tank fill pipe housing while fastening the Fuel Tank fill pipe bolts with 2 n.m (18 lb in) torque and secure the fuel fill cap.
- Q: How to replace the Fuel Filler Hose on a 15 Reg Cab with a 26 Gal Tank on GMC Sierra 1500?A:Begin the 15 reg cab Fuel Tank filler pipe replacement with the body torx(R) screws and pushpin retainer of the Fuel Tank filler housing then move to the Fuel Tank filler housing bolts connected to the Fuel Tank fill pipe. Next raise your vehicle to a level position in the middle of its height after finishing the removal of the Fuel Tank filler housing. Detach the ground wire bolt from the Fuel Tank fill pipe as the next step after removing the Fuel Tank fill pipe ground wire. First open the axle vent hose clip on the fuel fill pipe bracket before removing the rear axle vent hose from the clip. Then reposition the Fuel Tank fill pipe ground wire and chassis harness ground wire. The first step includes disconnection of the fuel fill pipe recirculation line quick connect fitting from the evaporative emission (EVAP) rear hose followed by loosening the Fuel Tank fill pipe clamp at the Fuel Tank. Finally, remove the Fuel Tank fill pipe while capping the Fuel Tank opening to prevent contaminants from entering. Install the Fuel Tank fill pipe by first removing the cap from the Fuel Tank opening then placing the fill pipe correctly before torquing the clamp to 2.5 nm (22 lb in). Route the fuel fill pipe recirculation line quick connect fitting to attach it on the evap rear hose then guide the rear axle vent hose to secure on the fuel fill pipe bracket before closing the axle vent hose clip. Insert the chassis harness ground wire together with the Fuel Tank fill pipe ground wire to the frame bracket before putting the ground wire anti-rotation tab into the frame hole and fastening the ground wire bolt at 9 nm (80 lb in). Lower the vehicle before installing the Fuel Tank filler housing and the bolts which attach to the Fuel Tank fill pipe while tightening them to 2.3 nm (20 lb in). For the tank filler housing installation you need to secure torx(R) screws and a pushpin retainer with screw tension at 2.3 nm and 20 lb in.


Related GMC Parts
 GMC Fuel Pump
 GMC Gas Cap
 GMC Fuel Injector
 GMC Throttle Cable
 GMC Intake Manifold Gasket
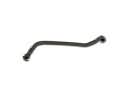 GMC Crankcase Breather Hose
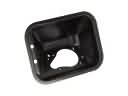 GMC Fuel Filler Housing
 GMC Fuel Injector O-Ring
 GMC Fuel Pressure Sensor
 GMC Fuel Pump Seal
 GMC Fuel Pump Strainer
 GMC Vapor Pressure Sensor
Browse GMC Fuel Filler Hose by Models
Acadia Sierra 1500 Yukon Canyon Sierra 2500 HD Terrain Envoy Sonoma Typhoon Syclone C1500 Envoy XL Envoy XUV Jimmy K1500 S15 S15 Jimmy Safari Savana 2500 Savana 3500 Sierra 2500 Sierra 3500 Yukon XL Acadia Limited C2500 C3500 G2500 K2500 K3500 P3500 Savana 1500 Yukon XL 1500 C1500 Suburban C2500 Suburban G1500 G3500 K1500 Suburban K2500 Suburban P2500 Sierra 1500 Classic Sierra 1500 HD Sierra 1500 HD Classic Sierra 1500 Limited Sierra 2500 HD Classic Sierra 3500 Classic Sierra 3500 HD Yukon XL 2500