ChevyParts
My Garage
My Account
Cart
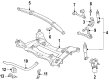
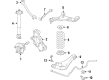
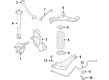
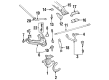
OEM Cadillac Control Arm
Suspension Arm- Select Vehicle by Model
- Select Vehicle by VIN
Select Vehicle by Model
orMake
Model
Year
Select Vehicle by VIN
For the most accurate results, select vehicle by your VIN (Vehicle Identification Number).
193 Control Arms found


Cadillac Upper Control Arm, Rear Driver Side Part Number: 23216530
$136.93 MSRP: $236.63You Save: $99.70 (43%)Ships in 1-2 Business DaysProduct Specifications- Other Name: Arm, Rear Axle Control Arm; Suspension Control Arm; Rear Upper Control Arm; Control Arm
- Position: Rear Driver Side
- Replaces: 20921466


Cadillac Lower Control Arm, Rear Passenger Side Part Number: 20799880
$211.12 MSRP: $335.19You Save: $124.07 (38%)Ships in 1-2 Business DaysProduct Specifications- Other Name: Arm, Rear Axle Control Arm; Suspension Control Arm and Ball Joint Assembly; Control Arm Assembly; Control Arm
- Position: Rear Passenger Side
- Replaces: 15926334, 25949987, 10339917, 15926336


Cadillac Lower Control Arm, Driver Side Part Number: 20799881
$277.92 MSRP: $441.27You Save: $163.35 (38%)Ships in 1-2 Business DaysProduct Specifications- Other Name: Arm, Steering Knuckle Control Arm and Ball Joint Assembly; Suspension Control Arm Assembly.
- Position: Driver Side
- Replaces: 15878395, 10339919, 15926341
Cadillac Upper Control Arm, Rear Passenger Side Part Number: 23216531
$136.93 MSRP: $236.63You Save: $99.70 (43%)Ships in 1-2 Business DaysProduct Specifications- Other Name: Arm, Rear Axle Control Arm; Suspension Control Arm; Rear Upper Control Arm; Control Arm
- Position: Rear Passenger Side
- Replaces: 20921469

Cadillac Lower Control Arm, Rear Driver Side Part Number: 23214430
$283.34 MSRP: $456.60You Save: $173.26 (38%)Ships in 1-2 Business DaysProduct Specifications- Other Name: Arm, Rear Axle Control Arm; Rear Lower Control Arm; Control Arm
- Position: Rear Driver Side
- Replaces: 23182015, 20921462
Cadillac Lower Control Arm, Rear Passenger Side Part Number: 23214431
$283.34 MSRP: $456.59You Save: $173.25 (38%)Ships in 1-2 Business DaysProduct Specifications- Other Name: Arm, Rear Axle Control Arm; Rear Lower Control Arm; Control Arm
- Position: Rear Passenger Side
- Replaces: 20921463, 23182016

Cadillac Upper Control Arm, Driver Side Part Number: 10356433
$226.34 MSRP: $385.37You Save: $159.03 (42%)Ships in 1-2 Business DaysProduct Specifications- Other Name: Arm, Steering Knuckle Upper & Lower Control; Suspension Control Arm; Control Arm
- Position: Driver Side


Cadillac Trailing Arm, Rear Part Number: 25939260
Product Specifications- Other Name: Arm Assembly-Rear Suspension Trailing; Suspension Trailing Arm; Arm, Rear Axle Control Arm
- Position: Rear
- Replaces: 15267639


Cadillac Lower Control Arm, Rear Driver Side Part Number: 25745695
Product Specifications- Other Name: Arm, Rear Axle Control Arm; Control Arm
- Position: Rear Driver Side

Cadillac Lower Control Arm, Rear Passenger Side Part Number: 25745696
Product Specifications- Other Name: Arm, Rear Axle Control Arm; Control Arm
- Position: Rear Passenger Side

Cadillac Trailing Arm, Rear Part Number: 25684655
Product Specifications- Other Name: Arm, Rear Suspension Trailing; Arm, Rear Axle Control Arm
- Position: Rear

Cadillac Upper Control Arm, Passenger Side Part Number: 12388432
Product Specifications- Other Name: Suspension Control Arm and Ball Joint Assembly; Control Arm Assembly; Arm Kit, Steering Knuckle Upper & Lower Control; Control Arm
- Position: Upper Passenger Side
- Replaces: 15665176, 15665187
Cadillac Upper Control Arm, Driver Side Part Number: 12388431
Product Specifications- Other Name: Suspension Control Arm and Ball Joint Assembly; Control Arm Assembly; Arm Kit, Steering Knuckle Upper & Lower Control; Control Arm
- Position: Upper Driver Side
- Replaces: 15665186

Cadillac Upper Control Arm, Driver Side Part Number: 12543999
Product Specifications- Other Name: Arm Kit, Steering Knuckle & Control Arm Assembly with Ball Joint.
- Position: Driver Side

Cadillac Upper Control Arm, Driver Side Part Number: 12543997
Product Specifications- Other Name: Arm Kit, Steering Knuckle & Control Arm Assembly with Ball Joint.
- Position: Driver Side
Cadillac Upper Control Arm, Passenger Side Part Number: 12543998
Product Specifications- Other Name: Arm Kit, Steering Knuckle & Control Arm Assembly with Ball Joint.
- Position: Passenger Side
- Replaces: 15616866
Cadillac Upper Control Arm, Passenger Side Part Number: 12544000
Product Specifications- Other Name: Arm Kit, Steering Knuckle & Control Arm Assembly with Ball Joint.
- Position: Passenger Side
- Replaces: 15634918
Cadillac Upper Control Arm, Driver Side Part Number: 12361035
Product Specifications- Other Name: Arm Kit, Steering Knuckle & Control Arm Assembly with Ball Joint.
- Position: Driver Side


Cadillac Lower Control Arm Part Number: 15988034
Product Specifications- Other Name: Arm, Steering Knuckle Upper & Lower Control; Control Arm
- Position: Front Lower
- Replaces: 15594134, 12548332

Cadillac Upper Control Arm, Rear Driver Side Part Number: 25684651
Product Specifications- Other Name: Arm, Rear Axle Control Arm; Suspension Control Arm and Ball Joint Assembly; Control Arm Assembly; Control Arm
- Position: Rear Driver Side
| Page 1 of 10 |Next >
1-20 of 193 Results
Cadillac Control Arm
Want to cut long-term maintenance and repair costs? Choose OEM Control Arm. Those parts deliver top durability you can trust. On our site, you'll find a huge catalog of genuine Cadillac parts. Prices are unbeatable, so you can keep more in your pocket. Every OEM Cadillac Control Arm includes a manufacturer's warranty. You can also get an easy return policy that keeps buying risk free. Fast delivery, get your car on the road quickly. It's simple to search, compare, and order. Stop guessing about quality or fit. Order today and save with parts that last.
Cadillac Control Arm Parts Questions & Experts Answers
- Q: How to replace the upper control arm on Cadillac CTS?A:Lift the car up and support it before you take off the tire and wheel. After that, unscrew the brake caliper mounting bracket and take off the shock absorber. Unscrew the upper Ball Joint retaining nut on the knuckle, and bracket out the upper Ball Joint from the upper Control Arm using j 43631. Then, remove all the upper Control Arm nuts and bolts from the frame, and take the whole upper Control Arm out of the vehicle. Put the upper Control Arm into the frame, attach the bolts and nuts, and tighten them to 150 n.m (111 lb ft). Join the upper Ball Joint to the knuckle and screw the nut on until it turns 20 n.m (15 lb ft) plus 210 degrees. Start by installing the brake caliper mounting bracket, continue with the shock absorber, and then put the tire and wheel assembly onto the wheel studs. Afterwards, take off the support and slowly lower the vehicle, then look at the rear wheel alignment.
- Q: How to replace the lower control arm on the 1500 Series on Cadillac Escalade?A:Replace the lower Control Arm on a 1500 series by starting to lift and support the vehicle followed by using a safety stand to hold the lower Control Arm. Take off the tire and the wheel, then the stabilizer shaft links off the lower Control Arm. Next, remove the two lower shock absorber module mount bolts and, if applicable, floor drive shaft nut. Remove the lower Ball Joint retaining nut, then using j 43631, (Ball Joint Separator) and j 45851, (Ball Joint Separator Protector Adapters) disconnect the bottom Ball Joint to the Steering Knuckle. Move on to remove the lower Control Arm nuts and washers; remove the Control Arm bolts; then, take out the Control Arm. To install, place the lower Control Arm and install the Control Arm bolts and washers which should be followed by observation of fastener notice. Make sure you tighten the lower Control Arm retaining nuts to 175 n.m (129 lb ft). Mount the lower Ball Joint into the Steering Knuckle and if installed, mount the wheel drive shaft with a nut that is tightened to 240 n.m (177 lb ft). Install the lower Ball Joint retaining nut and tighten to 100 n.m (74 lb ft) then followed by the installation of the two lower shock absorber module mount bolts which should tighten to 50 n.m (37 lb ft). Reattach the stailizer shaft links to the lower Control Arm, install the tire and wheel, as well as remove the safety stands, lower the vehicle and finally align the front end.
- Q: How to replace the rear axle upper control arm on Cadillac XLR?A:You can replace the rear axle upper Control Arm by first raising and supporting the vehicle. When in freezing or sub-freezing conditions, it is highly recommended to remove the tire and wheel assembly, disconnect the wheel speed sensor electrical connector, as well as the electronic suspension control sensor link. Take out the suspension knuckle from the upper Control Arm using the model j 42188 ball joint separator (J 42188). Jacking the lower Control Arm, loosen the upper ball joint stud nut but left it in place then remove the j-42188 & ball joint stud nut from the ball joint stud. Then, take out the upper Control Arm from the vehicle by removing the bolts that attach the upper Control Arm to the frame. To install position the upper Control Arm back into vehicle and install the upper Control Arm mounting bolts to the frame and tighten it up to 110 n.m (81 lb.ft). In the upper Control Arm, fit the suspension knuckle upper ball joint stud and tighten same with an allen wrench if necessary to tighten the stud nut of the ball joint stud to the appropriate value of 30 n.m (22 lb ft) plus 195 degrees. Reconnect the wheel speed sensor electrical connector and electronic suspension control sensor link and unhook the jack stand from the lower Control Arm. Lastly, install the tire and wheel assembly, lower the vehicle and conduct a rear-wheal alignment.